Adam Equipment BCT Software rev: V 1.
Easy Reference: Model name of the indicator/scale: Serial number of the unit: Software revision number (Displayed when power is first turned on): Date of Purchase: Name of the supplier and place: © Adam Equipment Company 2019
CONTENTS PN 3.11.6.6.15391, Rev B, August 2019 1.0 INTRODUCTION ....................................................................................................... 2 2.0 SPECIFICATIONS ..................................................................................................... 3 3.0 INSTALLATION ......................................................................................................... 5 3.1 UNPACKING ................................................................................
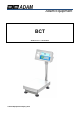
1.0 INTRODUCTION The BCT series provides a versatile check counting and weighing platform scale perfect for general warehouse and production. The BCT can be set to verify counts up to 60000 divisions All indicators are supplied with a RS-232 bi-directional interface and real time clock (RTC). The BCT indicator has a sealed keypad with colour coded membrane switches and there is a large, easy to read liquid crystal type display (LCD). The LCD is supplied with a backlight.
2.0 SPECIFICATIONS BCT Models Model name: BCT 16 BCT 32 BCT 60 BCT 75 BCT 150 BCT 300 Maximum Capacity 16kg 32 kg 60kg 75kg 150kg 300kg Readability 0.5g 1g 2g 0.005kg 0.01kg 0.02kg Resolution 1:32000 1:32000 1:30000 1: 15000 1: 15000 1: 15000 Repeatability (sd) 0.5g 1g 2g 0.005kg 0.01kg 0.02kg Linearity 1g 2g 4g 0.01kg 0.02kg 0.04kg Eccentric Loading 1g 2g 4g 0.01kg 0.02kg 0.04kg Hysteresis 1g 2g 4g 0.01kg 0.02kg 0.
Other specification Pan size BCT 16, 32, 60: 300 x 400mm BCT 75, 150, 300: 400 x 500mm BCT 35a, 65a, 130a: 300 x 400mm BCT 165a, 330a, 660a: 400 x 500mm Operating temperature Power supply Battery life 0C-40C 6V 10Ah Rechargeable battery and 12V DC 3A external adapter 90 hours typical. Battery Life is less when the backlight is used.
3.0 INSTALLATION 3.1 UNPACKING This scale must be connected to a load cell platform and calibrated as necessary to match the platform and user requirements. The user’s application and the technical specifications of the platform or load cell will determine the necessary configuration. 3.2 LOCATING © Adam Equipment Company 2019 The scale should not be placed in a location that will reduce the accuracy. Avoid extremes of temperature.
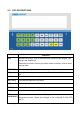
4.0 KEY DESCRIPTIONS Keys [0-9] Functions Numeric entry keys, used to manually enter a value for tare weights, unit weight, and sample size. Secondary functions: Used to type letters where necessary; used to add a decimal point. [PST/ CE] Clear the preinstall value. [M+] [AVG.] Add all the quantities and store, the max Total Number of Additions is 99. On/Off the automatic average function. [QTY/ PST] Preinstall the High/low Limit values. [ID] Press this key to enter the ID setting.
[U 1-6] Fetch a stored PLU value directly Used to add a decimal point when entering a number on the display [PRINT/ SAVE] Print the total weight, unit weight, quantity of percent [SMPL] Used to input the number of items in a sample. [UNIT W.T.] Used to enter the weight of a sample manually. [Tare ] [0/ Zero] 5.0 Tares the scale. Stores the current weight in memory as a tare value, subtracts the tare value from the weight and shows the results. This is the net weight.
5.2 UNIT WEIGHT DISPLAY This display will show the unit weight of a sample. This value is either input by the user or computed by the scale. The unit of measurement is grams if grams or kilograms is selected for the weighing unit, or pounds if pounds is selected. 5.3 COUNT DISPLAY This display will show the number of items on the scale or the value of the accumulated count. 5.4.1 SYMBOL ICONS “Z” or Zero: “Zero” indication. “Tare” displays the deduction of the container weight. Tare: Totaliser.
6.0 OPERATION NOTE: BCT scales only SETTING THE WEIGHING UNIT, lb or kg The BCT scale will turn on displaying the last weighing unit selected, either kilograms or pounds. To change the weighing unit press the [Units] key when the “Unit Weight” display shows zero. If necessary press the [CE] key to clear the unit weight before changing. 6.1 ZEROING THE DISPLAY Press the Zero key to re-zero the display with no load on the weigh pan.
Specific operation as follows: Put the container and weights on the pan, input the container’s weight and press [Tare] key, the weight window will show the net weight of the weights. Take away the container and weights, the weight windows will show a negative value. At this time, press [Tare] key to remove the tare weight value. Now, the weight window back to zero. 6.3 CHECKWEIGHING 6.3.
Press [Q’TY/PST] to confirm and move to the next setting. “LIM-Hi” should now appear on the display with zero digits on the right of the display. Use the numeric keys [1-9] to manually enter the high check limit. Press [Q’TY/PST] to confirm. “Lim-Lo” should now appear on the display with the same zero digits on the right of the display. Use the numeric keys to enter to low limit and press the [Q’TY/PST] key to confirm. PARTS COUNTING 6.4 6.4.
6.4.4 ACCUMULATION/ TOTALISING The totalising function can be used up to a maximum of 99 times before it must be reset. The totalising display is limited to seven digits maximum. When the quantity is shown on the quantity display, Press [M+] Key, and then enters the totalising function. The quantity display shows “Add XX “, XX means the Total Number of Additions. After 3 seconds, the scale will return to the counting mode.
Press [PLU] again to store the unit weight and enter SKU ID edit. User can use number and letter keypad to input. SKU ID can include letters, please check the step 6.5.2 for details on how to input. After inputting ID, press [PLU] to store. When finished, press [CE] to exit. 6.5.2 INPUT LETTER Press [.ABC] once, there will have an arrow sign appear on the display point to “ABC”, or show an “ABC” sign on the display. This means enter to letter input mode.
Choose the right com port, Click , if this succeeds, this will show “Success”. The user can then set the next PLU. DOWNLOAD MULTIPLE PLU BY TABLE (RECOMMEND) Use table edit software (such as Excel, WPS, Numbers) to new built a file, then input PLU data by follow format: Then save as xls file. 1. In ScaleSetPlu.
2. Choose the right com port, Click “download file” if succeed, will show “Success”. 7.0 USER PARAMETERS To access the user parameters menu, press the [PLU] key and the [CE/ BACKLIGHT] key at the same time to enter the user parameter setting, the display will show the first parameter ”P1 TRA”, this is RS232 communication setting. In this menu. Pressing the [PRINT] key will enter the next parameter. Pressing the [PLU] key will enter the sub parameter setting.
T6 Chk Turn XOR check on or off. T7 FC2 Communication mode: 1-6 T8 PF2 Print functions 1-9 P2 FUN – Other function settings Parameter Definition Options F1 BL For setting the backlight ON OFF Auto F1C SL Setting the sleep time of the backlight in 1-45 seconds seconds. F2 ARG For setting the average unit weight function ON automatically. OFF F3 CST Tare and zero stable waiting time. F4 MAE ON OFF Turn ON/OFF next add up when not returning to ON zero after the previous add up.
Main- setting Sub- setting setting Input new password. If user does not want to modify password, press [PRINT] to enter the next parameter. CODE F1 FIL Filtering. Pressing the M+ key increases the intensity of the filter, the higher the filter value the more stable the weight reading is. F2 ZEO Zero track parameter. If the zero point often moves, user can set this parameter.
Calibration parameter record. User can review or use it for setting. When calibration parameters are lost, user can use this record to calibrate without weight. Note – we would recommend using P4 Cal setting and doing a fresh calibration as this is the best method P1 Rul Calibration parameter ( the number is in the unit weight window, this value affects the weighing accuracy directly. Please note down this parameter after calibration.
8.0 CALIBRATION 8.1 SETTING CAPACITY AND DIVISION To set up the capacity and division follow the procedure below: With the indicator turned off, press and hold down the [PLU] and [CE/Backlight] keys and then turn the scale on using the rocker switch at the right back hand side of the indicator.
In the above example you can see the capacity is set for 20kg x 1g. To increase the capacity by 10 press the [M+] key; the capacity reaches a maximum by continuing pressing the [M+] key and then returns to the lowest point. Pressing the [Zero/0] key increases the flashing capacity value to various preset values, pressing the [Tare] key decreases the flashing capacity value. Once you are happy with the capacity value being correct, press the PLU key.
8.2 CALIBRATION The calibration display should look as follows: To calibrate the base, make sure the load cell cable is plugged into the back of the indicator, where it is labelled up load cell, the scale base is level, and there is no weight on the top pan. Enter the weight you wish to calibrate the scale using the Green keys; you can use the abc button to add a decimal point to the calibration value. Pressing the [CE/backlight] button clears any entered value.
9.0 9.1 LABEL PRINTING FUNCTION In normal weighing mode, press [Print/Save] to print through built in label printer. Printing can also be done through RS 232 connectivity. Labels can also be printed via the built-in printer when in the accumulation recall function and in parts counting. LABEL EDITING COMPUTER SOFTWARE The BCT is supplied with RS-232 interface which allows for connection between computer and indicator to edit labels for the inbuilt label printer and set printing parameters.
9.1.1 LABEL EDITOR SOFTWARE INTERFACE 9.1.
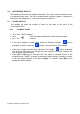
(3) Press the barcode icon in the top left-hand corner, the following menu will be displayed: From here select to start a new label design, open a previously saved template or save a template to your PC. (4) Set the parameters.
9.1.4 ADDING TEXT Various data can be added onto the label in which the text can be customised. Left click the TEXT icon and the drop down will appear Left click on any variable to add to the label. For example, net weight Net weight will appear on the label as: The added information can be moved and place anywhere on the label by clicking and holding down.
9.1.5 ADDING PHOTOS Pictures can be added to a label design, the pictures will show as a black and white picture. To add a picture, left click the picture icon in the editing tools section.
The barcode also has customisable parameters: Height: The height of the barcode Thickness: Minimum line width Barcode type: Type of barcode (food retailers usually use EAN13) Readable: Enable or Disable the Print out of the text below the barcode Rotation: Rotation angle (0 = clockwise) Text: Can insert this variable (EAN13 barcodes must be numeric and 12 digits long.
9.1.8 DELETING ITEMS Select the item you want to delete by left clicking it and press the delete button on the keypad. A message will appear asking the user to confirm the deletion. Press ‘OK’ to confirm and the item will then be deleted from the label. Alternatively, right click the item and click ‘delete’. The same message of confirmation will appear, click ‘OK’ to confirm. 9.
10.0 RS-232 INTERFACE BCT scales are supplied with a RS-232 bi-directional interface. The scale when connected to a printer or computer through the RS-232 interface, outputs the weight, unit weight and count.
Data Format‐Normal Output: ID QTY 0 pcs U. W 123 g Kg or g for metric weights and lb for pounds. G. W 1.234 Kg Net Wt. if net weight is displayed Item: [barcode] Includes 2 line feeds with carriage return at beginning and end of the form DATE 12/09/2006 TIME 14:56 Data Format‐ Memory Recall Print: ID ‐‐‐‐‐‐‐‐‐‐‐‐‐‐‐‐‐‐ TOTAL No. 5 Wt. 1.
In other languages the format is the same but the text will be in the language selected. Description ENGLISH FRENCH GERMAN SPANISH Item barcode Item Article Artikel ít Assigned product/ ID transaction ID - - - Product label Nom Name Nombre name/ item Name Print gross weight G. W Pds Brut Brut-Gew Pso Brut Net weight N. W Pds Net Net-Gew Pso Net Weight per unit counted U. W Pds unit Gew/Einh Pso/Unid QTY / Number of items Pcs counted Pcs Stck.
10.2 REAL TIME CLOCK SETUP The Real Time Clock (RTC) is used only for the RS-232 output. The Date and Time can be set as required. The scale will keep the clock running even when the power is off. In weighing mode, press and hold [PLU] key, then press [CE] once to enter setting mode. The display will show “P1 TrA”, press [PRINT] key once, the display will show “P2 FUN”. Press [PLU] key again and again to the unit weight display shows “F9 FAL”.
11.2 CHARGING When charging, the indicator charge light will appear red. It will turn green when charging finished (the charging time should be 8-10h). Attention: do not use up the battery, otherwise the battery may break. If the indicator is not in use for a long time, the battery should recharge in 40 days. After charge, please take off the power supply. We recommend that you do not always connect to the power supply. 11.
12.0 ERROR CODES During the initial power-on testing or during operation, the scale may show an error message. The meaning of the error messages is described below. If an error message is shown, repeat the step that caused the message, turning the balance on, carry out the calibration or other functions. If the error message is still shown contact your dealer for further support. ERROR CODE DESCRIPTION ADO--- Over range A/D Solution resolution Remove the weights of the pan or send back to the agent.
13.0 REPLACEMENT PARTS AND ACCESSORIES If you need to order any spare parts and accessories, contact your supplier or Adam Equipment. A partial list of such items is as follows Main Power cord Power supply Replacement Battery Printer 14.0 SERVICE INFORMATION This manual covers the details of operation. If you have a problem with the scale that is not directly addressed by this manual then contact your supplier for assistance.
WARRANTY INFORMATION Adam Equipment offers Limited Warranty (Parts and Labour) for any components that fail due to defects in materials or workmanship. Warranty starts from the date of delivery. During the warranty period, should any repairs be necessary, the purchaser must inform its supplier or Adam Equipment Company. The company or its authorised Technician reserves the right to repair or replace the components at any of its workshops at no additional cost, depending on the severity of the problems.
WEEE 2012/19/EU This device may not be disposed of in domestic waste. This also applies to countries outside the EU, per their specific requirements. Disposal of batteries (if fitted) must conform to local laws and restrictions. Cet appareil ne peut être éliminé avec les déchets ménagers. L’élimination de la batterie doit être effectuée conformément aux lois et restrictions locales. Dieses Gerät nicht mit dem Hausmüll entsorgt.
ADAM EQUIPMENT is an ISO 9001:2015 certified global company with more than 40 years’ experience in the production and sale of electronic weighing equipment. Adam products are predominantly designed for the Laboratory, Educational, Health and Fitness, Retail and Industrial Segments.