
Product Manual


© Adam Equipment Company 2008
12
3.3.4 SETTING UP THE CPWp
pp
plus
luslus
lus W SERIES
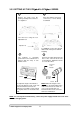
There are two wheel attachments to be fixed at the rear
of the base. Fasten them to the bottom of the base by
using the two hex-headed screws for each wheel
attachment.
Note: Make sure the wheels are above the ground level
by at least 5 mm after it is assembled.
P
lace the base on a rigid floor and level it
using the 4 adjustable feet. Install the handle
in the vertical position by inserting the ends
into the circular sockets attached to the
wheels. Secure the handle by using two M6
screws at each end.
The indicator is
separately packed and
comes attached to a
bracket with the help of
two thumb screws.
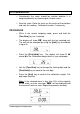
Mount the indicator on the top flat railing of the handle
using two thumb screws. To adjust the angle of the
indicator, use the two thumb screws on the side of the
bracket that connect the indicator. Connect the cable
attached to the base to the connector at the rear of
the indicator.
Tighten the ferrule to secure the cable. Tie the cable
neatly with the trolley edge using the cable-tidy clips.
Place the stainless Steel pan on the base
v
ertically.
To move the scale, tilt the scale backwards so
that it is completely supported only on the
wheels as shown below.
Warning: Do not place anything on the
platform while moving the scale.
NOTE: A. To re-charge the internal battery, connect the power supply module to the rear of the
indicator and apply power.
1
2
Attach Indicator here
Adjustable feet
Wheel attachment
Base
Thumb Screw
Bracket
Ferrule
Connector
on the
Indicator
Connector attached to
the cable
4
3