Adam Equipment MUW HEALTH AND FITNESS SCALE USER MANUAL (P.N. 7.00.6.6.
CONTENTS CONTENTS .........................................................................................................................2 1.0 INTRODUCTION.......................................................................................................3 2.0 SET UP .....................................................................................................................3 2.1 UNPACKING AND SETTING UP YOUR MUW .....................................................3 3.
1.0 INTRODUCTION The MUW Health and Fitness scale provides the weight and height of a patient before calculating the BMI based on the results. Each result will be displayed on the Indicator and held until the result is cleared, the BMI result can be used to help evaluate some ones overall health. Units of weighing are Kg, Lbs, and Lbs and Ounces. Height measurements are displayed in cm, feet and inches, and inches.
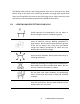
The MUW comes with 4 x wall fixing brackets that can be secured to the pillar before fixing to the wall. If the wall fixing brackets are being used attach these when you fix the M4 x 10 screws to the pillar fixing inserts. Fasten securely to the wall once you have selected the position the MUW will be used in. 3.0 LOCATING AND PROTECTING YOUR SCALE Avoid extremes of temperature. Do not place in direct sunlight or near air conditioning vents. Avoid unstable power sources.
4.
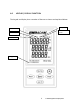
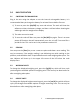
KEYS PRIMARY FUNCTION SECONDARY FUNCTION To turn the scale On or Off. To clear the readings on the display ready for the next weighing To change the displayed height reading between cm, feet or feet and inches To send a command to print the current displayed readings To change the displayed weight reading between Kg, Lb’s or Lb’s and Ounces To Zero the scale before weighing To Tare any item to obtain net weight 4.
5.0 BASIC OPERATION 5.1 SWITCHING THE BALANCE ON Plug in the unit using the adapter or use the internal rechargeable battery. It is recommended that you charge the battery for at least 8 hours before first use. 1) To turn on press the [On/Off] key once and release. The scale will show the software revision, the battery voltage, and then a self-test before showing the stable sign and zero weight on the display. 2) The scale can now be used. 3) To turn the scale off after use press the [On/Off] key again.
5.5 WEIGHING/HEIGHT/BMI To determine a person’s weight, height and BMI the patient should stand on the platform within the marked area and look straight ahead. The ultrasonic sensor will detect that a person is on the platform signified by the symbol in the upper right part of the display and start to determine the height. When a stable reading of weight is obtained the three readings will be displayed. The results will remain on the display until the [Clear] key is pressed.
5.6 PRINTING AND OUTPUTTING THE RESULTS If a printer or other data collection device is being used the results will be sent automatically or manually depending on the printing control set up. The data transmission speed must be set correctly to allow the results to be received. The Doctor and patients identity number can be programmed into the Indicator to give you a traceable record which also records date and time. To enter the Doctors Id press and hold the [Print] key for 2 seconds.
6.0 PARAMETERS The balance has 8 parameters where options can be set by the user. FUNCTION F1 EL SECTION See section 6.1 F2 OFF See section 6.2 F3 SER See section 6.3 Sets the printing control and data transmission speed Default is 9600 F4 PT SEL See section 6.4 Printing controls F5 ULTRA F6 HOLD F7 D-T F8 SET UP TECH F9 TE CH See section 6.5 Calibration of the height sensor See section 6.6 Sets the HOLD function to ON or OFF See section 6.7 Setting the date and time See section 6.
6.2 SETTING AUTO OFF F2 OFF An automatic power down time can be set so that the MUW turns off after a period where no activity is detected. This preserves the life time of the battery when used in this mode. Settings are OFF, 5, 10, 20, and 30 minutes. 1) Switch on the scale then press the [kg/lb] key during the self-checking test of the display. 2) The display will show the first function F1 EL.
5) Press the [Print] key to change the setting for the printing control and press [Zero] to save. 6) The current setting for data transmission speed “Bps” will now be displayed. 600, 1200, 2400, 4800, 9600 are available. Default is 9600. Press the [Print] key to change the setting and press [Zero] to save. Test will be displayed, press the [Print] key to send a test print command. 7) Press [Zero] to save, [cm/ft] to exit, then [kg/lb] to select the next parameter. 6.
6.5 ULTRASONIC HEIGHT CALIBRATION F5 ULTRA The Ultrasonic height sensor has been factory calibrated and should not require frequent calibration. If there is a problem with height measuring proceed as below. 1) Switch on the scale then press the [kg/lb] key during the self-checking test of the display. 2) The display will show the first function F1 EL.
6.7 SETTING DATE AND TIME F7 D-T 1) Switch on the scale then press the [kg/lb] key during the self-checking test of the display. 2) The display will show the first function F1 EL.. 3) Press the [kg/lb] key to select F7D-T and then [Zero] to enter the date setting display. 4) The display will show the day, month and year. 5) To change any setting press the [kg/lb] key to increment the flashing digit and either the [Print] or [Clear] key to move the flashing digit to the left or right.
1) Switch on the scale then press the [kg/lb] key during the self-checking test of the display. 2) The display will show the first function F1 EL. 3) Press the [kg/lb] key to select F8 SET UP and then [Zero] to enter and show the first parameter. 4) Press the [Print] key to change the setting and [Zero] to save and move to the next parameter, press [cm/ft] to exit. To return to normal operation turn the scale OFF and then ON again. 6.
8.0 SERIAL INTERFACE SPECIFICATIONS The balance comes equipped with an RS-232 Serial Interface. The connector is a DE-9P female fitting with the following connections. Pin 2 TXD Transmitted data Pin 3 RXD Received data Pin 5 GND Signal ground Printing Output: The lines will include a heading for each detail then the value. A typical output when weighing is shown below. 6 lines of data are printed if all are enabled. All lines end with a carriage return and a line feed , (0dH and 0aH in ASCII).
9.1 ERROR MESSAGES If an error message is shown, repeat the step that caused the message. If the error message is still shown then contact your dealer for support. DISPLAYED MESSAGE Err UNDER Err H Err L ------ 10.0 DESCRIPTION Measured height is above 210cm/82.5 inches Measured height is below 80cm/31.
11.0 WARRANTY INFORMATION Adam Equipment offers Limited Warranty (Parts and Labour) for the components failed due to defects in materials or workmanship. Warranty starts from the date of delivery. During the warranty period, should any repairs be necessary, the purchaser must inform its supplier or Adam Equipment Company. The company or its authorised Technician reserves the right to repair or replace the components at any of its workshops depending on the severity of the problems.
Manufacturer’s Declaration of Conformity This product has been manufactured in accordance with the harmonised European standards, following the provisions of the below stated directives: Electro Magnetic Compatibility Directive 2004/108/EC Low Voltage Directive 2006/95/EC Adam Equipment Co. Ltd. Bond Avenue, Denbigh East Milton Keynes, MK1 1SW United Kingdom FCC COMPLIANCE This equipment has been tested and found to comply with the limits for a Class A digital device, pursuant to Part 15 of the FCC Rules.
ADAM EQUIPMENT is an ISO 9001:2008 certified global company with more than 40 years experience in the production and sale of electronic weighing equipment. Adam products are predominantly designed for the Laboratory, Educational, Health and Fitness, retail and Industrial Segments.