
User Manual


7
S SERIES MANUAL [ENGLISH]
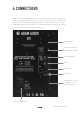
In addition to a standard IEC mains connector, the simple S Series rear panel features
traditional AES XLR analog inputs and AES3 digital Input and Thru connectors [the latter
are for multi-channel arrays where multiple speakers are being driven using the same
signal]. There‘s also a USB jack to facilitate internal software upgrades and the use of
computer-based remote setting software, and a blank panel covering an Options slot
that will hold two RJ45 connectors for future expansion options.
NOTE: Always use AES/EBU-compatible, shielded twisted-pair cables for digital connections.
5. GETTING STARTED
Before using your new speakers, you should let them settle at the ambient temperature
of your listening environment by leaving them in position for an hour or so after unpacking
them. We recommend that the S Series speakers are driven on a solid, stable surface
for best results. For more on optimal placement, see page 8. Please also be aware that
before optimum performance can be attained, it always takes some hours of continuous
usage to ʼbreak inʻ factory-fresh reference monitors.
With the speakers connected to your audio source but turned off, and with the audio input
to the monitors turned all the way down, the amplifiers should be connected to AC mains
power via the supplied standard IEC cable. The switched-mode power amplifiers in the
S Series loudspeakers can handle mains electricity from anywhere in the world, with a
voltage and frequency range of 100-240 volts AC, 50 /60 Hz, so you can plug the monitors
in without having to worry about mains transformers or overheating. Then simply turn
on the loudspeakers, start your playback audio, and gradually increase the output level
of your audio source. You should now start to hear sound through your S Series speakers.
If this is not the case, turn to page 19 and the section on troubleshooting.