Mounting chart Note: See instructions for side mount and bottom mount installation Description 12” drawer Side mount Bottom mount 12” opening required Install on bottom of cabinet 12” or wider 15” drawer 15” opening required Install on bottom of cabinet 15” or wider 21” drawer 21” opening required Install on bottom of cabinet 21” or wider P.
Parts list #2 #4 #3 #5 DESCRIPTION QTY 1 1 left side, 1 right side 2 8 4 #1. Wire basket #2. Cabinet sliders #3. Plastic mounting brackets #4. Slider mounting screws #5. Basket mounting screws ⊙ ⊙ ⊙ ⊙ ⊙ REQUIRED TOOLS (not provided) Drill 1/16" Drillbit Screwdriver Tape measure Level P.
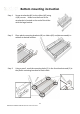
Bottom mounting instruction Step 1 Screw wire basket (#1) to the sliders (#2) using 4 (#5) screws. Make sure the front of the wire basket is located on the end of the slider with the large bracket. Step 2 Place plastic mounting brackets (#3) on sliders (#2) and place assembly in cabinet at desired location. Step 3 Using a pencil, mark the mounting holes (2) in the front brackets and (2) in the plastic mounting brackets for each slider. P.
Bottom mounting instruction – continued. Step 4 Remove wire basket assembly from cabinet and drill 1/16” pilot holes in the marked locations. Step 5 Screw plastic mounting brackets (#3) to back wall using 4 screws (#4). Step 6 Reinstall the wire basket assembly in plastic mounting brackets and install 4 screws (#4) in the predrilled pilot holes of front mounting bracket.
Side mounting instruction Step 1 Hold the left slider (#2) against the insider of the cabinet face frame at desired height. Make a pencil mark at the top of the front bracket. Use a tape measure and record the height from the bottom of the cabinet to this mark. Note: Take in to consideration the sizes of items that will be stored and additional wire baskets that may be installed.
Side mounting instruction – continued. Step 4 While holding the slider level and parallel to the inside wall, measure from inside wall to the center of front hole in the top of the slider. Record this dimension and mark it on the back wall on the line from step #2.
Side mounting instruction – continued. Step 6 Drill 1/16” pilot holes in the back wall and install plastic mounting bracket using (2) #4 screws. Step 7 Insert slider in the back plastic mounting bracket and reinstall screw (#4) in the front mounting bracket hole. Repeat steps on the right side of cabinet using same measurements as left side. Step 8 Install wire basket (#1) to sliders (#2) using basket mounting screws (#5) P.