
Installation Instructions


P. 5
4814101-03 K-6815A-16A-18A Chrome slider instruction
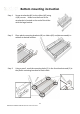
Side mounting instruction
Step 1
Hold the left slider (#2) against the insider of the cabinet face frame at desired
height. Make a pencil mark at the top of the front bracket. Use a tape
measure and record the height from the bottom of the cabinet to this mark.
Note: Take in to consideration the sizes of items that will be stored and
additional wire baskets that may be installed.
Step 2
Mark a line on the back wall at the same height as
mark made in the previous step, close to where the
plastic mounting bracket (#6) will be located.
Note: The top of the front mounting bracket and the
top of the plastic mounting bracket should be the
same height.
Step 3
Hold the slider at the previous location and level to the bottom of the cabinet
and mark the mounting hole in the front bracket that is closest to the center of
the cabinet face frame. Drill a 1/16”pilot hole and temporarily install the
slider using screw (#4).
Note: Front slider bracket
should not extend beyond
the front of the cabinet face
frame or it will interfere
with the closing of the
cabinet door.