
User`s guide


Chapter 4: Installing the SATA/SAS Controller and Disk Drives l18
Before You Begin
● Read the Safety Information on page 60.
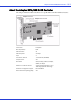
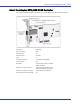
● Familiarize yourself with the SATA/SAS 1405, 1045 controller’s physical features page 12.
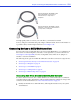
● Ensure that you have the proper cables for your controller and devices page 19.
● If you have a low-profile computer cabinet, replace the original full-height bracket with the
low-profile bracket supplied in the controller kit.
Caution:
Handle the controller by its bracket or edges only.
Installing the SATA/SAS Controller
This section describes how to install your SATA/SAS 1405, 1045 controller into your computer
cabinet.
1 Turn off your computer and disconnect the power cord. Open the cabinet, following the
manufacturer’s instructions.
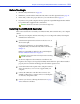
2 Select the PCI expansion slot and remove the slot cover, as
shown at the right.
For the best performance, use the available slot that’s
compatible with your SATA/SAS 1405, 1045 controller (see
Chapter 2).
PCIe bus compatibility is marked to the controller figures
in About SATA/SAS Controllers on page 11.
Caution:
Touch a grounded metal object before handling
the SAS controller.
3
As shown at right, insert the SATA/SAS controller into the
expansion slot and press down gently but firmly until it clicks into place. When installed
properly, the SAS controller should appear level with the expansion slot.
4 Secure the bracket in the expansion slot, using the retention
device (for instance, a screw or lever) supplied with your
computer.
5 Connect the SATA/SAS controller’s I2C connector (not
available on all models) to an I2C connector on a backplane
or enclosure, using an I2C cable.
6 Connect your devices, following the instructions on page
20 for SATA/SAS controllers.
!
!