Fast Track 2+2/386® 2000 Series Drive-Thru Timer System User Guide R 02/02 PHASE RESEARCH 3500 W. Moore Avenue, Suite M Santa Ana, CA 92704 (714) 850-1320 or Fax: (714) 850-1502 www.phaseresearch.com email - fasttrack@phaseresearch.
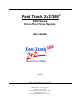
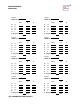
PHASE RESEARCH USER GUIDE SET PARAMETERS WORKSHEETS SET PARAMETERS WORK SHEET SAMPLE Sheet 1 Store Header FAST BURGER Store: Number: 1234 Manager: JONES Phone: (123) 456-7889 Modem: (123) 456-7890 City: ANY TOWN STORE HOURS 1st day of week: OPEN 6:00AM 6:00AM 6:00AM 6:00AM 6:00AM 6:00AM 6:00AM SUN MON TUE WED THU FRI SAT 1 2 3 4 5 6 7 8 DAYPARTS START 6:00AM 10:30AM 1:00PM 5:00PM 8:00PM MON - CLOSE 1:00AM 1:00AM 1:00AM 1:00AM 1:00AM 1:00AM 1:00AM - STOP - 10:30AM 1:00PM 5:00PM 8:00PM 1:00AM - PRINTE
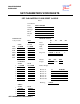
PHASE RESEARCH USER GUIDE SET PARAMETERS WORK SHEET SAMPLE Sheet 2 A MENU Target= BEEP ON ARRIVAL= A <= B <= C <= D <= F > F Repeat Time :30 :45 1:00 1:30 1:30 @ B P 1 2 3 4 2 N N N N N 30 SEC A GREET Target= BEEP ON ARRIVAL= Time :04 :07 :10 :10 :10 A <= B <= C <= D <= F > F Repeat @ Target= BEEP ON ARRIVAL= NO B P 0 0 0 0 0 N N N N N OFF SEC Time :30 :45 1:00 1:30 1:30 @ A <= B <= C <= D <= F > F Repeat Time 1:30 1:45 2:00 2:30 2:30 @ B P 1 2 3 4 2 N N N N N B P 1 2 3 4 2 N N
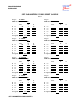
PHASE RESEARCH USER GUIDE SET PARAMETERS WORKSHEET Store Header Store: Number: Manager: Phone: Modem: City: STORE HOURS 1st day of week: OPEN SUN MON TUE WED THU FRI SAT 1 2 3 4 5 6 7 8 - CLOSE - DAYPARTS START - STOP - PRINTER OPTIONS RT Hour Daypart Shift Daily Report @ PEC AUTO Remote Display #1 #2 #3 #4 #5 % Flash avg SHIFTS START 1 2 3 4 - STOP - SET PARAMETERS WORKSHEETS CLOSE + time= Header Targets Remote Remote Remote Remote Remote Remote DA WK MO or
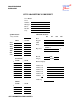
PHASE RESEARCH USER GUIDE Target= BEEP ON ARRIVAL= Time A <= B <= C <= D <= F > F Repeat @ Target= BEEP ON ARRIVAL= B P SEC Target= BEEP ON ARRIVAL= Time A <= B <= C <= D <= F > F Repeat @ Time B P Time Time A <= B <= C <= D <= F > F Repeat @ SEC P SEC B P SEC Target= BEEP ON ARRIVAL= B P Time A <= B <= C <= D <= F > F Repeat @ SEC Target= BEEP ON ARRIVAL= A <= B <= C <= D <= F > F Repeat @ B Target= BEEP ON ARRIVAL= Target= BEEP ON ARRIVAL= A <= B <= C <= D <= F > F Repeat @ Time A
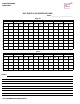
PHASE RESEARCH USER GUIDE DAYPARTS AND SHIFTS RECORD DATE: ________________________ Dayparts Sun start 1 stop Store opening time Mon start stop Store opening time Tue start stop Store opening time Wed start stop Store opening time Thur start stop Store opening time Fri start stop Store opening time Sat start stop Store opening time 2 3 4 5 6 7 Store closing time 8 Store closing time Store closing time Store closing time Store closing time Store closing time Store closing time
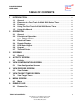
PHASE RESEARCH USER GUIDE TABLE OF CONTENTS 1 INTRODUCTION ............................................................................................................... 1-1 1-1 1-2 1-3 1-4 1-5 2 3 OPERATION ....................................................................................................................... 2-1 2-1 2-2 General ...................................................................................................................... 2-1 Principles of Operation ..........
PHASE RESEARCH USER GUIDE 10 RESET LOOP .................................................................................................................. 10-1 10-1 Reset Loop ............................................................................................................. 10-1 11 PRINT HEADER SCREEN ......................................................................................... 11-1 11-1 Print Store Header .............................................................................
PHASE RESEARCH USER GUIDE TROUBLESHOOTING ......................................................................................................... A3-1 SET PARAMETERS WORKSHEETS ........................................................................... A4-1 INDEX ..........................................................................................................................................
PHASE RESEARCH USER GUIDE SECTION 1 - INTRODUCTION 1-1 General The Fast Track 2+2/386 2000 Series Timer (herein also referred to as the Timer) helps you operate a drive-thru store more efficiently and profitably by tracking the progress of customer vehicles through the ordering and delivery process.
PHASE RESEARCH USER GUIDE A fully functional system requires a customer-furnished Intercom, Menu Board Loop with Vehicle Detector and the Fast Track 2+2/386 2000 Series Timer. At a minimum, the Timer contains a Main Console and a Remote Display. The Main Console interfaces with the customer-furnished Intercom and Vehicle Detector, Window Loops, and from one to six Remote Displays. The Timer can work with a single or double lane drive-thru restaurant.
PHASE RESEARCH USER GUIDE 1-3 Features The Fast Track 2+2/386 2000 Series Timer helps you improve and maintain efficiency and profitability with the following features: # Automatic operation that handles most of your routine requirements (For the most part, your job is to replace printer paper and let the Timer do its job!) # Indicator lights that let you see at a glance exactly where the cars are in your drive-thru lanes # Automatic operation that helps identify drive-thru problems and then lets
PHASE RESEARCH USER GUIDE 1-4 Using The Fast Track 2+2/386 2000 Series Timer You can select, group, and analyze any of the data the Timer collects, with the Timer providing both detail and summary reports showing how vehicles move through your drive-thru. Reports print automatically on a regular schedule. When the Timer is installed, it is programmed to automatically display data and produce reports based on your store’s requirements.
PHASE RESEARCH USER GUIDE 1-5 Using this Manual This manual will familiarize you with all of the Timer’s functions and instruct you how to customize its behavior to meet your special or changing requirements. Simply look in the Table of Contents or Index for the section describing the feature.
PHASE RESEARCH USER GUIDE SECTION 2 - OPERATION 2-1 General The Fast Track 2+2/386 2000 Series Timer operates automatically with a minimum of operator attention, updating the data on its Activity screen and Remote Displays, and printing regularly scheduled automatic reports. 2-2 Principles of Operation A fully functional timer requires a customer furnished Intercom, Menu Board Loop with a Vehicle Detector, and the Timer. As a minimum, the Timer must include a Main Console and a Remote Display.
PHASE RESEARCH USER GUIDE The Main Console’s interface with the customer-furnished Intercom and Vehicle Detector allows the Timer to detect a vehicle that has been greeted via Intercom upon arrival at the Menu Board. Window Loops allow the Timer to detect the car’s arrival at and departure from the cashier and service window and/or other detection points. For simplicity, the following sequence of events assumes that there are Loops at the Cashier Window and Pick-Up Window: 1.
PHASE RESEARCH USER GUIDE EVENT 1 EVENT 2 Arrival of vehicle at Menu Board Loop Generates VEHICLE PRESENCE signal Generates GREET CANCEL signal Employee keys microphone to greet customer EVENT 3 Vehicle departs from Menu Board Loop EVENT 4 Discontinues VEHICLE PRESENCE signal Vehicle arrives at Cashier Loop EVENT 5 Generates VEHICLE PRESENCE signal Vehicle departs from Cashier Loop EVENT 6 Discontinues VEHICLE PRESENCE signal Vehicle arrives at Pick-Up Loop EVENT 7 Generates VEHICLE PRESE
PHASE RESEARCH USER GUIDE 2-2.1 Multiple Vehicles The Timer is capable of keeping track of up to 16 vehicles moving simultaneously through each drive-thru lane. The Timer can track the progress of each vehicle independently, accurately noting when each car moves onto or off a vehicle detection zone. 2-3 Electrical Power The Timer’s electrical power, supplied by an external transformer, is always left on. The transformer is connected by a power cord to a 110 VAC power outlet.
PHASE RESEARCH USER GUIDE 2-4 Remote Displays SECTION 2 - OPERATION The Remote Displays are 5-by-9 inch modules with three illuminated digits visible on both sides. The Displays show minutes and seconds to document the time each car spends during key steps in the ordering and sales process. (When no cars are in the drive-thru, the Displays show the average vehicle times during the shift or other appropriate time period.
PHASE RESEARCH USER GUIDE 2-5 LED Status Lights SECTION 2 - OPERATION The eight LED Status Lights on the Main Console show how customers are moving through your drive-thru system. Labeled L1 through L8, these lights are activated when their corresponding stations are active or occupied. The pattern of the L1...L8 indicator lights on the Console lets you see at a glance where the cars are in your drive-thru lanes. They also help you make sure that the Timer and its sensors are working together properly.
PHASE RESEARCH USER GUIDE 2-6 Keypad SECTION 2 - OPERATION The Keypad is your entry to the Timer’s many features and options, allowing you to access the Timer’s numerous screens and customize its reports and features. The keys and their basic functions are described below: Returns to the previous screen. Repeatedly pressing this key returns to the Activity screen. Selects a menu option. Also used to move to the next screen in a sequence and for confirming selections. Prints a copy of the display screen.
PHASE RESEARCH USER GUIDE Pressing makes the keys with pink triangles act as a telephone-style Keypad, allowing you to enter characters and digits. Press the appropriate key from 0 through 9 one or more times to select the character you want to enter. Repeatedly pressing the keys cycles through four alphanumeric characters, including the number in the pink triangle. For example, the “2” key can be used to cycle through the characters “ABC2” (see below).
PHASE RESEARCH USER GUIDE 2-7 Thermal Printer SECTION 2 - OPERATION The Thermal Printer prints reports and logs significant events that occur during the Timer’s operation, both automatically as scheduled and manually as desired. The printer uses special thermal paper tape, designed to print only on the side facing out on the roll. The serrated edge of the paper exit slot helps you to neatly tear off reports. When the paper tape’s edges begin to turn pink, it is time to load a new roll.
PHASE RESEARCH USER GUIDE THIS PAGE IS INTENTIONALLY LEFT BLANK SECTION 2 - OPERATION 2-10
PHASE RESEARCH USER GUIDE SECTION 3 - SCREENS 3-1 General This section describes the Fast Track 2+2/386 2000 Series Timer’s screens: how you can display them and use the Keypad to customize the Timer, as well as analyze the data it collects and stores. Once you learn how to use a few of the screens, it will be easy for you to use all the others.
PHASE RESEARCH USER GUIDE Each screen is described in much greater detail in the following sections, with step-by-step instructions on how to access and use each screen. As you follow the instructions to display these screens, keep in mind that: H The starting point is the Activity screen (See “Activity” on page 4-1). H Some screens and actions require a password. H Some screens are accessed from menu screens, from which you select an option that takes you to another screen.
PHASE RESEARCH USER GUIDE SECTION 4 - ACTIVITY SCREEN 4-1 Activity The Activity screen is your “Home Base” for system operation. 1 D S A M G W W L 1 : 0 0 A M M O N F E B Y P T 1 0 : 3 0 A M - 2 : 0 0 H F T 6 : 0 0 A M - 4 : 0 0 S I D E N O W A V E N U : 0 4 : R E E T : 0 4 : I N 1 : 1 5 : I N 2 : 2 8 : I N E 1 : 3 3 1 : D A I L Y C A R S I N L A N E T O T A L C A R S P U L L O U T S IMPORTANT: 1.
PHASE RESEARCH USER GUIDE # An event list with current car times and average car times # The time period for averages and totals # Number of cars now in the selected drive-thru lane (CARS IN LANE) # Total number of cars passing through the selected lane during the time period # Total number of Pullouts from the selected lane during the time period Use the Keypad to access other data screens and the Menu.
PHASE RESEARCH USER GUIDE SECTION 5 - VIEW CONFIGURATION SCREEN 5-1 View Configuration Screens From ACTIVITY Screen (see “ACTIVITY SCREEN” on page 4-1): 1. Press to open Menu screen. 2. Press to move cursor to [DRIVE-THRU CONFIG]. 3. Press to view the Main and Alternate Configurations.
PHASE RESEARCH USER GUIDE NOTE: The Alternate Configuration feature is used only when your drive-thru operation changes during the day. For example, if your store includes two windows, one of which is used only when busy, there is no reason to time that window when it is not in use. Therefore, Alt Config allows you to disable the unused window. This helps to keep information consistent with your changing drive-thru operation. This feature can also be used in other scenarios.
PHASE RESEARCH USER GUIDE SECTION 6 - VIEW PERIODS SCREEN 6-1 View Periods This is a view-only screen that shows the current daypart and shift settings. The actual programming is set on another screen (see “PARAMETERS PROGRAMMING” on page 13-1). From ACTIVITY Screen (see “ACTIVITY SCREEN” on page 4-1): 1. Press .
PHASE RESEARCH USER GUIDE SECTION 7 - VIEW TARGET TIMES SCREEN 7-1 View Target Times This screen shows the grading criteria and grades achieved for different target events. From ACTIVITY Screen (see “ACTIVITY SCREEN” on page 4-1): 1. Press . You are now in the View Target Times screen. 1 1 : 0 0 A M V I E W M O N = D A I L Y T A R G E T = T O T A L A B C D F = = = = = T I : 1 : 1 : 2 : > D M 3 0 3 0 E 0 0 0 0 # C A R 7 1 3 1 1 < + O R - > S C R O L L S < M A I N M E N U > T O 2.
PHASE RESEARCH USER GUIDE SECTION 8 - MENU SCREEN 8-1 Menu The Menu screen displays information about your Fast Track 2+2/386 system, including menu options and instructions for accessing features.
PHASE RESEARCH USER GUIDE The available menu option lines as listed below are described in more detail in the sections noted: # [REMOVE CAR FROM LANE] Section 9 # [RESET LOOP] Section 10 # [PRINT HEADER] Section 11 # [MANUAL REPORTS] Section 12 # [SET PARAMETERS] Section 13 # [DIAGNOSTICS] Section 14 # [RESET MEMORY] Section 15 SECTION 8 - MENU SCREEN 8-2
PHASE RESEARCH USER GUIDE SECTION 9 - REMOVE CAR 9-1 Remove Car THIS FEATURE REQUIRES AN ACCESS CODE FOR ENTRY The Remove Car screen lets you manually synchronize the Fast Track 2+2/386 2000 Series Timer. You will rarely need this option, however, as the Timer normally synchronizes itself. From MENU Screen (see “MENU SCREEN” on page 8-1). The cursor is on [Remove Car From Lane] : 1. Press . You are prompted to enter an Access Code. 2. Enter your six-digit Access Code.
PHASE RESEARCH USER GUIDE THIS PAGE IS INTENTIONALLY LEFT BLANK SECTION 9 - REMOVE CAR 9-2
PHASE RESEARCH USER GUIDE SECTION 10 - RESET LOOP 10-1 Reset Loop THIS FEATURE REQUIRES AN ACCESS CODE FOR ENTRY This screen lets you manually reset an internal Fast Track 2+2/386 2000 Series Timer Loop Detector that failed to reset when the last car left. This action should rarely be required. NOTE: Reset Loop feature should only be used when an L light is on and there is no car on a particular detection point. Example: L4 is on, the Timer is running, but no cars are in the drive-thru lane(s).
PHASE RESEARCH USER GUIDE 4. Press to move to the station you want to adjust. 5. Press to reset the selected loop and turn off its loop light on the Main Console. (Only Loop Detectors internal to the Timer can be reset.
PHASE RESEARCH USER GUIDE SECTION 11 - PRINT HEADER SCREEN 11-1 Print Store Header The [PRINT HEADER] function enables your Fast Track 2+2/386 2000 Series Timer to print the Store Header information. (The Menu will remain displayed during printing.) From MENU Screen (see “MENU SCREEN” on page 8-1): 1. Press to move cursor down to [PRINT HEADER]. 2. Press . The printer now generates a Store Header (see example following).
PHASE RESEARCH USER GUIDE SECTION 12 - MANUAL REPORTS 12-1 Manual Reports The Manual Reports screen is your entry to the manual reporting system. It allows you to request a report based on a selected portion of the historical data gathered by the Fast Track 2+2/386 2000 Series Timer. From MENU Screen: 1. Press to move cursor to [MANUAL REPORTS]. 2. Press . You are now in the Manual Reports screen.
PHASE RESEARCH USER GUIDE NOTE: A Manual Report can provide the answer to almost any kind of question you might ask about your data. Use a Manual Report to see how your store is meeting performance standards, to compare shifts or time periods, and for many other useful purposes. Defining and producing a Manual Report is easy and becomes very natural with some practice. The information the Timer needs to produce reports is entered using a short sequence of one, two, or three screens.
PHASE RESEARCH USER GUIDE 12-1.1.1 Daily Reports From MANUAL REPORTS Screen (see “MANUAL REPORTS” on page 12-1): 1. Press to move cursor to [DAILY]. 2. Press . You are now in the Daily Reports screen. 3. Press to move cursor to the desired day(s). 4. Press to select or to deselect a specific day (you may select one or more days). An X appears to the right of each row selected for reporting.
PHASE RESEARCH USER GUIDE The Report Format Selection screen lets you pick the starting and ending dates of a time range for which Daily Reports will be produced.
PHASE RESEARCH USER GUIDE 9. Press to produce the selected screen or printer report. The Timer will display SEARCHING and/or PROCESSING for up to several seconds before the report is displayed or printed. 10. Press when viewing a screen report to display the corresponding grading report. This screen shows counts and percentages of cars that meet the criteria for each letter grade. (If you then need a printed copy of the grading report, press 11. Press .
PHASE RESEARCH USER GUIDE 12-1.1.2 Weekly Reports From MANUAL REPORTS Screen (see “MANUAL REPORTS” on page 12-1): 1. Press to move cursor to [WEEKLY]. 2. Press . You are now in the Weekly Reports screen. 3. Press to move cursor to the desired week(s). 4. Press to select or to deselect a specific week (you may select one or more weeks). An X appears to the right of each row selected for reporting.
PHASE RESEARCH USER GUIDE The Report Format Selection screen lets you pick the starting and ending dates of a time range for which Weekly Reports will be produced.
PHASE RESEARCH USER GUIDE 9. Press to produce the selected screen or printer report. The Timer will display SEARCHING and/or PROCESSING for up to several seconds before the report is displayed or printed. 10. Press when viewing a screen report to display the corresponding grading report. This screen shows counts and percentages of cars that meet the criteria for each letter grade. (If you then need a printed copy of the grading report, press 11. Press .
PHASE RESEARCH USER GUIDE 12-1.1.3 Monthly Reports From MANUAL REPORTS Screen (see “MANUAL REPORTS” on page 12-1): 1. Press to move cursor to [MONTHLY]. 2. Press . You are now in the Monthly Reports screen. 3. Press to move cursor to the desired month(s). 4. Press to select or to deselect a specific month (you may select one or more months). An X appears to the right of each row selected for reporting.
PHASE RESEARCH USER GUIDE The Report Format Selection screen lets you pick the starting and ending dates of a time range for which Monthly Reports will be produced.
PHASE RESEARCH USER GUIDE 9. Press to produce the selected screen or printer report. The Timer will display SEARCHING and/or PROCESSING for up to several seconds before the report is displayed or printed. 10. Press when viewing a screen report to display the corresponding grading report. This screen shows counts and percentages of cars that meet the criteria for each letter grade. (If you then need a printed copy of the grading report, press 11. Press .
PHASE RESEARCH USER GUIDE 12-1.2 Hourly and Custom Reports SECTION 12 - MANUAL REPORT From MANUAL REPORTS Screen (see “MANUAL REPORTS” on page 12-1): 1. Press to move cursor to [CUSTOM] or leave cursor on [HOURLY]. 2. Press . You are now in either the Custom (displayed below) or Hourly Reports screen. (The Hourly Reports screen is identical except for the heading that reads, “HOURLY REPORTS” rather than “CUSTOM REPORTS.
PHASE RESEARCH USER GUIDE 6. Press to set the dates. 7. Press to move the cursor to [VIEW] or [PRINT] in order to send the report to either the display or the printer. Selecting the [VIEW] or [PRINT] option below the REPORT BY AVERAGE field will produce a single report that averages all the selected data. The REPORT BY PERIOD [VIEW] or [PRINT] selection will produce individual report sections for each period. The Header for each report section indicates which dates are included in the section. 8.
PHASE RESEARCH USER GUIDE SECTION 12 - MANUAL REPORT 12-1.3 Daypart and Shift Reports The Daypart and Shift Report screens let you set reporting for one or more dayparts or shifts. 12-1.3.1 Daypart Reports From MANUAL REPORTS Screen (see “MANUAL REPORTS” on page 12-1): 1. Press to move cursor to [DAYPARTS]. 2. Press . You are now in the Dayparts screen. 1 1 : 0 0 3.
PHASE RESEARCH USER GUIDE The Report Format Selection screen lets you pick the starting and ending dates of a time range for which Daypart Reports will be produced.
PHASE RESEARCH USER GUIDE 9. Press to produce the selected screen or printer report. The Timer will display SEARCHING and/or PROCESSING for up to several seconds before the report is displayed or printed. 10. Press when viewing a screen report to display the corresponding grading report. This screen shows counts and percentages of cars that meet the criteria for each letter grade. (If you then need a printed copy of the grading report, press 11. Press screen. .
PHASE RESEARCH USER GUIDE 12-1.3.2 Shift Reports From MANUAL REPORTS Screen (see “MANUAL REPORTS” on page 12-1): 1. Press to move cursor to [SHIFTS]. 2. Press . You are now in the Shifts screen. 1 1 : 0 0 1 = 2 = 3 4 < < < < 3. Press A + E M A M M O N S H I F T S F E B 2 3 6 : 0 0 A M 4 : 0 0 P M 4 : 0 0 P M - 1 2 : 0 0 A M R O N A R R T I O W S > T O M O V E - > T O S E L E C T E R > T O C O N T I N U E N M E N U > T O E X I T to move cursor to the desired shift row(s). 4.
PHASE RESEARCH USER GUIDE The Report Format Selection screen lets you pick the starting and ending dates of a time range for which Shift Reports will be produced.
PHASE RESEARCH USER GUIDE 9. Press to produce the selected screen or printer report. The Timer will display SEARCHING and/or PROCESSING for up to several seconds before the report is displayed or printed. 10. Press when viewing a screen report to display the corresponding grading report. This screen shows counts and percentages of cars that meet the criteria for each letter grade. (If you then need a printed copy of the grading report, press 11. Press screen. .
PHASE RESEARCH USER GUIDE SECTION 12 - MANUAL REPORT 12-1.4 Year to Date Reports The Year to Date Reports screen shows the number of cars that pass through your drive-thru lanes and stations and the average time at each, since January 1 of the current year. From MANUAL REPORTS Screen (see “MANUAL REPORTS” on page 12-1): 1. Press to move cursor to [YTD]. 2. Press . You are now in the Year to Date screen.
PHASE RESEARCH USER GUIDE 5. Press to move the cursor to [VIEW] or [PRINT] in order to send the report to either the display or the printer. Selecting the [VIEW] option will produce a single report that averages all the selected data. Selecting the [PRINT] selection will produce the same single report, as well as individual grading reports for each event. The Header for each report section indicates which time periods are included in the section. 6. Press to produce the selected screen or printer report.
PHASE RESEARCH USER GUIDE 12-1.5 Car by Car Reports SECTION 12 - MANUAL REPORT The Car by Car Reports allow you to define reports that provide information about each car passing through your drive-thru. 12-1.5.1 Car by Car Reports by Station From MANUAL REPORTS Screen (see “MANUAL REPORTS” on page 12-1): 1. Press to move cursor to [CAR BY CAR]. 2. Press . You are now in the Car by Car screen.
PHASE RESEARCH USER GUIDE 5. Press or now highlighted. to toggle selection ON or OFF. Your selections are NOTE: Pullouts and other (FT) events will not be reported unless you change the settings from OFF (default setting) to ON.
PHASE RESEARCH USER GUIDE 12-1.5.2 Car by Car Reports by Time and Date From MANUAL REPORTS Screen (see “MANUAL REPORTS” on page 12-1): 1. Press to move cursor to [CAR BY CAR]. 2. Press . You are now in the Car by Car screen.
PHASE RESEARCH USER GUIDE 6. Press to view the screen below, on which you can define the time period and date range for your Car by Car report. The events and grades you previously selected are displayed below the current time/date and type of report (CAR by CAR). 1 1 : 0 0 A A A 7.
PHASE RESEARCH USER GUIDE The following is a sample Car by Car Report with rows for each event, using the actual event names in your configuration. Each row shows time of day, station name, letter grade, and actual time duration of event.
PHASE RESEARCH USER GUIDE SECTION 13 - PARAMETERS PROGRAMMING 13-1 Parameters Programming THIS FEATURE REQUIRES AN ACCESS CODE FOR ENTRY. The Set Parameters screen lets you customize your Timer to match changing store requirements (operating hours, shift times, or automatic reporting requirements). See “SET PARAMETERS WORKSHEETS” (Appendix 2).
PHASE RESEARCH USER GUIDE TIMER SERIES NUMBER MODEL CONFIGURATION 1 1 : 0 0 A M M O N F E B 2 3 F T 2 + 2 / 3 8 6 V E R 2 2 0 F T 1 0 0 3 S N # 1 2 3 4 5 6 M E N U R E M O V E C A R F R O M L A N E R E S E T L O O P P R I N T H E A D E R M A N U A L R E P O R T S S E T P A R A M E T E R S D R I V E - T H R U C O N F I G D I A G N O S T I C S R E S E T M E M O R Y < A R R O W S > T O < E N T E R > T O < M A I N M E N U > IMAGE VERSION SERIAL NUMBER M O V E S E L E C T T O E X I T 2.
PHASE RESEARCH USER GUIDE 13-1.1 Assign Access Codes The Access Codes screen lets you secure your system from unauthorized use.
PHASE RESEARCH USER GUIDE NOTE: You may assign up to four Access Codes, identified as A, B, C, and D on the Set Access Codes screen. An unused Access Code is displayed as “UNUSED.” A used Access Code is displayed as “SET.” (When no access code has been set, the default access code is 000000. Once any of the access codes has been set, however, the default access code (000000) no longer allows access.) You may also program a global password to allow full access, but care must be taken before this is done. 2.
PHASE RESEARCH USER GUIDE IMPORTANT: IF THE SELECTED ACCESS CODE IS UNUSED, THE PASSWORD ENTRY SCREEN (SEE PREVIOUS PAGE) WILL APPEAR. IF THE ACCESS CODE HAS ALREADY BEEN SET, THE FOLLOWING TECH CODES SCREEN WILL APPEAR.
PHASE RESEARCH USER GUIDE SECTION 13 - PARAMETERS 13-1.2 Time/Store Hours The Time/Store Hours screen lets you set the current date and time and the day considered to be the first day of the week for your store. It also lets you set the daily store opening and closing times for each day of the week. From STORE PARAMETERS Screen (see “PARAMETERS PROGRAMMING” on page 13-1): 1. Press to select [TIME/STORE HOURS]. 2. Press . You are now in the Time/Store Hours screen.
PHASE RESEARCH USER GUIDE NOTE: To set up a store for a 24-hour day, set the OPEN and CLOSE times the same. When CLOSE time is set to the same time as OPEN time, CLOSE time field will display 24 HOUR. NOTE: You may set a particular day as CLOSED by pressing on the day’s OPEN time until it reads, “CLOSED”. (Closed will be between 11:45 p.m. and 12:00 a.m.
PHASE RESEARCH USER GUIDE 13-1.3 Store Heading SECTION 13 - PARAMETERS The Store Heading screen lets you enter text for the Header, which you can print using the [PRINT HEADER] function on the Menu screen. (The Header can be automatically printed with some reports to identify them by their store.) The Header information is also displayed on the Header of reports generated by the Fast Track personal computer software suite, if being used.
PHASE RESEARCH USER GUIDE 5. Press the number key(s) repeatedly until the desired character is displayed. For example, pressing the number “2” key (PRINT DISPLAY): One time will display an “A” Two times will display a “B” Three times will display a “C” Four times will display a “2” Five times will display an “a” Six times will display a “b” Seven times will display a “c” (All number keys will display letters and numbers in this fashion.
PHASE RESEARCH USER GUIDE SECTION 13 - PARAMETERS 13-1.4 Set Dayparts The Set Dayparts screen lets you break each day into a number of smaller units called dayparts, which are used to group data for viewing and reporting. From STORE PARAMETERS Screen (see “PARAMETERS PROGRAMMING” on page 13-1): 1. Press to select [DAYPARTS]. 2. Press . You are now in the Set Dayparts screen.
PHASE RESEARCH USER GUIDE 7. Press to change the time in 15-minute increments. The Timer adjusts automatically to prevent time gaps or overlaps. NOTE: The ending time of each daypart coincides with the starting time of the next daypart for the same day, though you may use different dayparts for each day of the week. Daypart 1 always starts at the opening time for the day, and the last programmed daypart always ends at the closing time for the day. 8.
PHASE RESEARCH USER GUIDE SECTION 13 - PARAMETERS 13-1.5 Set Shifts The Set Shifts screen lets you divide each day into smaller units called shifts, which are used to group data for viewing and reporting. From STORE PARAMETERS Screen (see “PARAMETERS PROGRAMMING” on page 13-1): 1. Press to select [SHIFTS]. 2. Press . You are now in the Set Shifts screen, and the cursor is on DAY.
PHASE RESEARCH USER GUIDE 7. Press to change the time in 15-minute increments. The Timer adjusts automatically to prevent time gaps or overlaps. NOTE: The ending time of each shift coincides with the starting time of the next shift for the same day, though you may use different shifts for each day of the week. Shift 1 always starts at the opening time for the day, and the last programmed shift always ends at the closing time for the day. 8.
PHASE RESEARCH USER GUIDE SECTION 13 - PARAMETERS 13-1.6 Set Targets The Set Targets screen lets you create a system of target times, audible indicators (beeps), and letter grades for any or all programmed event(s). From STORE PARAMETERS Screen (see “PARAMETERS PROGRAMMING” on page 13-1): 1. Press to select [TARGETS]. 2. Press . You are now in the Set Targets screen. 1 T D B 1 A A E : R Y E A B C D F F C < < < < > = = = = O D D < A < + 3.
PHASE RESEARCH USER GUIDE 9. Press or to select the desired daypart. 10. Press to move the cursor to BEEP. 11. Press to move the cursor to [=] immediately to the right of BEEP ON ARRIVAL. 12. Press NO. or to toggle the BEEP ON ARRIVAL option to YES or 13. Press to select the grade (A, B, C, etc.) for which you wish to set or change the target time. (If you do not want targeting for a particular grade, set the grade’s target time to 0.
PHASE RESEARCH USER GUIDE 18. Press to move the cursor to the field that begins F REPEAT. 19. Press to move the cursor to the field just to the right of @. 20. Press or to set the number of times you want the beep to repeat. The Remote Display will sound two successive short beeps at intervals of 2, 5, 10, 15, or 30 seconds depending on your choice. (Select OFF to disable the repeat beep.) 21. Press to move the cursor immediately to the left of DAYS. 22.
PHASE RESEARCH USER GUIDE SECTION 13 - PARAMETERS 13-1.7 Set Printer Options The Set Printer Options screen lets you select automatic report printing that matches your requirements, providing 16 different report settings to give you a great deal of flexibility. From STORE PARAMETERS Screen (see “PARAMETERS PROGRAMMING” on page 13-1): 1. Press to select [PRINTER OPTIONS]. 2. Press . You are now in the Set Printer Options screen. DAILY WEEKLY MONTHLY 3. Press Option fields.
PHASE RESEARCH USER GUIDE 4. Press or each selection. to select the report option. The Timer displays an X for 5. Press to move the cursor to REPORT. 6. Press to move the cursor to [@] immediately to the right of REPORT. 7. Press or to select one of two options: a specified time (time=) or a specified time increment after store closing (close+). 8. Press to move the cursor to either [=] or [+] depending on your choice in the previous step. 9.
PHASE RESEARCH USER GUIDE 17. Press or to select ON (to print the PEC report as cars move through the drive-thru) or OFF. 18. Press to move cursor immediately to the right of TARGETS. 19. Press OFF. or to select ON (to print the Targets on the reports) or 20. Press to move cursor immediately to the right of AUTO. 21. Press or to select ON or OFF (to disable automatic reporting).
PHASE RESEARCH USER GUIDE SECTION 13 - PARAMETERS 13-1.8 Set Remote Display Options THIS FEATURE REQUIRES AN ACCESS CODE FOR ENTRY The Set Remote Display Options screen lets you select the information that appears on the Remote Displays. From STORE PARAMETERS Screen (see “PARAMETERS PROGRAMMING” on page 13-1): 1. Press to select [REMOTE DISP OPTIONS]. 2. Press . You are now in the Set Remote Display Options screen.
PHASE RESEARCH USER GUIDE NOTE: If you do not know the number associated with a particular Remote Display, remove and reconnect the five-pin connector atop the Display. Do not remove the connector by pulling on the gray cable; remove it only by pulling on its black base. The unit then goes through a power-up sequence and displays the address of the Remote.
PHASE RESEARCH USER GUIDE 5.b. Press to move cursor to the right of the percentage. 5.c. Press or will change color. 5.d. Press 5.e. Press 6. Press to select the desired percentage at which the Display to move the cursor to [%]. or to select the event to be monitored. to move the cursor to [FLASH AVG]. 7. Press or to select the averaging period (HOURLY; DAYPRTS; SHIFTS; DAILY; WEEKLY; MONTHLY; ALT). The averaging period applies to all Remote Displays.
PHASE RESEARCH USER GUIDE SECTION 13 - PARAMETERS 13-1.9 Set Remote Addressing IF IT IS NECESSARY TO CHANGE A REMOTE DISPLAY’S ADDRESS, USE THE FOLLOWING STEPS: 1. Unplug the five-pin connector from the top of the Remote Display and remove the display from its mounting. Remove the two (2) smaller Phillips head screws from the top of the Display first, and then remove the two (2) Phillips head screws from the bottom of the Display. The two (2) covers of the Display should now separate. 2.
PHASE RESEARCH USER GUIDE SECTION 13 - PARAMETERS 13-1.10 Night Manager THIS FEATURE REQUIRES AN ACCESS CODE FOR ENTRY The Night Manager screen allows you to view and print particular events over a specified time period to track such events, as well as identify problems and their causes (which is particularly useful for absentee management). . From STORE PARAMETERS Screen (see “PARAMETERS PROGRAMMING” on page 13-1): 1. Press to select [NIGHT MANAGER]. 2. Press .
PHASE RESEARCH USER GUIDE 4. Press to move the cursor to [VIEW] or [PRINT] in order to send the report to either the display or the printer. NOTE: Selecting VIEW allows you to “drill down” through two more screens of greater detail (one for FT EVENTS and one for PULL OUTS). Selecting PRINT will cause all three Night Manager screens (the first Night Manager screen, FT EVENTS screen, and PULLOUTS screen) to print. 5. Press to produce the selected screen or printer report.
PHASE RESEARCH USER GUIDE 13-1.10.1 Show Event Detail The Show Event Detail screen displays more detail for the event (FT EVENTS) selected on the first Night Manager screen. 1. From STORE PARAMETERS Screen (see “PARAMETERS PROGRAMMING” on page 13-1): 2. Press to select [NIGHT MANAGER]. 3. Press . You are now in the Night Manager screen.
PHASE RESEARCH USER GUIDE 7. Press to move the cursor to [FT EVENTS]. 8. Press to “drill down” to view a more detailed screen for FT EVENTS. The display shows the conditions that contributed to the FT Events count.
PHASE RESEARCH USER GUIDE 13-1.10.2 Show Event Counts The Show Event Counts screen displays more detail for the event (PULLOUTS) selected on the previous screen. 1. From STORE PARAMETERS Screen (see “PARAMETERS PROGRAMMING” on page 13-1): 2. Press to select [NIGHT MANAGER]. 3. Press . You are now in the NIGHT MANAGER screen.
PHASE RESEARCH USER GUIDE 7. Press to move the cursor to [PULL OUTS]. 8. Press to “drill down” to view a more detailed screen for PULLOUTS. The display shows the conditions that contributed to the Pullouts count.
PHASE RESEARCH USER GUIDE SECTION 14 - DIAGNOSTICS SCREENS 14-1 Diagnostics THIS FEATURE REQUIRES AN ACCESS CODE FOR ENTRY The Diagnostic screen is a monitoring feature that lets you view the number of operating exceptions – FT (Fast Track) Events and Pullouts – for a particular day of operation. From MENU Screen (see “Menu” on page 8-1): 1. Press to move cursor to [DIAGNOSTICS]. 2. Press . You are now prompted to enter your Access Code. 3.
PHASE RESEARCH USER GUIDE NOTE: Selecting either [VIEW] or [PRINT] will allow you to view three Diagnostic screens (all showing details about the FT EVENTS and PULLOUTS, as shown on screens below): Choosing [PRINT] will produce these three Diagnostic screens on a single report tape. Selecting [VIEW] will allow you to view the same three Diagnostic tools on the display screen by using the following steps: 6. Press after selecting [VIEW].
PHASE RESEARCH USER GUIDE SECTION 15 - RESET MEMORY 15-1 Reset Memory THIS FEATURE REQUIRES A TECH CODE FOR ENTRY The Reset Memory screen allows you to erase all historical event data in the memory. CAUTION: THIS SCREEN WARNS THAT IF YOU PRESS THE KEY, YOU WILL ERASE ALL HISTORICAL EVENT DATA PERMANENTLY.
PHASE RESEARCH USER GUIDE 3. Press the numbered pink keys (0 - 9) to enter your six-digit Tech Code. You are now in the Reset Memory screen. 1 1 : 0 0 A M M O N F E B 2 3 C A U T I O N T H I S W I L L C A U S E A L L C A R C O U N T S , T O T A L S T O B E L O S T F O R E V E R T O C O N T I N U E P R E S S < C L E A R > < M A I N 4. M E N U > T O E X I T Press . This will erase your Timer’s memory permanently, and you will not be able to retrieve any historical event data.
PHASE RESEARCH USER GUIDE PRINTER REPORT TAPES The sample Printer report tape below details the meaning of each entry on a report generated by the automatic reporting feature of the Timer.
PHASE RESEARCH USER GUIDE A P P E N D I X 1 HOURLY REPORTS 4:00 PM START3:00 PM A SIDE MENU GREET PICK UP TOTAL MON FEB 23 1999 <> -STOP 4:00 PM #CARS 19 19 19 19 PULLOUTS AVG :58 :04 1:11 2:40 = 1 EVENT: TARGET A B C D F MENU #CARS 7 4 4 2 2 % 35 23 20 12 10 EVENT: TARGET A F GREET #CARS 18 1 % 95 5 EVENT: TARGET A B C D F PICK UP #CARS 9 5 2 2 1 % 50 25 10 10 5 EVENT: TARGET A B C D F TOTAL #CARS 5 6 4 3 1 % 30 34 19 15 5 ****END OF REPORT********* This report is a REAL-TIME (RT) r
PHASE RESEARCH USER GUIDE A P P E N D I X DAYPART REPORTS 1:30 AM MON FEB 23 1999 START- DAYPARTX -STOP 11:00 AM <> 1:30 PM A SIDE MENU GREET PICK UP TOTAL #CARS 122 122 122 122 PULLOUTS AVG :52 :04 1:19 2:48 = EVENT: TARGET A B C D F MENU #CARS 42 35 24 13 7 EVENT: TARGET A F GREET #CARS 111 11 EVENT: TARGET A B C D F PICK UP #CARS 56 32 13 12 9 EVENT: TARGET A B C D F TOTAL #CARS 66 16 22 13 5 1 % 35 28 20 11 6 % 91 9 % 46 26 11 10 7 % 54 13 18 11 4 ****END OF REPORT********* This re
PHASE RESEARCH USER GUIDE A P P E N D I X 1 SHIFT REPORTS 4:00 PM MON FEB 23 1999 START10:00AM <> A SIDE MENU GREET PICK UP TOTAL #CARS 198 198 198 198 PULLOUTS -STOP 4:00PM AVG :58 :04 1:11 2:40 = 1 EVENT: TARGET A B C D F MENU #CARS 77 44 40 22 15 EVENT: TARGET A F GREET #CARS 180 18 % 91 9 EVENT: TARGET A B C D F PICK UP #CARS 83 44 38 19 14 % 42 22 19 10 7 EVENT: TARGET A B C D F TOTAL #CARS 95 38 32 19 14 % 39 22 20 11 8 % 48 19 16 10 7 ****END OF REPORT********* This report is
PHASE RESEARCH USER GUIDE A P P E N D I X DAILY REPORTS 12:00 AM MON START6:00 AM DAILY <> A SIDE MENU GREET PICK UP TOTAL FEB 23 1999 -STOP 12:00 AM #CARS 241 240 240 240 PULLOUTS AVG :52 :04 1:19 2:48 = 1 EVENT: TARGET A B C D F MENU #CARS 143 22 49 15 11 EVENT: TARGET A F GREET #CARS 224 16 EVENT: TARGET A B C D F PICK UP #CARS 171 28 13 19 11 % 71 12 5 8 4 EVENT: TARGET A B C D F TOTAL #CARS 124 52 48 15 1 % 52 22 20 6 0 % 59 9 20 6 4 % 93 7 ****END OF REPORT********* This repor
PHASE RESEARCH USER GUIDE DEFINITIONS OF TERMS DRIVE-THRU TIMER-A computer technology management tool to measure and monitor drive-thru speed of service in a fast food restaurant EVENT- Occurrences in the drive-thru and/or the Timer itself THE FOLLOWING ARE EXAMPLES OF EVENTS: ACCESS CODE-User can program four individual Access Codes (A,B,C,D) to establish restricted entry to Timer features ALT CONFIG OFF-The time at which Alt Config toggles OFF and the original main drive-thru configuration is restored A
PHASE RESEARCH USER GUIDE A P P E N D I X 2 GREET TIME-The time taken to respond to a car that has arrived at the Menu Board/order point MAX CARS-The Timer’s automatic subtraction of a car when the actual number of cars exceeds the number that has been programmed (using the drive-thru configuration feature) MULTI-STATION EVENT-An event that starts and stops an event timer from two or more detection points; there may be up to four such events PERIOD-A user defined block of time used with the Manual Report
PHASE RESEARCH USER GUIDE TROUBLESHOOTING TROUBLE PRINTER REMOTE PROBABLE CAUSE Paper jam. SOLUTION Remove jammed paper and reload printer. Reset printer. Printer locks up. Paper jam. Remove jammed paper, reload paper, and reset printer. Paper advances but does not print. Incorrect paper type. Use specified paper. Paper in backwards. Reload paper correctly. Prints too light. Possible printer issue. Contact dealer or factory. Prints only half of characters. Possible printer issue.
PHASE RESEARCH USER GUIDE A P P E N D I X TROUBLE REMOTE Displays colon (:) only. 3 Blank display. TROUBLESHOOTING PROBABLE CAUSE SOLUTION Brown-out or power surge. Unplug cable from top of Remote and then plug back in. Wait for Remote to stop counting down and press Main Menu twice. Remote needs to be reset. Unplug cable from top of Remote and then plug back in. Wait for Remote to stop counting down and press Main Menu twice. Store hours set incorrectly. Reset store hours or time and date.
PHASE RESEARCH USER GUIDE TROUBLE MAIN CONSOLE Timer inaccurately shows store as closed. PROBABLE CAUSE Store hours set incorrectly. SOLUTION Reset store hours. Timer continues timing Slowpoke. though no cars are in drivePossible detection issue. thru. Timer fixes itself. Contact dealer or factory. Timer does not have power. Power cord unplugged. Plug in power cord. Circuit breaker in building is tripped (off). Reset circuit breaker. 3 Power to building is off. Blown fuse.
PHASE RESEARCH USER GUIDE SET PARAMETERS WORKSHEETS A P P E N D I X SET PARAMETERS WORK SHEET SAMPLE Sheet 1 Store Header FAST BURGER Store: Number: 1234 Manager: JONES Phone: (123) 456-7889 Modem: (123) 456-7890 City: ANY TOWN STORE HOURS 1st day of week: OPEN 6:00AM 6:00AM 6:00AM 6:00AM 6:00AM 6:00AM 6:00AM SUN MON TUE WED THU FRI SAT 1 2 3 4 5 6 7 8 DAYPARTS START 6:00AM 10:30AM 1:00PM 5:00PM 8:00PM MON - CLOSE 1:00AM 1:00AM 1:00AM 1:00AM 1:00AM 1:00AM 1:00AM - STOP - 10:30AM 1:00PM 5:00PM 8:00P
PHASE RESEARCH USER GUIDE A P P E N D I X 4 SET PARAMETERS WORK SHEET SAMPLE Sheet 2 A MENU Target= BEEP ON ARRIVAL= A <= B <= C <= D <= F > F Repeat Time :30 :45 1:00 1:30 1:30 @ B P 1 2 3 4 2 N N N N N 30 SEC A GREET Target= BEEP ON ARRIVAL= Time :04 :07 :10 :10 :10 A <= B <= C <= D <= F > F Repeat @ Target= BEEP ON ARRIVAL= NO B P 0 0 0 0 0 N N N N N OFF SEC Time :30 :45 1:00 1:30 1:30 @ A <= B <= C <= D <= F > F Repeat Time 1:30 1:45 2:00 2:30 2:30 @ B P 1 2 3 4 2 N N N N N B
PHASE RESEARCH USER GUIDE A P P E N D I X SET PARAMETERS WORKSHEET Store Header Store: Number: Manager: Phone: Modem: City: STORE HOURS 1st day of week: OPEN SUN MON TUE WED THU FRI SAT 1 2 3 4 5 6 7 8 - CLOSE - DAYPARTS START - STOP - PRINTER OPTIONS RT Hour Daypart Shift Daily Report @ DA CLOSE + time= Header Targets WK 4 MO or PEC AUTO Remote Display Remote Remote Remote Remote Remote Remote #1 #2 #3 #4 #5 % Flash avg SHIFTS START 1 2 3 4 - STOP - SET PARAMETERS WORKSHEETS A4-3
PHASE RESEARCH USER GUIDE A P P E N D I X 4 Target= BEEP ON ARRIVAL= Time A <= B <= C <= D <= F > F Repeat @ Target= BEEP ON ARRIVAL= B P SEC Target= BEEP ON ARRIVAL= Time A <= B <= C <= D <= F > F Repeat @ Time B P Time Time A <= B <= C <= D <= F > F Repeat @ SEC P SEC B P SEC Target= BEEP ON ARRIVAL= B P Time A <= B <= C <= D <= F > F Repeat @ SEC Target= BEEP ON ARRIVAL= A <= B <= C <= D <= F > F Repeat @ B Target= BEEP ON ARRIVAL= Target= BEEP ON ARRIVAL= A <= B <= C <= D <= F
PHASE RESEARCH USER GUIDE DAYPARTS AND SHIFTS RECORD DATE: ________________________ Dayparts Sun start 1 stop Store opening time Mon start stop Store opening time Tue start stop Store opening time Wed start stop Store opening time Thur start stop Store opening time Fri start stop Store opening time Sat start stop Store opening time 2 3 A P P E N D I X 4 4 5 6 7 Store closing time 8 Store closing time Store closing time Store closing time Store closing time Store closing time
PHASE RESEARCH USER GUIDE INDEX SYMBOLS +/- Keys Description of .......................................................................................................................... 2-7 A A/B/A+B Key Description of .......................................................................................................................... 2-7 Access Codes Screens Assign Access Codes See Assign Access Codes Screen Set Access Codes See Set Access Codes Screen Activity Screen Brief Description of .......
PHASE RESEARCH USER GUIDE A P P E N D I X 5 Change Header Settings ......................................................................................................... 13-8 Change Store Hours ................................................................................................................ 13-6 Clear Key Description of ..........................................................................................................................
PHASE RESEARCH USER GUIDE E Electrical Power Outage .......................................................................................................... 2-4 Enter Select Key Description of .......................................................................................................................... 2-7 Event 00 ....................................................................................................................................
PHASE RESEARCH USER GUIDE A P P E N D I X 5 I Intercom ............................................................................................................................... 1-2, 2-1 K Keyboard Mode Key Description of .......................................................................................................................... 2-7 Keypad Description of ..........................................................................................................................
PHASE RESEARCH USER GUIDE Manual Reports Screen Brief Description of ................................................................................................................. 3-1 Illustration .............................................................................................................................. 12-1 Manually Reset a Loop Detector .......................................................................................... 10-1 Manually Synchronize Fast Track ...................
PHASE RESEARCH USER GUIDE A P P E N D I X 5 Parameters See Parameters Programming Access Codes See Set Access Codes Screen Dayparts See Set Dayparts Screen Heading See Heading Screen Night Manager See Night Manager Screen Printer Options See Set Printer Options Screen Remote Display Options See Set Remote Display Options Screen Shifts See Set Shifts Screen Targets See Set Targets Screen Time/Store Hours See Time/Store Hours Screen Pick-Up Window ..........................................................
PHASE RESEARCH USER GUIDE Report Format Selection Screen (Daily, Weekly, and Monthly Reports) Illustration ..........................................................................................................12-4, 12-7, 12-10 Report Format Selection Screen (Daypart or Shift Reports) Illustration ............................................................................................................................ 12-15 Reports Car by Car .........................................................
PHASE RESEARCH USER GUIDE A P P E N D I X 5 Set Targets Screen Illustration ............................................................................................................................ 13-14 Set Text to Appear in Header ............................................................................................... 13-8 Setting Sections of the Day (Dayparts) and/or Shifts .................................................... 13-10 Setting Targets for Grading ...............................
PHASE RESEARCH USER GUIDE V Vehicle Detector .................................................................................................................. 1-2, 2-1 Vehicle Presence Signal ............................................................................................................ 2-2 View Configuration Screen ..................................................................................................... 5-1 Illustration ............................................................
PHASE RESEARCH 3500 W. Moore Avenue, Suite M Santa Ana, CA 92704 (714) 850-1320 or Fax: (714) 850-1502 www.phaseresearch.com email - fasttrack@phaseresearch.