
Installation guide


3
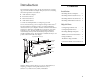
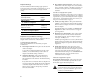
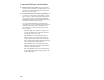
Step 6:
OPTIONAL. If you want the LED in your
computer to light whenever there is activity on the
SCSI bus, disconnect the LED cable from the LED
connector on the motherboard and connect it to the
LED connector on the host adapter.
Step 7:
Make sure that all your SCSI devices have
been set with unique SCSI IDs from 0 to 6. (Refer to
your device documentation for SCSI ID settings and
instructions on changing the default settings.)
Caution:
AHA-2910C host adapters support
only single-ended SCSI devices. Differential
SCSI devices may be damaged if you connect
them to the host adapter. Read the device
documentation.
Installing Internal SCSI Devices
The SCSI devices inside a computer are attached to an
internal SCSI cable. The last device on the cable must be
terminated. Most internal SCSI devices have a jumper or
switch that controls termination. Refer to the device’s
documentation on enabling or disabling termination.
If you purchased your AHA-2910C as part of an Adaptec
kit, you can use the 50-pin internal SCSI cable to connect
up to two internal SCSI devices.
Note:
Before you begin, make sure your internal
SCSI devices are not terminated.
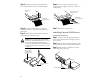
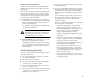
Step 1:
Find the colored stripe on the 50-pin
internal SCSI cable and then align it with Pin-1 on the
host adapter’s connector. Pin-1 is usually identified by
a
▲
, or “1” on the connector.
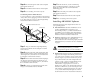
Step 2:
Plug the internal SCSI cable into the host
adapter’s connector.
1
1
LED Cable from
Motherboard
Pin 1
LED Connector
on Host Adapter
2-pin
LED
Cable
Colored Stripe
(typically red or blue)
50-pin SCSI
Ribbon Cable
Pin 1
Indicator
Host Adapter’s Connector