ANA-7711 IG.
ANA-7711 IG.book Page ii Friday, May 9, 2003 12:24 PM Copyright ©2002 – 2003 Adaptec, Inc. All rights reserved. No part of this publication may be reproduced, stored in a retrieval system, or transmitted in any form or by any means, electronic, mechanical, photocopying, recording or otherwise, without the prior written consent of Adaptec, Inc., 691 South Milpitas Blvd., Milpitas, CA 95035. Trademarks Adaptec, the Adaptec logo, ANA, and NAC are trademarks of Adaptec, Inc.
ANA-7711 IG.book Page iii Friday, May 9, 2003 12:24 PM Adaptec Customer Support If you have questions about installing or using your Adaptec product, check this document first—you will find answers to most of your questions here. If you need further assistance, use the support options listed below. Technical Support Identification (TSID) Number ■ Before contacting Technical Support, you need your unique 12-digit TSID number. The TSID number identifies your product and support status.
ANA-7711 IG.book Page iv Friday, May 9, 2003 12:24 PM Europe ■ Visit our Web site at www.adaptec-europe.com. ■ German: To speak with a Technical Support Specialist, call +49 89 43 66 55 22, Monday to Friday, 9:00 to 17:00, CET. For support via e-mail, submit your question to Adaptec’s Technical Support Specialists at ask-de.adaptec.com. ■ French: To speak with a Technical Support Specialist, call +49 89 43 66 55 33, Monday to Friday, 9:00 to 17:00, CET.
ANA-7711 IG.book Page v Friday, May 9, 2003 12:24 PM Limited 3-Year Hardware Warranty 1. Adaptec, Inc. (“Adaptec”) warrants to the purchaser of this product that it will be free from defects in material and workmanship for a period of three (3) years from the date of purchase.
ANA-7711 IG.book Page vi Friday, May 9, 2003 12:24 PM Regulatory Compliance Statements Federal Communications Commission Radio Frequency Interference Statement WARNING: Changes or modifications to this unit not expressly approved by the party responsible for compliance could void the user’s authority to operate the equipment. This equipment has been tested and found to comply with the limits for a Class B digital device, pursuant to Part 15 of the FCC rules.
ANA-7711 IG.book Page vii Friday, May 9, 2003 12:24 PM Canadian Compliance Statement This Class B digital apparatus meets all requirements of the Canadian InterferenceCausing Equipment Regulations. Cet appareil numérique de la classe B respecte toutes les exigences du Règlement sur le matériel brouilleur du Canada. Japanese Compliance (Voluntary Control Council Initiative) This equipment complies to class B Information Technology equipment based on VCCI (Voluntary Control Council for Interface).
ANA-7711 IG.
ANA-7711 IG.
ANA-7711 IG.book Page 2 Friday, May 9, 2003 12:24 PM ANA-7711C/F Installation Guide Read This First This chapter is an important guide to the rest of the documentation and provides a summary of the hardware and software installation process. Additional chapters describe how to: ■ Install the adapter ■ Install the driver ANA-7711C/F NAC Adapter Features The ANA-7711C/F NAC adapter features are summarized below: ■ Full TCP/IP protocol processing ■ PCI 2.2 compliant; compatible with 3.
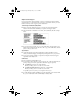
ANA-7711 IG.book Page 3 Friday, May 9, 2003 12:24 PM Introduction Adapter Illustrations The ANA-7711C/F NAC adapters are illustrated below. The table that follows describes the LED indicators. Copper connector ANA-7711C NAC Adapter SC fiber connector ANA-7711F NAC Adapter ANA-7711 Model Label LED Description Copper and Fiber 1000 Rate Indicator—When lit (green), indicates a valid GbE (1000 Mbps/sec) connection.
ANA-7711 IG.book Page 4 Friday, May 9, 2003 12:24 PM ANA-7711C/F Installation Guide System Requirements Hardware and operating system requirements are discussed below. Hardware Requirements Your computer must meet the following requirements: ■ Intel Pentium or equivalent computer ■ At least 128 MB of RAM ■ An available 3.3-V keyed PCI slot ■ CD-ROM drive ■ GbE copper (CAT 5 or CAT 6) or SC fiber cable (not included). Visit www.adaptec.com for cables.
ANA-7711 IG.book Page 5 Friday, May 9, 2003 12:24 PM Introduction About the Documentation The NAC Installation CD provides the following documentation files: ■ README—The README file located in the root directory, contains the latest information about the ANA-7711C/F NAC adapter, important technical information about device compatibility, operating system support, and drivers. Visit www.adaptec.com for the latest updates. Visit ask.adaptec.
ANA-7711 IG.book Page 6 Friday, May 9, 2003 12:24 PM ANA-7711C/F Installation Guide Overview of the Installation Process The following steps provide an overview of the process of installing and configuring the ANA-7711C/F NAC adapter: 1 Verify that your computer meets the requirements described in System Requirements on page 1-4. 2 Gain familiarity with the contents of the NAC Installation CD. 3 Install the ANA-7711C/F NAC adapter as described in Chapter 2.
ANA-7711 IG.book Page 1 Friday, May 9, 2003 12:24 PM 2 Installing the NAC Adapter To install the adapter in an available 3.3-V keyed PCI slot: 1 Turn off the power to the computer and disconnect the power cord. 2 Before handling the board, discharge any static electricity from your body by touching a grounded metal object such as the exposed metal parts on the back of your computer. 3 Remove the cover from the computer case. If necessary, refer to the instructions in your computer documentation.
ANA-7711 IG.book Page 2 Friday, May 9, 2003 12:24 PM ANA-7711C/F Installation Guide 5 Insert the adapter in the 3.3-V keyed PCI expansion slot. Press the board firmly into the slot until it clicks into place. Replace the slot cover screw. ! Caution: Be sure to use an unused 3.3-V keyed PCI slot. 6 Close the computer cabinet and reattach the power cord. Next, install the NAC adapter driver for your operating system. See Chapter 3, Installing the Driver.
ANA-7711 IG.book Page 1 Friday, May 9, 2003 12:24 PM 3 Installing the Driver Now that you have installed the adapter in the computer, you are ready to install the driver. The following installation uses the Red Hat Network Configuration Graphical User Interface (GUI). Note: To install the driver manually, see the instructions included in the README file on the installation CD. The following instructions describe how to install the driver on a Red Hat 8.0 UP system or on a Red Hat 8.0 SMP system.
ANA-7711 IG.book Page 2 Friday, May 9, 2003 12:24 PM ANA-7711C/F Installation Guide The Devices tab in the Network Configuration window is displayed. Note the ethernet device numbers listed in the Device column. Later, you will need to select the next unused device number to identify your NAC. 4 Click Add. The Add New Device Type window is displayed.
ANA-7711 IG.book Page 3 Friday, May 9, 2003 12:24 PM Installing the Driver 5 Click Ethernet connection and click Forward. The Select Ethernet Device window is displayed. 6 Click Other Ethernet Card and click Forward. The Select Ethernet Adapter window is displayed. 7 Select Adaptec ANA-7711 Network Accelerator Card (NAC) from the Adapter drop down list, and select the next unused eth device number for the NAC from the Device drop down list and click Forward.
ANA-7711 IG.book Page 4 Friday, May 9, 2003 12:24 PM ANA-7711C/F Installation Guide The Configure Network Settings window is displayed. 8 Click Automatically obtain IP address settings with: or Statically set IP addresses: as appropriate. You can automatically obtain IP Address settings using dhcp. If you choose to enter static addresses, enter the NAC IP Address, Subnet Mask, and Default Gateway Address. 9 Click Forward and then click Apply. 10 Click Close and then save your changes.
ANA-7711 IG.book Page 1 Friday, May 9, 2003 12:24 PM 4 Configuring the NAC Adapter Now that you have installed the driver, you can configure the following settings: ■ buffer_megs—The amount of memory allocated for temporary packet storage. ■ autoneg—The autonegotiation port speeds of the NAC and the connected switch. ■ flow—The flow control or pace of data transmission.
ANA-7711 IG.book Page 2 Friday, May 9, 2003 12:24 PM ANA-7711C/F Installation Guide Setting the Buffer Size The buffer size identifies the amount of system memory allocated for temporary packet storage. For example, buffer_megs=512 indicates that 512 MB has been allocated as buffer memory. Increasing this amount improves performance and provides an extra safety margin against packet loss and dropped connections when dealing with large numbers of connections.
ANA-7711 IG.book Page 2 Friday, May 9, 2003 12:24 PM R Adaptec, Inc. 691 South Milpitas Boulevard Milpitas, CA 95035 USA ©2003 Adaptec, Inc. All rights reserved. Adaptec and the Adaptec logo are trademarks of Adaptec, Inc. which may be registered in some jurisdictions. Part Number: 513191-06, Ver.