R INSTALLATION GUIDE SCSI CARD 2906
▼ ▼ ▼ ▼ AVA-2906 SCSI Card 2906 Installation Guide R
Contents ➤ Introduction 2 ➤ Before You Begin 2 ➤Installing the SCSI Card 2906 4 ➤Preparing the SCSI Devices 6 Check the SCSI IDs 6 Terminate the Ends of the SCSI Bus 6 ➤Connecting Internal SCSI Devices 7 ➤Connecting External SCSI Devices 11 ➤Installing the SCSI Card 2906 Software 14 Computers with Windows 95/98 14 Computers with Windows NT 4.0 15 Computers with Windows 3.1 15 Computers with DOS 6.
SCSI Card 2906 Introduction With SCSI Card 2906, you can connect up to seven SCSI devices to any IBM-compatible computer with Bus Mastering PCI expansion slots.
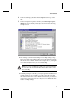
SCSI Card 2906 4 In Device Manager, double-click Computer at the top of the list. 5 In the Computer Properties window, click Interrupt request (IRQ) (if it is not already selected) as shown in the following sample screen: ■ The Settings column lists the IRQs in use. IRQ settings range between 0 and 15. If an IRQ setting is not listed under Settings this means it is available. In the screen sample above, setting 10 is not listed and, therefore, is an available IRQ.
SCSI Card 2906 Determine which SCSI devices will be connected to the computer. If you want to connect more than two internal SCSI devices or one or more external SCSI devices, you will need additional cables not included in this package. These cables are described in the SCSI Card 2906 User’s Reference. Installing the SCSI Card 2906 WARNING: Before you start, turn OFF power to the computer and disconnect the power cord. Then ground yourself by touching an unpainted surface of the computer case.
SCSI Card 2906 Expansion Slot Cover PCI Expansion Slots 3 Remove the SCSI Card 2906 from its antistatic packaging. Always handle the card by its edges. 4 Insert the SCSI Card 2906 in the slot, pressing it down firmly so the gold fingers are seated in the slot as shown in the following diagram. Secure the SCSI card bracket with the screw you removed in Step 2.
SCSI Card 2906 Preparing the SCSI Devices Setting up SCSI devices before attaching them to the SCSI card typically involves setting SCSI IDs and termination, mounting internal SCSI devices inside your computer, and connecting power cables to each SCSI device. Setup varies for different kinds of SCSI devices. Always refer to the SCSI device’s documentation for specific instructions. Below are some guidelines for setting SCSI IDs and termination on your SCSI devices.
SCSI Card 2906 Connecting Internal SCSI Devices 1 Be sure that each internal SCSI device you are installing has a unique SCSI ID from 0 to 6. Refer to the SCSI device’s documentation to determine the SCSI ID setting. If any two SCSI devices (internal or external) you are connecting to the SCSI card have the same SCSI ID, change the SCSI ID on one SCSI device. The SCSI Card 2906 is preset to SCSI ID 7 and should not be changed. See the SCSI Card 2906 User’s Reference for additional information on SCSI IDs.
SCSI Card 2906 Note: If it is difficult to reach behind your internal SCSI devices mounted in the drive bay, try connecting the internal SCSI devices to the SCSI cable and power supply (Steps 5 - 7 below) before securing each SCSI device inside your computer. 4 Connect one end of the internal SCSI cable to the SCSI Card 2906 internal SCSI connector as shown below.
SCSI Card 2906 5 Connect the other end of the cable to the last internal SCSI device as shown below (this SCSI device must be terminated; see Step 2 above). Make sure Pin 1 on the cable aligns with Pin 1 of the internal SCSI device’s connector. Pin 1 usually is designated by a small triangle or “1”.
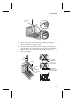
SCSI Card 2906 7 Connect a power cable from your computer’s power supply to the power input connector on the sCSI device as shown below. Repeat this step for each additional SCSI device. Power Input Connector Power Cable from Power Supply Power Cable Connected to the SCSI Device’s Power Supply Power Supply Caution: Power connectors and power cables typically are keyed with beveled edges. Use caution when you are connecting the power cable to the device. 8 Replace the computer cover.
SCSI Card 2906 Connecting External SCSI Devices 1 Be sure that each external SCSI device you are installing has a unique SCSI ID from 0 to 6. Refer to the SCSI device’s documentation to determine the SCSI ID setting. If any two SCSI devices (external or internal) you are connecting to the SCSI Card 2906 have the same SCSI ID, change the SCSI ID on one SCSI device. The SCSI Card 2906 is preset to SCSI ID 7 and should not be changed.
SCSI Card 2906 For each external SCSI device you install, you need a highquality external SCSI cable. See the SCSI Card 2906 User’s Reference for additional information on connecting your SCSI devices and ordering cables. DB25-pin (Female) Connector DB25-pin External SCSI (Male) Cable (not included in package) 3 Connect the other end of the cable to a SCSI connector on the back of the external SCSI device as shown below. If you are installing only one external SCSI device, terminate the device.
SCSI Card 2906 Note: If you are connecting external SCSI devices, use SCSISelect to set the Maximum Synchronous transfer rate to 5 MBytes/sec. The DB-25 connector is not rated for higher speeds. Refer to the section titled Configuring the SCSI Card 2906 with SCSISelect in the SCSI Card 2906 User’s Reference. 4 Connect the other external SCSI devices by connecting each SCSI device to the previous one until all SCSI devices are connected as shown below.
SCSI Card 2906 7 Turn ON the computer to boot it. 8 Install any software included with your SCSI device. 9 Continue with Installing the SCSI Card 2906 Software. Installing the SCSI Card 2906 Software To install the SCSI Card 2906 software (software driver), go to the section below for the operating system (for example, Windows 95/ 98) installed on your computer. If the operating system is not yet installed, install it now. Refer to your operating system documentation for instructions.
SCSI Card 2906 Note: If the driver is not listed or is not loading properly, see the Troubleshooting section of the SCSI Card 2906 User’s Reference. Computers with Windows NT 4.0 1 Start Windows NT 4.0 2 Click the Start button, point to Settings, and then double-click Control Panel. 3 Double-click SCSI Adapters. 4 In the SCSI Adapters window, click the Drivers tab. 5 In the Drivers tab, click Add. 6 In the Install Driver window, click Have Disk.
SCSI Card 2906 4 Select File/Run from the Program Manager menu. 5 When the Run dialog box appears, type a:\setup if you are using the A drive, or b:\setup if you are using the B drive. Then click OK. 6 Follow the instructions that appear on-screen. Computers with DOS 6.x or Above 1 Turn on all external SCSI devices and then the computer. 2 Insert the Adaptec EZ-SCSI diskette for DOS and Windows 3.1 into the floppy disk drive.
SCSI Card 2906 Federal Communications Commission Radio Frequency Interference Statement WARNING: Changes or modifications to this unit not expressly approved by the party responsible for compliance could void the user’s authority to operate the equipment. This equipment has been tested and found to comply with the limits for a Class B digital device, pursuant to Part 15 of the FCC rules. These limits are designed to provide reasonable protection against harmful interference in a residential installation.
SCSI Card 2906 Adaptec, Inc. 691 South Milpitas Boulevard Milpitas, CA 95035 © 1998 Adaptec, Inc. All rights reserved. No part of this publication may be reproduced, stored in a retrieval system, or transmitted in any form or by any means, electronic, mechanical, photocopying, recording or otherwise, without the prior written consent of Adaptec, Inc., 691 South Milpitas Blvd., Milpitas, CA 95035. Adaptec, the Adaptec logo, AVA, EZ-SCSI and SCSISelect are trademarks of Adaptec, Inc.
R Adaptec, Inc. 691 South Milpitas Boulevard Milpitas, CA 95035 © 1998 Adaptec, Inc. All rights reserved. Adaptec, and the Adaptec logo are trademarks of Adaptec, Inc. which may be registered in some jurisdictions. Printed in Singapore STOCK NO.: 512169-00, Rev.