AVC-2210 QSG.book Page 1 Friday, April 4, 2003 1:54 PM VideOh! DVD AVC-2210 Getting Started R DISCLAIMER: This product may be designed to assist you in reproducing materials. In doing so, you must have permission from the copyright owner of the materials to avoid violating copyright law and being subject to payment of damages and other remedies.
AVC-2210 QSG.book Page 1 Friday, April 4, 2003 1:54 PM Overview Congratulations on the purchase of your Adaptec VideOh!™ DVD Video Converter Kit. With this kit, you can convert your analog videos into digital format and create your own DVDs and VCDs (Video CDs). Using the AVC-2210 and the Sonic® MyDVD® software, you can capture your favorite video footage, organize and customize them to suit your imagination, and then burn them onto your DVD or CD. Then they’re ready to share.
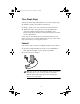
AVC-2210 QSG.book Page 2 Friday, April 4, 2003 1:54 PM Three Simple Steps Getting up and running with VideOh! involves three simple steps: ❏ Connect - install your hardware and software ❏ Create - capture your video, customize it a bit, then burn it ❏ Share! Your video can be played on any compatible DVD player. Recordable media playback compatibility varies between DVD player models. Consult your DVD player manual for more information. These steps are described in the rest of this document.
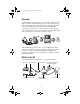
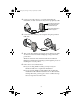
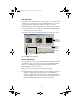
AVC-2210 QSG.book Page 3 Friday, April 4, 2003 1:54 PM 3 Connect your video device to your AVC-2210 using the included A/V cable. Your device may need a proprietary cable. Connect red audio plug to red audio port and white audio plug to white audio port Connect yellow video plug to yellow video input port 4 Connect the AVC-2210 to your computer using the provided USB cable. 5 Turn on the AVC-2210 by pressing the Power button.
AVC-2210 QSG.book Page 4 Friday, April 4, 2003 1:54 PM ■ If you are using Windows XP or Windows 2000 and you have plugged your device into a USB 1.1 port, you will see a message indicating that a high-speed USB device is plugged into a non-high-speed USB port. This means your AVC-2210 will run at the slower USB 1.1 speed. To increase your speed you may want to upgrade to USB 2.0. Go to www.adaptec.com for more information on USB 2.0 adapters.
AVC-2210 QSG.book Page 5 Friday, April 4, 2003 1:54 PM To get more information, refer to the online tutorial included with Sonic MyDVD. Or, at any time while you’re using this software, click ? or Help, to display detailed information about any step you want to perform. Before you begin creating: ■ Make sure your analog video device (such as a camcorder or VCR) is connected to the AVC-2210 and switched on.
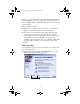
AVC-2210 QSG.book Page 6 Friday, April 4, 2003 1:54 PM 2 Move the mouse pointer over either DVD-Video or Video CD, then click Create or Modify a ... Project. The Main project window appears. 3 On the Main project window (shown in Step 2), click Capture. The Capture window appears. These buttons won’t operate your analog video device. Use the Play, Stop, and other control buttons on your device to control your analog video tape. 4 Press the Play button on your analog video device.
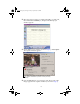
AVC-2210 QSG.book Page 7 Friday, April 4, 2003 1:54 PM 5 To begin transferring your video to your computer, click Start Capturing. MyDVD captures your video, including the audio. Note: If you get any error messages at this point in your video capturing, stop your analog video device and refer to Need Help Capturing Your Video? on page 11. 6 When you want to stop transferring your video to your computer, click Stop Capturing, then stop or pause your analog video device.
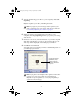
AVC-2210 QSG.book Page 8 Friday, April 4, 2003 1:54 PM Trim Your Video Now that you’ve captured some video footage, you can trim it. For example, you can change your Start and End points. You can also choose the specific video frame that you want to use as the thumbnail picture that is displayed in your Main project window. 1 From the Main project window, double-click the thumbnail for the video clip you want to trim. 2 Use the controls in the Trimming window to trim your video.
AVC-2210 QSG.book Page 9 Friday, April 4, 2003 1:54 PM ■ If your computer’s processing speed is less than 800 MHz or if you are using a slower video card, your preview video in the MyDVD capture window may appear choppy. However, the finished DVD or VCD, played back on your TV, will be fine. Updating the drivers for your computer’s video and/or audio card may minimize this problem. Check your video or sound card manufacturer’s Web site for driver updates.
AVC-2210 QSG.book Page 10 Friday, April 4, 2003 1:54 PM Finding More Information To learn more about how to use Sonic MyDVD and ArcSoft ShowBiz: ■ In the MyDVD Welcome window, click the Help button or Tutorial button. In the Main project window, click the Help menu and select MyDVD Help or Tutorial. ■ In Showbiz, click on the question mark icon on the ShowBiz Main screen to open the online Help and Learn the Basics tutorial. Right-click on any screen item to open context-sensitive Help.
AVC-2210 QSG.book Page 11 Friday, April 4, 2003 1:54 PM ■ If the LED is blinking orange, save your work, close MyDVD, then power your AVC-2210 off, then on again. Need Help Capturing Your Video? ■ If your analog video device, such as a VCR or camcorder, is not powered on, after about 1 minute, you will get an error message. To allow MyDVD to recognize and capture the video: a b c d ■ Click OK to close the error message. Click Done to close the Capture window.
AVC-2210 QSG.book Page 12 Friday, April 4, 2003 1:54 PM ■ If there are large gaps in your analog video tape of about 5 minutes, MyDVD stops capturing. To continue, forward to a new clip and start capturing. Gaps in video footage are often caused by stops, pauses, static, or unrecorded space in the original recording. They can also be caused by old, damaged, or deteriorated video tapes. ■ Set your computer monitor’s screen resolution to 1024 x 768 or higher for optimum viewing.
AVC-2210 QSG.book Page 13 Friday, April 4, 2003 1:54 PM Getting Help from Adaptec If you have questions about installing or using your Adaptec product, check this document first—you will find answers to most of your questions here. If you need further assistance: ■ Search the Adaptec Support Knowledgebase (ASK) at ask.adaptec.com for articles, troubleshooting tips, and frequently asked questions for your product.