Hi-Speed USB 2.
Content Introduction…………………………………………………………………………2 Features and Specifications .………………………………………………….2 System Requirements……….………………………………………..………….3 For Your Safety…….……………………………………………………………...3 Installation of USB Driver…………………………………………………….…..4 Installing in Windows98/98SE OS Environment……………………………4~5 Installation of USB Flash Disk Utility Program……………………………….6 Disk Partition and Security Setup Function………………………………..7~10 Log in Security Disk……………………………………………………………..
Introduction Congratulations on your purchase of this Hi-Speed USB Portable Flash Disk! This Hi-Speed USB Flash Disk is your friendly, secure, and lightweight removable mass storage device disk. It plugs thru the USB port so your computer will quickly detect and configure the disk without needing to restart the computer. You read, write, copy and delete files just the same way as you use a disk drive.
System Requirements Pentium Desktop PC & Laptop PC with high power USB port hub Windows 98/ 98SE, ME, 2000, XP, Vista Mac OS 9.X or above Linux Kernal 2.4 or above For Your Safety Keep your Hi-Speed USB Flash Disk away from all kinds of sources of high temperature and moisture, and also avoid using it on sunlight exposure.
Installation of USB Driver Before using your Hi-Speed USB Flash Disk, please confirm which version of OS you install into your computer. To use the Hi-Speed USB Flash Disk, you simply plug it into your computer’s USB port. Windows ME, 2000, XP and Vista, Mac 9.X or above, Linux Kernal 2.4 or above versions all support the Microsoft USB Mass Storage driver needed to detect and run the device.
3. Please click on “ Next” to continue the setup of USB 2.0 Flash Disk driver. 4. When appearing “You need to un-plug and re-plug the device” message, please click on “OK” to finish the setup of USB Mass Storage Disk driver. After re-plugging, OS will detect the USB Flash Disk and run the disk driver automatically.
Installation of USB Flash Disk Utility Program This section provides you information on how to run the USB Flash Disk Utility program. The Utility program allows you to set a private security password as well as disk format and partition functions. The Utility program includes 2 major functions: 1. Security function: Login/Logout Set and Change Password Change the size of Disk Partitions 2.
Disk Partition and Security Setup Function 1. Please insert the CD and double-click on “USB Flash Disk Utility” icon. The USB Flash Disk Utility menu will appear like as below: 2.
3. Click “ Security “, the Security Manu will appear like as below: 4. Click “ Security Config “, the image will appear as below: 4.1 You can directly move pointer to adjust the security disk’s size, or you can fill in the size number of security disk into “Protected” column. 4.2 Fill in your password into “ New Password” and “ Confirm “ column. (Maximum password length is 26 characters) 4.3 To avoid forgetting your password, you can fill in the password hint into “ Password Hint ” column.
5. Click “ OK “ , the image will appear as below, then please click “Yes”. 6. Processing Disk Partition. In this period, please do not unplug your Hi-Speed USB Flash Disk to avoid the disk crash.
7. After completing disk partition, the “success” message will appear like as below. Please click “OK” and re-plug your Hi-Speed USB Flash Disk. 8. After re-plugging, please confirm if there are 2 drive areas in your removable disk when you check “My Computer” section.
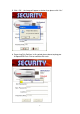
Log in Security Disk 1. Please confirm your disk have 2 disk areas (one is normal drive, the other is security drive), then process the step1 to step 3 regarding last section (Disk Partition and Security Setup Function). 2. Click on “Security Login”, the image will appear like as below. Please enter your password and click on “OK”, then you can access the security disk. If forgetting your password, please click on “Hint” button for password hint.
Partition Change and Password Setup 1. After executing Security function, the Security Menu will appear like as below. Please click on “Security Config”. 2. Please fill in the revising size into “Protected” column, fill in the old password into “Old Password”, and fill in new password into “New Password” column. Then please click “OK” to complete the change of drive size and password.
Change Password 1. After executing Security function, the Security Manu will appear like as below. Please click on “Change Password”. 2. Please fill in the old password into “Old Password”, fill in new password into “New Password” and “Confirm” column, and fill in the password hint into “Password Hint” column.
3. Please click on “OK” and the “change password” message will appear like as below: 4. Completing the change password step, the message will appear like as below. Please click on “OK”. When you log in next time, please use the new password to log in.
Disk Format 1. Please move your mouse pointer to “Disk icon”, then it will show “Format” like as below: 2. Please click on “Format” icon and the image will appear like as below. Please choose which drives you want to format. You can fill in the words into “Volume Name” you want to show. The words will show in the Task Bar when you plug-in your Hi-Speed USB Flash Disk.
3. Please click on “OK” and the “Confirm” dialog window will appear like as below. This is a reminder for the data will all gone when you complete the format function. Please click on “Y” for processing the format function. 4. When you complete the format, the message will appear like as below. Please click on the “OK” button to complete the disk format.
Make Bootable Disk 1. After executing Format function, please mark “Create Bootabled USB Flash Drive” and the check window will appear like as below. Please choose the Boot folder (the type of the boot file in this folder should be *.ISO) and confirm the file route. Please click the “OK” to start making the bootable disk. 2. Before making the bootable disk, the “Confirm” message will appear like as below. This reminder is telling you the data in your disk will be erased after you process it.
3. When finishing the function, the message will appear like as below. Please click on “OK” to complete the Make bootable Disk function.