
User Manual


ADCP-75-158 • Preliminary Issue A • June 2003 • Section 3: Host Unit Installation
Page 3-7
© 2003, ADC Telecommunications, Inc.
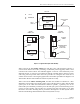
3. Reinstall both mounting brackets so the long side of the bracket is flush with the HU front
panel as shown in Figure 3-5. Use the screws removed in step 2 to re-attach the brackets to
the HU chassis.
Figure 3-5. Installing the Mounting Brackets for 23-Inch Rack Installations
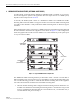
4. Position the HU in the designated mounting space in the rack (per system design plan) and
then secure the mounting brackets to the rack using the four machine screws provided (use
#12-24 or M6 x 10 screws, whichever is appropriate) as shown in Figure 3-6.
Figure 3-6. HU Rack Mount Installation
Note: Provide a minimum of 3 inches (76 mm) of clearance space on both the left and
right sides of the HU for air intake and exhaust.
18653-A
REMOVE AND REINSTALL MOUNTING
BRACKETS AS SHOWN FOR
INSTALLATION IN 23-INCH RACKS
18654-A