Digital Wrist Blood Pressure Monitor Automatic Blood Pressure Monitor 6015 Instruction Manual PLEASE NOTE: THIS MEDICAL INSTRUMENT MUST BE USED ACCORDING TO INSTRUCTIONS TO ENSURE ACCURATE READINGS.
1. Introduction 1.1. Features of your blood pressure monitor This blood pressure monitor, with integrated time/date display, is a fully automatic, digital blood pressure measuring device for use on the wrist. It enables very fast and reliable measurement of the systolic and diastolic blood pressure as well as pulse by way of the oscillometric method of measuring. This device offers a very high degree of accuracy demonstrated through clinical studies. It is also very easy to use.
evaluated after consultation with your doctor. NOTE: To obtain the greatest accuracy from your blood pressure instrument, it is recommended that the instrument be used within a temperature range of 50°F (10°C) to 104°F (40°C), with a relative humidity range of 15-90% (non-condensing). 3. Important information on blood pressure and its measurement 3.1. How does high/low blood pressure arise? Your level of blood pressure is determined in a part of the brain called the circulatory center.
Further information • If your values are mostly standard under resting conditions but exceptionally high under conditions of physical or psychological stress, it is possible that you are suffering from so-called “labile hypertension”. Please consult your doctor if you suspect that this might be the case. Warning: • Diastolic blood pressure values above 120mmHg require immediate medical treatment. 3.3. What can be done if regular high/low values are obtained? Please consult your doctor.
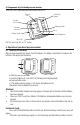
4. Components of your blood pressure monitor Your ADC® wrist type blood pressure monitor consists of: Time & Date Systolic Pressure Date/Time button 3-03 110 75 71 g mmH Diastolic Pressure Memory button M g mmH Battery Cover Pulse Start/Stop button P T/STO STAR Wrist Cuff Cuff fits wrist size 5½” to 7¾” inches. 5. Operation of your blood pressure monitor 5.1. Inserting the batteries After you have unpacked your device, insert the batteries.
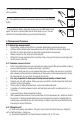
ensure correct placement. See + and - symbols inside battery compartment. Note: You must set the current time and date after inserting the batteries, and each time you remove the batteries. 5.2. Checking the current time/date/year setting Press and hold the Date/Time button. The date and time will be displayed. 5.3. Setting the time and date This blood pressure monitor has an integrated clock with date display. This allows you to store blood pressure values corresponding to time of day and date.
9) Press the DATE/TIME button again. The last two characters (minutes) now blink. 10) The exact time (minutes) can now be entered pressing the MEMORY button. M 11) Now after all settings have been made, press the TIME button once again. The input is now complete and the clock begins to run. You can check the time and date settings by pushing the time button. 6. Measurement Procedure 6.1. Before the measurement: • Avoid eating, smoking, and all forms of exertion before taking your blood pressure.
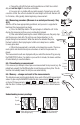
c) Secure the cuff with the hook and loop adhesive so that it lies comfortably and not too tight. It should be comfortable. d) Lay your arm on a table with your palm upwards. Support your arm with a cushion so that the cuff rests at about the same height as the heart. Remain still for 2 minutes, sitting quietly, before beginning a measurement. 6.4. Measuring procedure (Measure in a seated position only. Stay still.) After the cuff has been appropriately positioned, and your arm is supported at 0.5~1.
Clearing the Memory Press and hold the Memory button until a “CL” is displayed. Audible tone will signal when the memory has been cleared. Further information Repeating measurements without resting in between results in inaccurate readings. Wait several minutes in a relaxed position, sitting or lying, before you repeat a measurement. 7. Error messages/Troubleshooting If an error occurs during a measurement, the measurement is discontinued and a corresponding error code is displayed (Example: Err 2).
b) The cuff contains a sensitive air-tight bladder. Handle this carefully and avoid all types of straining through twisting or buckling. c) Clean the device with a soft, dry cloth. Do not use gasoline, thinners, or similar solvent. Spots on the cuff can be removed carefully with a damp cloth and soapsuds. The cuff must not be washed! d) Do not drop the instrument or treat it roughly in any way. Avoid strong vibrations. e) Never open the device! This will invalidate the manufacturers warranty! 9.
. Technical specifications: Weight: Size: Storage temperature: Operating humidity: Operation temperature: Display: Measuring method: Pressure sensor: Measuring range: SYS/DIA: Pulse: Cuff pressure display range: Memory: Measuring resolution: Accuracy: 4.8oz. (137g) (with batteries + cuff) 3.27” x 2.9” x 2.