
Clothes Dryer User Manual


24
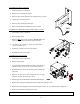
E. SAIL SWITCH ASSEMBLY
The sail switch is a heat circuit safety device, which controls the heat circuit only. When the dryer is operating
and there is proper airflow, the sail switch damper pulls in and closes the sail switch, providing
ALL the other
heat related circuits are functioning properly. If an improper airflow occurs, the sail switch damper will release,
and the circuit will open.
IMPORTANT: UNDER NO CIRCUMSTANCES should heat circuit safety devices ever be disabled.
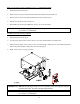
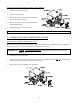
TO REPLACE SAIL SWITCH
1. Discontinue power to the dryer.
2. Remove the two (2) screws, which hold the sail switch to the bracket.
NOTE: Be careful not to drop or lose the twin speed nut on the backside of the sail switch.
3. Disconnect the two (2) connectors on the sail switch.
4. Reverse this procedure for installing new sail switch.
Adjust sail switch as described in the next section.
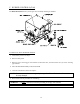
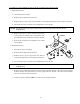
TO ADJUST SAIL SWITCH
1. Operate the installed dryer normally to verify that the
heat system is fully operational.
2. Open the main dryer door.
3. Manually depress the door switch actuator.
4. While continuing to depress the door switch actuator, and with the door open, start the dryer.
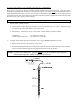
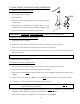
5. If the heat system is not activated in 15-seconds, the sail switch is properly adjusted.
6. If the heat system is activated, the sail switch is improperly adjusted and must be readjusted by bending the
actuator arm of the sail switch toward the left side of the dryer. If the actuator arm is bent too far toward
the left side of the dryer, the dryer may not have heat when needed. After any adjustments of the sail
switch, the above procedure must be repeated to verify proper operation.
CAUTION: DO NOT disable this switch by taping or screwing sail switch damper to burner.
Personal injury or fire could result.