GDV-870 High Definition DVD-Audio/Video Player User’s Manual
Congratulations on your purchase of the Adcom GDV-870 You have made a wise choice that will reward you with exceptionally accurate video and audio reproduction for years to come. To realize the full potential of your new DVD player, please read these operating and installation instructions thoroughly before attempting to make any connections to it. The GDV-870 is not only designed to reproduce the highest quality sound and picture but also to deliver the greatest possible value.
Chapter 1 - Welcome Introduction ………………………………………………… 5 Unpacking the GDV-870 ……………………………… 5 Key Features………………………………………………… 5 Placing the GDV-870 …………………………………… 6 About the Remote Control ………………………… 6 Front Panel Overview ………………………………… 7 Remote Control Overview …………………………… 8 Rear Panel Overview ……………………………………10 Chapter 2 - Connections Operations Overview ………………………………… 25 Basic DVD Playback ………………………………………26 Special Playback Features A to Z …………………27 Audio CD Playback ………………………………………29 MP3 Playback …………………
Important Safety Instructions • • • • • • • • Important Safety Instructions • • • • • • • Read all the safety and operating instructions before connecting or using this unit. Retain this notice and the owner’s manual for future reference. All warnings on the unit and in its operating instructions should be adhered to. All operating and use instructions should be followed. Do not use this unit near water.
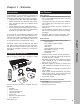
Chapter 1 - Welcome Introduction Congratulations on your decision to purchase the Adcom GDV-870 DVD player.
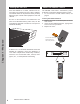
Placing the GDV-870 Place the GDV-870 on a stable, vibration-free surface away from moisture and out of direct sunlight. Your Adcom dealer will be pleased to show you many different types of audio/video equipment racks and cabinets. Be sure to leave sufficient room behind the rear panel to accommodate cables, power cords, etc. We recommend a minimum of 5 inches of free space for maximum flexibility.
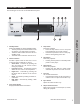
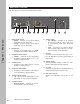
Front Panel Overview The following is an overview of the GDV-870 front panel. � � � � � � � ���� ���� ����� ������� ����� ��������������������������� ��������������� Standby button Powers the GDV-870 on and off (Standby mode). • The rear panel power switch must be in the on position (|) for this button to function. • The Power LED is amber when the unit is in Standby mode. • The Power LED is red when the unit is on.
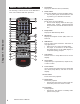
Remote Control Overview The following is a brief overview of the GDV-870 remote control buttons and their operations. power eject title menu 1 2 3 4 5 6 7 8 9 +10 0 1 Title button Displays the DVD title menu (if available). 2 Power button Powers the GDV-870 on and off (Standby mode). • The rear panel power switch must be in the on position (|) for this button to function. 3 Display button Brings up the On-Screen Display.
13 Skip Prev/Next buttons Skips to the previous or next chapter (or track) during disc playback. 14 Zoom button Zooms in during playback. 15 Program button Programs a customized chapter or track order. 16 Video Off button Turns off the video display during CD playback. 17 Audio button Selects among available audio tracks during DVD playback. 18 Volume +/- buttons Adjusts the player’s volume level. 26 Stop button Stops disc playback.
Rear Panel Overview The following is an overview of the GDV-870 rear panel. ���� ��������� ��������� ������� � �� �� ���� ����� �� ��� ������������� ��� �������� ����������������� ���� ���������������������� �������������� Chapter 1 - Welcome ������� 10 ���� � �� �� ����������� � �� �� 1 Digital audio output • Optical - Connects to the optical digital audio input of your AV preamp. • Coaxial - Connects to the coaxial digital audio input of your AV preamp.
Chapter 2 - Connections Connections Overview Adcom provides every conceivable connection to integrate the GDV-870 with your home theater system. We recommend that you choose the best video and audio options compatible with your particular display device and sound system. Video Connections • Composite video ...................................12 • S-Video ...............................................12 • Component video ..................................12 • Progressive Scan video ..........................
Composite/S-Video Connections Component/Progressive Scan Composite Video Connections Composite video is used in nearly all consumer video devices. We recommend using this output only when S-Video or Component Video inputs are not available. 1 Component/Progressive Scan Connections Component video is the best available analog connection method to an HDTV display. If your display supports Progressive Scan or HD analog, the picture quality is even more impressive.
HDMI Connections 2-Channel Audio Connections About HDMI HDMI, or High Definition Multimedia Interface, is an advanced audio/video connection method that transfers full-bandwidth digital audio and video signals over a single cable. Connecting Analog Audio Using the analog audio output allows the internal DSP and DACs to decode and convert the data from the disc to analog signals.
Digital Audio Connections 5.1-Channel Audio Connections Connecting Digital Audio The GDV-870 features two digital audio outputs—one coaxial and one optical—to send multi-channel Dolby Digital and DTS sound tracks from your DVD player to your AV preamp/surround sound processor. Chapter 2 - Connections 1 Connections for 5.1-Channel Audio Playback To enioy high-resolution, multi-channel audio playback, connect the six RCA jacks on the back of the GDV-870 to the 5.1 analog input on your preamp.
Control Connections Remote IR Sensor Connections Use the IR input jack to connect an external IR sensor to the GDV-870 if the unit is behind cabinet doors or otherwise not visible to the remote. Trigger Connections The 12V DC trigger provides a convenient way to power on your player in synch with the rest of your home theater system. • Use the trigger input with your preamp to turn the GDV-870 on and off automatically. • Use the trigger pass through to control an additional device in your system.
Power Connections Turning on the Power Setting this button to the on position (|) supplies power to the unit, enabling use of the Standby button on the front panel. When the main power switch is in the off position, current is cut off to the unit. When all connections are complete, you’re ready to check the voltage switch, plug in the power cable, and power on the GDV-870. 3 Checking the Voltage Switch Before plugging in the unit, make sure the voltage is set to your country’s voltage configuration.
Chapter 3 - Setup Setup Overview The following is an overview of the GDV-870 Setup Menu, including: • • • • • • Setup Menu navigation ...........................18 Language settings .................................19 Video settings...................................... 20 Audio settings...................................... 21 Rating settings ..................................... 23 Miscellaneous settings ............................
Setup Menu Navigation Use the following remote control buttons to navigate the Setup Menu. • Setup - Press the Setup button to display and exit the Setup Menu. • Arrows - Press the / buttons to move the highlight up and down the list of menu items. Press the / buttons to move the highlight left and right. • Select - Press the Select button to confirm your menu selections.
Language Settings To access the Language Settings menu: 1 Press the Setup button. 2 Use the / buttons to select Language, then press the button. 3 Use the / buttons to choose from the following menu items: OSD Language Sets the language for the GDV-870 Setup Menu and on-screen displays. • Use the / buttons to select English, Français, or Español.
Video Settings Language To access the Video Settings menu: 1 Press the Setup button. 2 Use the / buttons to select Video, then press the button. 3 Use the / buttons to choose from the following menu items: Aspect Ratio Sets the aspect ratio of the GDV-870 to match your display device. • Use the / buttons to select 4:3 or 16:9. - Select “4:3” if you are using a standard 4:3 display device. - Select “16:9” if you are using wide-screen 16:9 display device.
Audio Settings To access the Audio Settings menu: 1 Press the Setup button. 2 Use the / buttons to select Audio, then press the button. 3 Use the / buttons to choose from the following menu items: Bass Management Enables or disables bass management. Bass management automatically steers low-frequency signals to their optimal speaker depending on your speaker configuration settings. • Use the / buttons to select On or Off. Front Speakers Sets the relative size of your front speakers.
Audio Settings (cont.) Digital Audio Output Sets the audio signal from the coaxial and optical digital audio outputs. • Use the / buttons to select Off, PCM, or All. - Select “Off” if you are not using the digital audio outputs. - Select “PCM” (or Pulse Code Modulation) if the digital audio output is connected to a 2channel digital AV preamp. - Select “All” if the digital audio output is connected to an AV preamp with a Dolby Digital or DTS surround sound processor.
Rating Settings The GDV-870 includes a password-protected Parental Control feature that prevents playback of discs based on their MPAA ratings. Language Video Parental Control : 8. Adult Set Password Enter Password Audio To access the Rating Settings menu: 1 Press the Setup button. 2 Use the / buttons to select Rating, then press the button. 3 Use the / buttons to choose from the following menu items: Rating Misc Chapter 3 - Setup Parental Control Selects the desired rating level.
Miscellaneous Settings To access the Miscellaneous Settings menu: 1 Press the Setup button. 2 Use the / buttons to select Misc, then press the button. 3 Use the / buttons to choose from the following menu items: Use Default Settings Restores the GDV-870 to its original factory settings (except for the Parental Control password). • Select “Use Default Settings” and press Select. • When prompted with the confirmation message “Use Default Settings,” use the / buttons to select “Yes” and press Select.
Chapter 4 - Operations Operations Overview Now that you’ve connected and configured your GDV-870, it’s time for the fun part—enjoying the full power and performance of your Adcom DVD player. This chapter covers: • • • • • • • • Basic DVD Playback ............................... Special Playback Features A to Z ............... Audio CD Playback ................................ MP3 Playback ...................................... JPEG/Picture CD Playback ....................... Divx/MPEG4 Playback ............
Basic DVD Playback Follow these steps to play a DVD. Chapter 4 - Operations Playing a DVD 1 Before you begin: • Power on the GDV-870. • Power on your TV or display device. • Power on your AV preamp. • Select the input on your TV and/or AV preamp corresponding to the GDV-870. 2 Open the disc tray. • Press the Eject button on the remote control (or front panel) to open the disc tray. 3 Load your disc. • Insert the disc with the label side up. • Press the Eject button again to close the disc tray.
Special Playback Features A to Z angle menu Angle Press the Angle button repeatedly during DVD playback to view additional viewing angles (if available). A DVD can have up to nine selectable viewing angles. Menu Press the Menu button to return to the DVD disc menu. Disc menus often includes scene selection, set up options, and special bonus features. 1/3 aspect Audio Press the Audio button repeatedly during DVD playback to select alternative audio tracks (if available).
Special Playback Features A-Z (cont.) A-B Repeat (A-B) Loops playback between two points. Press the A-B button once to set point A. Press the A-B button a second time to set point B and begin loop playback. Press the A-B button a third time to cancel A-B Repeat. The clip should be at least 3 seconds. Rep A-B Chapter 4 - Operations rev f wd prev next slow Search Buttons Press repeatedly to search forward/backward at x2, x4, x8, and x16 normal speed. Press Play to resume normal playback.
JPEG/Picture CD Playback Audio CD Playback Basic Audio CD Playback 1 Load the Audio CD in the disc tray. • The disc will begin playback automatically. 2 Press the Prev and Next buttons to browse the CD tracks. 3 Press the Stop button to stop playback. 4 For additional playback options, see the figure below. MP3 Playback Elapsed time Playback status Current track/ Total tracks DivX/MPEG4 Playback DivX/MPEG4 Playback 1 Load the DivX/MPEG4 disc in the disc tray.
Program Playback 7 DVD/VCD Program Playback 1 Load a DVD or VCD. 2 Press the Program button to display the Program menu. 3 Highlight the desired title/chapter and press Select to add it to your program. • If you make a mistake, press Clear to delete the last programmed title. 4 Repeat Step 2 until you have added up to 16 titles to your program. 5 Move the cursor to Play and press Select to play your custom program. • To delete the program, move the cursor to Clear All and press Select.
Chapter 5 - Help Customer Support Use the Troubleshooting chart on page 32 to resolve common situations that don’t require professional attention. If the information provided does not resolve your problem, please contact your Adcom dealer or contact the Adcom customer service department as follows: Adcom, LLC 8541 E. Anderson Dr., Suite 101 Scottsdale, Arizona 85255 • Telephone: (480) 607-2277 • Fax: (480) 348-9876 • Email: service@adcom.com • Web: www.adcom.
Troubleshooting Chapter 5 - Help The table below shows possible causes and solutions to common GDV-870 issues. If you do not see the answers you need here, please contact your Adcom dealer or customer service department; see page 31. 32 Symptom Cause/Solution No power • Make sure the power cord is properly connected to the power outlet. • Make sure the main power is switched on. No playback • • • • • • Make sure the disc is loaded. Make sure the disc is loaded with the label side up.
Technical Specifications Compatibility Disc Types ............................. DVD/DVD±R/DVD±RW, CDDA, MP3/MPEG4, Picture CD, CD-R/RW Video Formats ........................ MPEG2/MPEG4 Audio Formats ........................ MPEG 1, Layer 1, Layer 2, Layer 3 Signal Output Color System .......................... PAL/NTSC/AUTO Audio System ........................ DIGITAL down mix stereo, DIGITAL digital output, Audio DAC 24bit/192kHz Video Output ......................... 1 Vp-p at 75 ohm Audio Output ....
Index A G S Angle 27 Aspect 27 Aspect Ratio 20 Audio 19, 27 Audio Cables 11 Audio Settings 21 Go To 27 C JPEG Playback 29 CD Playback 29 Center Delay 21 Center Speakers 21 Connections 2-Channel Audio 13 5.
Adcom shall not be liable for any errors contained herein or for any damages arising out of or related to this document or the information contained herein, even if Adcom has been advised of the possibility of such damages. This document is intended for informational and instructional purposes only. Adcom reserves the right to make changes in the specifications and other information contained in this document without prior notification.
8541 East Anderson Drive, Suite 101 Scottsdale, Arizona 85255 Voice: 480.607.2277 Fax: 480.348.9876 www.adcom.com GDV-870_manual_v1.