GTP-830 Digital Processing Tuner/Preamplifier Owner’s Manual
serial number: date purchased:
A NOTE FROM ADCOM Thank you and congratulations on your purchase of the ADCOM GTP-830 Digital Processing Tuner/ Preamplifier. The GTP-830 provides Dolby Digital and DTS decoding with 7.1 output channels, as well as a 5.1 analog bypass and the RDS radio data system. These features and ADCOM’s legendary quality provide the heart of your cutting-edge home theater. ADCOM PROTECTION PLAN (USA ONLY) ADCOM offers the enclosed valuable Limited Warranty.
IMPORTANT SAFETY INSTRUCTIONS WARNING: To reduce the risk of fire or electric shock, do not expose this appliance to rain or moisture. ATTENTION: Pour eviter tout risque de feu ou choc electrique, ` ` ne pas exposer cet appareil a` la pluie ou a` l'humidite.` AVIS: Risque de choc electriquene pas ouvrir. ` CAUTION RISK OF ELECTRIC SHOCK DO NOT OPEN Warning: To reduce the risk of fire or electric shock, do not expose this unit to rain or moisture.
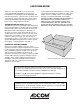
SAFETY NOTIFICATION PAGE power lines ground clamp service entrance conductors standoff insulators, b mast service entrance equipment antenna lead-in wire ground wire, a,b ground clamps antenna discharge unit, c to external antenna terminals of radio receiver power service grounding electrode system (e.g. interior metal water pipe) ground wire, a,b bonding jumper, d ground clamps optional antenna grounding electrode driven 8 feet (2.44 M) into the earth if required by local codes.
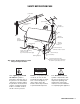
GTP-830 CHECKLIST ✔ ✔ ✔ ✔ ✔ ✔ GTP-830 Tuner/Preamp ADCOM Power Cord 6 | ADCOM OWNER’S MANUAL GTP-830 Remote Control with Batteries Video 5 input cover GTP-830 Owners Manual and Warranty FM Antenna/Balun Adapter
TABLE OF CONTENTS A Note from ADCOM 3 The ADCOM Protection Plan 3 Unpacking your GTP-830 3 Safety Information 4-5 GTP-830 Checklist 6 1.0 Product Features 8 1.1 Front Panel Controls 9 1.2 Rear Panel Inputs & Outputs - System Connections 14 1.3 The Remote Control 20 2.0 Installing/Connecting the GTP-830 29 2.1 Physical Placement 29 2.2 Connecting Source Components to the GTP-830 29 3.0 Initial Setup 30 3.1 The On Screen Display 30 3.2 Channel Balance 30 3.
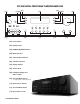
GTP-830 DIGITAL PROCESSING TUNER/PREAMPLIFIER [01] [04] [03] D I G I T A [02] L [05] [06] [07] display up FM mute/high blend tune/preset memory down [08] [05] volume G T P - 8 3 0 phones video L audio R CD tape monitor ext 5.
PRODUCT FEATURES 1.1 Front Panel Controls The GTP-830’s front panel is a model of simplicity. All controls are logically grouped for easy, intuitive [02] Display button: The GTP-830 supports RDS PS and RDS RT. With stations carrying RDS information, “RDS” will light up in the display panel, and the station’s RDS name is automatically displayed (RDS PS). operation. Familiarize yourself with the preceding diagram and read the short explanations of each feature below.
GTP-830 DIGITAL PROCESSING TUNER/PREAMPLIFIER [03] FM Mute/High Blend button: This button combines two functions; it switches the tuner from Stereo to Mono and disengages the muting circuitry at the same time. The muting circuit will mute the tuner in between radio stations when searching or tuning to avoid tuning noise. However, very weak radio station signals may be suppressed by the muting circuit. If such a very weak station is in stereo it will have a high level of background hiss.
PRODUCT FEATURES reasonably strong radio station, where it will stop. Press the Down/Up button again for 1/2 second to start searching again. NOTE: Automatic tuning is available on both FM and AM. By briefly tapping the Down or Up buttons you can engage manual tuning respectively down or up the frequency band for precise tuning to a specific frequency. With each successive tap of the keys, the tuner will take 0.05 MHz steps on FM so you can accurately tune into the desired frequency.
GTP-830 DIGITAL PROCESSING TUNER/PREAMPLIFIER [11] Input Selector buttons: These buttons select the active video and audio input for the GTP-830 and the audio signal sent to the Preamp Outputs, Tape, Aux Outputs, Video 3 & 4 and TV monitor outputs. Video inputs 1, 2 and 3 also select the Digital Inputs 1, 2 and 3, respectively. Video 1: Video 1 selects the signal from a TV/Satellite/Cable receiver or DVD player connected to Video 1 as the active input.
PRODUCT FEATURES play area and is also shown for 3 seconds in the large text section of the display. The Surround Mode button scrolls through the available surround sound modes when pressed repeatedly. The surround modes are: total: Left, Center, Right, Surround Left, Surround Right and an “Effects Channel” (Subwoofer). With either Dolby Digital 5.1 or DTS digital input, the Stereo, Dolby Pro Logic and Hall surround modes cannot be selected. Stereo: The Stereo mode provides straight two channel listening.
GTP-830 DIGITAL PROCESSING TUNER/PREAMPLIFIER [14] [15] [16] preamp outputs R L antenna [17] aux-out R [23] monitor out L video s-video WARNING: To reduce the risk of fire or electric shock, do not expose this appliance to rain or moisture. front AM ATTENTION: Pour eviter tout risque de feu ou choc electrique, ` ` R audio L rear ne pas exposer cet appareil a` la pluie ou a` l'humidite.` FM center Manufactured under license from Digital Theater Systems, Inc. US Pat.
PRODUCT FEATURES 1.2 Rear Panel Inputs & Outputs System Connections Like the front panel, the GTP-830’s rear panel is carefully arranged to make hookup, configuration, and use as simple as possible. However, the GTP-830’s extraordinary capabilities take some study to use most effectively. We strongly suggest [14] Antenna connections: AM Antenna: An AM loop antenna is supplied with the GTP-830 and is required for AM reception. Open the clip terminal lever and insert the wire from the antenna.
GTP-830 DIGITAL PROCESSING TUNER/PREAMPLIFIER [15] Preamp outputs: rear back surround front Before making any connections, check that the GTP-830 and the power amplifiers it will be connected to are switched off. Connect the RCA-to-RCA leads from the Front Left and Right, Center, Surround Rear Left and Right, and preamp outputs Surround Back Left and Right L R Preamp Outputs to your external amplifiers.
PRODUCT FEATURES Video 1 & Video 2 (Audio): Inputs for the audio playback and video signal from a video device such as a stereo TV, DVD player, satellite cable TV receiver or a Laser Disc. Using twin RCA-to-RCA leads, connect to the left and right ‘Audio Out’ of the video device to these inputs. Using a single RCA-to-RCA lead (Video Composite) or S-Video lead, also connect the video output of the video device. Video 1 & Video 2 can be used for video playback only.
GTP-830 DIGITAL PROCESSING TUNER/PREAMPLIFIER [23] AC power cord: After you have completed all connections to the amplifier, plug the AC line cord into a “live” wall socket. [24] 12v DC Trigger: To facilitate remote turn-on and turn-off of other components (power amplifiers, for example), this 2.5mm mini-jack provides a constant signal (12 volts DC) whenever the GTP-830 is fully powered.
PRODUCT FEATURES ADCOM OWNER’S MANUAL | 19
GTP-830 DIGITAL PROCESSING TUNER/PREAMPLIFIER [24] Source selectors [25] Power button [26] Input selectors G T P - 8 3 0 [27] Mute button [51] main vid 1 vid 2 vid 3 vid 4 vid 5 tuner CD [28] d. range (dynamic range) button [24] [25] power ext5.1 stop [29] [31] Play button [32] Pause button mode setup [28] [33] Stop button [30] [34] Arrow buttons [35] [35] Select button select [34] [32] [30] Mode button d.
PRODUCT FEATURES 1.3 The Remote Control to reenter the main remote page. The dim button will now again change the GTP-830 display. The GTP-830 remote control is a learning remote The button description that follows distinguishes the function of each button dependent on the page the remote is in. The remote is shipped from the factory with ADCOM commands saved under the main, tuner, and CD pages, and with important GTP-830 functions such as volume saved under each page.
GTP-830 DIGITAL PROCESSING TUNER/PREAMPLIFIER [27] Mute button: In all modes, this button is preprogrammed to mute outputs of device. Mute does not affect recordings made using the Tape outputs but will affect the signal going to the Preamp Outputs. When the unit is in mute mode, any adjustment of the Volume Control on the front panel [08] will release the muting, i.e. the original volume level will be resumed. [28] d.
PRODUCT FEATURES [37] Test button: [43] Pre/Tune button: Pressing the test button engages the test signal generator to allow for adjustment of all speaker levels, so that each channel can be adjusted for equal loudness at your listening position. The test signal cycles automatically with 3-second intervals from Front Left, Center, Front Right, Rear Right, Back Right, Back Left, Rear Left, to Subwoofer in continuous cycles.
GTP-830 DIGITAL PROCESSING TUNER/PREAMPLIFIER NOTES: Direct sunlight or very bright ambient lighting may affect the operating range and angle for the remote control handset. The infrared remote control command receiver, located to the right of the Power button, receives commands from the remote control. There must be a clear line-of-sight path from the remote control to this window; if that path is obstructed, the remote control may not work.
PRODUCT FEATURES Remote Function Table BUTTON FUNCTION Main CD Tuner All Others PAUSE Not programmable Pause CD Programmable Programmable PLAY Not programmable Play CD Programmable Programmable SETUP/UP Not programmable Programmable Programmable Programmable RIGHT OSD Right Select Skip Ahead Programmable Programmable DOWN OSD Scroll Down Programmable Programmable Programmable LEFT OSD Left Select Skip Back Programmable Programmable SELECT OSD “Enter” Select Programmable
GTP-830 DIGITAL PROCESSING TUNER/PREAMPLIFIER Programming your ADCOM GTP-830 Remote Controller The ADCOM universal remote controller operates eight different audio/video components. As you’ve already seen, it’s preprogrammed to control ADCOM’s GTP-830 Preamp/Tuner and the GCD-700/750 NOTE: You can program new commands over the preprogrammed commands in tuner and CD if you wish. However, you cannot program any buttons, even those unprogrammed with GTP-830 command codes, while you’re in main mode.
PRODUCT FEATURES 5. Verify that the ADCOM remote has learned the new command by pressing and holding the same button on the source remote. The ADCOM remote’s status LED should flash green twice and then go back to steady orange. This indicates successful programming. Release the button on the source remote. Repeat Steps 3 through 5 for any other commands you want to teach your ADCOM remote for that source component.
GTP-830 DIGITAL PROCESSING TUNER/PREAMPLIFIER For example, if the m1 button is programmed in Group 1 mode to turn on the TV, turn on the audio receiver, turn on the VCR, and then turn on the satellite receiver, it will perform the same series of commands whenever the m1 button is pressed IF main, vid 1, vid 2, or vid 3 sources are selected at the time you select that macro.
INSTALLING/CONNECTING THE GTP-830 2.1 Placement Your system components need a stable, vibrationfree supporting surface. Your ADCOM dealer will be pleased to show you many different types of audio/video equipment racks and cabinets. Keep the GTP-830 (and other audio/video components) away from moisture and out of direct sunlight. Bear in mind that the GTP-830’s rear panel is the central connecting point for almost every component in your audio/video system.
GTP-830 DIGITAL PROCESSING TUNER/PREAMPLIFIER What this section is all about . . . After connecting your home theater, you may elect to configure the GTP-830 to the specific speaker arrangement and dimensions of your system. The procedures described in this section demonstrate how to use the GTP-830’s on screen display to enter this information. Once complete, the GTP-830 stores this information so that these tasks need only be repeated if speakers are changed or substantially repositioned. 3.
INITIAL SETUP 0dB and to match the other channels to it. Normally, if the Right speaker is located at the same distance from the listening position to the Left speaker it should be set at the same level as the Left speaker. Press the Test button again to leave or cancel the Test mode; any changes will be memorized automatically. NOTE: There is no output in the Subwoofer during noise sequencer operation; therefore it is difficult to adjust the level in test mode.
GTP-830 DIGITAL PROCESSING TUNER/PREAMPLIFIER Scroll through the preset delay time options and select the desired time. When both delays have been entered, choose “SAVE & EXIT” to save the settings and return to the Main Menu. In Dolby Digital surround mode, the rear channel delay time can be set from 0ms to 15ms with 1ms increments. The center channel can also be delayed up to 5ms, in 1ms steps. In Dolby Pro Logic surround mode, the rear channel delay time can be set from 15ms to 30ms and 1ms per step.
INITIAL SETUP Installing surround speakers will greatly enhance the surround experience as these add considerably to the overall “ambiance.” Dolby Pro Logic encoded material is deliberately limited in dynamic range and frequency bandwidth for the surround channel and thus only requires speakers of far lesser capabilities compared to the front channels. Dolby Digital, however, is a full range system with two independent surround channels and with dynamics equal to that of the front channels.
GTP-830 DIGITAL PROCESSING TUNER/PREAMPLIFIER 3.5 Surround Speaker Placement surround rear left front left center front right This speaker setting is preferred if you are not using surround backs. surround rear right surround rear left front left surround back left center This is the preferred speaker setting if you are using surround backs.
INITIAL SETUP surround rear left 2-3 ft. Note: If space permits, install surrounds 2-3 feet above viewers.This helps to minimize localization effects. 3.6 Input Settings Input Settings shows information about the current state of operation of the GTP-830, and repeats much of the same information shown on the GTP830’s front panel.
GTP-830 DIGITAL PROCESSING TUNER/PREAMPLIFIER Troubleshooting Tip Your GTP-830’s circuitry is built around advanced microprocessors. The GTP-830 may exhibit occasional anomalies arising from AC line surges, etc. If you experience unexpected behavior, or if the GTP-830 “locks up” and does not respond to control input, reset it by turning the front power switch off. (Do not use the remote control’s “power” button.) Wait 10 seconds and then turn the GTP-830 on.
TROUBLESHOOTING PROBLEM CAUSE SOLUTION No sound • Power AC lead unplugged or power not switched on • Tape Monitor selected • Mute on • Check if AC lead is plugged in and power switched on • De-select Tape Monitor mode • Switch off Mute No sound on one channel • Speaker not properly connected or damaged.
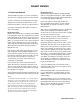
CARE, MAINTENANCE, AND SERVICE CARING 5.0 Care, Maintenance, and Service Caring for your GTP-830 ADCOM has taken great care to ensure your GTP830 is as flawless in appearance as it is electronically. The front panel is a heavy gauge, high-grade aluminum extrusion carefully finished and anodized for durability. The chassis, top cover, and rear panels are powder-coated heavy gauge steel that have been baked to ensure a lasting, durable finish.
SPECIFICATIONS Preamplifier Section Input Impedance Audio Video 50k Ohms 75 Ohms Output Impedance Audio Video 320 Ohms 75 Ohms Frequency Response 20Hz to 20kHz ± 0.5dB THD+N@ Rated Output 20Hz to 20kHz ≤ 0.01% IM Distortion CCIF @ 15kHz and 16kHz ≤ 0.009% Signal to Noise Ratio (@ 1kHz “A” weighted) Ref. to 1V input, max output voltage > 95dB Sensitivity 1 volt output 220mV Subwoofer Crossover Frequency 100Hz Crosstalk (@ 1kHz) >80dB Maximum Output Voltage 4.
10 Timber Lane Marlboro, NJ 07746 tel: 732.683.2356 fax: 732.683.9790 www.adcom.com © 2001 by ADCOM All rights reserved. GTP-830_v5.