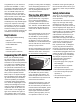
GTP-860 II Digital Processing Tuner/Preamplifier G T P - 8 6 0 II volume PROLOGIC II phones video L audio R tape monitor ext 5.
ABOUT ADCOM PERFORMANCE AND VALUE In the world of high performance electronics, Adcom has done the impossible: make state-ofthe-art components that are easy to use at an affordable price. In doing this, Adcom has created a revolution in the world of consumer electronics. By creating some of the most renowned components and offering them at affordable prices, Adcom has enabled more people to enjoy their favorite music and movies at top performance levels.
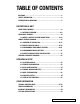
TABLE OF CONTENTS WELCOME .................................................................... 2 SAFETY INFORMATION ...................................................... 4 INTRODUCTION & UNPACKING ............................................. 5 DESCRIPTION OF UNIT FRONT PANEL DRAWING .................................................... 6 1.1 INTERFACE OVERVIEW ............................................ 6-9 REAR PANEL DRAWING .................................................... 10 1.
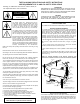
N OCK THE FOLLOWING PRECAUTIONS AND SAFETY INSTRUCTIONS ARE REQUIREMENTS OF UL AND CSA SAFETY REGULATIONS Warning: To reduce the risk of fire or electric shock, do not expose this unit to rain or moisture.
Congratulations on your decision to purchase the GTP-860II 7.1 tuner/ preamplifier. Multichannel audio and home theater are better than ever. Your new ADCOM component was designed to deliver all the impact of your favorite action flick and the subtle harmonic texture that makes high resolution audio amazing. Audition the GTP-860II paired with an ADCOM power amp and DVD player and you will experience what high performance is all about.
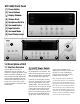
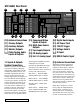
GTP-860II Front Panel [1] [2] [3] [4] [5] [6] [7] [8] [9] Power Button Tuner Buttons Display Window Volume Knob Headphone/Vid 5 In Surround Backs Input Selector Surround Mode Bass/Treble Knobs 3 2 2 1 5 4 6 7 8 9 1.0 Description of Unit 1.1 Interface Overview The GTP-860II’s front panel is designed for ease of operation. All controls are logically grouped for easy, intuitive operation. Familiarize yourself with the preceding diagram and read the short explanations of each feature below.
[2] Digital Tuner Controls from the front panel or remote. Stations can also be tuned manually. and FM frequency bands. NOTE: Tuner reception cannot take place unless an appropriate AM and/or FM antenna is connected to the rear panel of the GTP-860II. FM/AM Button: Toggles between AM FM Mode Button: Sets the FM tuner to mono mode. The letter “M” appears next to the tuner preset number in the front panel display. Pressing the button again returns the FM tuner to stereo mode.
[3] Display Window The display area shows all vital information when the unit is operational. [4] Volume Knob The Volume control adjusts the overall loudness of the signals being fed to the preamplifier outputs. Unlike conventional controls, the GTP860II’s volume control doesn’t have a start or end position. Volume can also be adjusted from the remote control using the Master Volume Up or Down buttons [31].
function enables you to check on a recording that you are making without affecting the recording process. When Tape Monitor is selected, the button will remain lit until Tape Monitor is disengaged again. This function is only active when a stereo analog source is selected. [8] Surround Mode With the Surround Mode button the available surround sound modes can be selected. The selected surround mode is permanently indicated in the display area on the right side of the top line of the display.
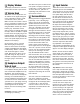
GTP-860II Rear Panel 16 10 17 18 11 12 19 13 14 15 24 25 22 21 20 23 [10] Antenna Connections [11] Preamp Outputs [12] Auxiliary Outputs [13] Monitor Outputs [14] Video/Analog Audio Inputs & Outputs [15] Component Video Inputs & Output [16] Multi-Zone Source Outputs [17] Tape Inputs/Outputs [18] CD Analog Inputs [19] Ext. 5.1 Analog Input [20] Digital Audio Inputs [21] AC Power Cord [22] 12V DC Trigger [23] Voltage Switch [24] IR Input [25] RS232 Control Input 1.
FM Antenna: A ribbon wire FM antenna is included and should be connected to the FM connector at the rear of the unit using the ‘balun’ adapter supplied. The ribbon aerial should be mounted on a vertical surface and placed so that it forms a ‘T’. Experiment with placement of the antenna to find the position that gives the best signal strength and lowest background noise. An inadequate FM signal normally results in high levels of hiss, especially in stereo, and interference from external electrical sources.
[16] Multi-Zone Source Outputs These output jacks provide a duplicate of the analog audio signal that are connected to Video 1-4, CD and Tape inputs. They are designed to allow the user to interface the sources connected to the GTP-860II with an external stereo receiver or tuner/ preamplifier to facilitate multi-zone operation.
Connecting a Multi-Zone Source The drawing above illustrates the proper hook-up to provide audio to multiple zones using a signal source with the GTP-860II. As illustrated above we use a GTP-506 and GFA6006 to distribute the audio source, an ADCOM GCD-750 CD player. Referenced from page 12, [16]. right left digital input 75 ohm audio outputs serial number please visit www.adcom.
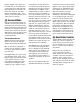
2.0 GRC-800 Remote Control [26] Source selectors [27] Power button [28] Input selectors [29] Mute button [30] d. range [dynamic range] [31] Volume Up/Down buttons 53 26 27 28 35 main vid 1 vid 2 vid 3 vid 4 vid 5 tuner CD power tape 38 ext5.1 d.
2.1 GRC-800 Overview The GRC-800 remote control is a learning remote control that is capable of saving commands for all remote controls in your home theater system. In this way, you may eliminate the confusion of using multiple remotes. Although such power comes with some added complexity, the complexity is minimal and with some repetition will become second nature.
explosions might wake sleeping family members. Simply turning the volume control down would probably make a whisper in the next scene inaudible. The d. range button solves this dilemma by progressively lowering the volume of loud peaks while increasing the level of softer sounds. [31] Volume Up/Down while a menu item is highlighted. In CD mode, it is pre programmed for audible reverse scan with an ADCOM CD player.
These buttons are programmable for use with any source. automatically switch off after a preset number of minutes. Pressing the sleep button once will set the sleep time to 90 minutes, after which the GTP-860II will automatically switch off into Standby mode. Sleep mode is shown on the Display Panel. To adjust the Sleep Delay, press the sleep button, each consecutive press will reduce the sleep time in 30-minute increments, as shown in the Display Panel.
2.2 Remote Function Table This table supplements the information you’ve just read. Use it to quickly review button functions. The controller’s capabilities are extensive and may be somewhat intimidating at first.
BUTTONS Main CD Tuner All Others LEFT OSD Left Select Skip Back Programmable Programmable SELECT OSD “Enter” Select Programmable Programmable Programmable 1 Not programmable Track 1 Preset 1 Programmable 2 Not programmable Track 2 Preset 2 Programmable 3 Not programmable Track 3 Preset 3 Programmable 4 Not programmable Track 4 Preset 4 Programmable 5 Not programmable Track 5 Preset 5 Programmable 6 Not programmable Track 6 Preset 6 Programmable 7 Not programmabl
2.3 Programming Your ADCOM GRC-800 Remote The ADCOM universal remote controller operates eight different audio/ video components. As you’ve already seen, it’s pre programmed to control ADCOM’s GTP-860II Preamp/Tuner and the GCD-700/750 CD players. In addition, it has seven “component memory banks” available so you can program the remote to learn commands for your DVD player, satellite box, laser disc player, VCR, etc. This lets you use one remote controller for your entire system.
4. Exit “delete mode” by pressing and holding the source selector and select buttons simultaneously. The orange status LED and the source selector button will turn off. Deleting All The Programmed Commands for One Source Component 1. Press the ADCOM remote’s source selector and select buttons simultaneously and hold until the orange Status LED and the source selector button turn on and remain lit. 2. Press and hold down the backlight button.
Function and Data list for GTP-860II (ADCOM) Discrete (Direct Access) Custom Code for Installers 1AE8h: Custom Code(B) Custom Code(B): 0101 1000 0001 0111 LSB on left Code:NEC Function Data(B) D Function Data(B) D MAIN POWER ON MAIN POWER OFF DOLBY PRO LOGIC SYMPHONY HALL 2 CHANNEL STEREO 5 CHANNEL STEREO DOLBY PL II CINEMA DOLBY PL II MUSIC DOLBY PL II PANORAM 0010 1010 1010 1010 0111 0000 1111 0000 1111 0010 0111 0010 0011 1010 1011 1010 0111 1010 84 85 14 15 79 78 92 93 94 Surround Backs ON Sur
Suggested Speaker Locations surround rear left front left surround back left surround rear left center surround back right center front right surround back right front right surround rear right surround rear right This is the preferred speaker setting if you are using surround backs. front left surround back left This speaker setting is preferred if you are using dipoles for your surround rears. surround rear left surround rear left front left 2-3 ft.
RETURN TO SETUP 3.0 Operation & Setup After connecting your home theater, you may elect to configure the GTP860II to the specific speaker arrangement and dimensions of your system. The procedures described in this section demonstrate how to use the GTP860II’s on-screen display to enter this information. Once complete, the GTP-860II stores this information so that these tasks need only be repeated if speakers are changed or substantially repositioned.
EXT 5.1: OFF CHANNEL DOLBY TEST D MODE: PROLOGIC II SETUP EXITTO WITH SAVE RETURN SETUP EXIT WITHOUT SAVE 3.3 Delay Config DELAY CONFIG CHANNEL BALANCE FRONT L/R DIS: 10ft CENTER DIS: LEFT: 0dB8ft SURROUND DIS: 3dB5ft CENTER: DELAY UNIT: FEET RIGHT: 0dB REAR R : 0dB BACK R : 0dB RETURN BACK L : TO SETUP 0dB REAR L : 0dB SUB: 0dB RETURN TO SETUP For the best surround sound performance it is important that sound from all speakers SPEAKER CONFIG reach the listener’s ears at the same time.
The mode option sets the default surround mode to be used with each source. The options are DOLBY DIGITAL, DTS, PRO LOGIC II-C/M/P, HALL, STEREO, and 5 CH STEREO. The available choices in each of the fields can be selected with the left or right arrow buttons on the remote; confirm the choice with the select button. 3.6 ProLogic II Setup Dolby ProLogic II is a surround mode that can be used to generate surround sound from stereo program material.
SYMPTOM POSSIBLE REASON POSSIBLE SOLUTION No sound • Power AC lead unplugged or power not switched on • Tape Monitor selected • Mute on • Power Amplifier not on • Check if AC lead is plugged in and power switched on • De-select Tape Monitor mode • Switch off Mute • Turn on the Power Amplifier No sound on one channel • Speaker not properly connected or damaged.
Troubleshooting Use the troubleshooting notes above to solve common situations that don’t require professional attention. If the steps stated in possible solution do not resolve your problem, then please contact your ADCOM dealer or call the ADCOM customer service department. Any problems not covered here should be brought to the attention of your ADCOM dealer or ADCOM customer service department.
Please address mail inquires to: ADCOM Service 8541 East Anderson Drive Scottsdale, Arizona 85255 USA Phone, Fax or Email inquires to: Voice: (480) 607-2277 or Fax: (480) 348-9876 Monday through Friday, 8:00 AM to 4:00 PM MST Email: service@adcom.com For fax inquires, please include a return fax number for the reply. When calling or writing about your ADCOM product, be sure to note and refer to its serial number as well as the date of purchase and the dealer from whom it was purchased.
| ADCOM GTP-860 II Owner’s Manual
GTP-860II Specifications Input Impedance Audio . . . . . . . . . . . . . . . . . . . . . . . . . . . . . . . . . . . . . . . . . . . . . . . . . . . . . . . . . . . . . . . . . . . . . . . . . . . . . . . . 50k Ω Video . . . . . . . . . . . . . . . . . . . . . . . . . . . . . . . . . . . . . . . . . . . . . . . . . . . . . . . . . . . . . . . . . . . . . . . . . . . . . . . . . 75 Ω Output Impedance Audio . . . . . . . . . . . . . . . . . . . . . . . . . . . . . . . . . . . . . . . . . . . . . . . . . . . .
ADCOM A division of Klein Technology Group, LLC 8541 East Anderson Drive Scottsdale, Arizona 85255 Voice: (480) 607-2277 Fax: (480) 348-9876 http://www.adcom.