U S E SMARTView & I www.addertec.
About this manual SmartView - Installation and Use Sixth edition (April 1999) Part No. ADD0026/6 (c) 1999 Adder Technology Ltd. All rights reserved. Whilst every precaution has been taken in the preparation of this manual, Adder Technology Ltd assumes no responsibility for errors or omissions. Neither is any liability assumed for damages resulting from the use of the information contained herein. We reserve the right to change the specifications, functions and circuitry of the product without notice.
Radio Frequency Energy Shielded cables must be used with this equipment to maintain compliance with radio frequency energy emission regulations and ensure a suitably high level of immunity to electromagnetic disturbances. European EMC directive 89/336/EEC This equipment has been tested and found to comply with the limits for a class B computing device in accordance with the specifications in FCC Compliance Statement (United States) the European standard EN55022.
Contents 1. Introduction..................................................................................... 5 1.1 Key features ........................................................................................... 5 1.2 Package contents................................................................................... 6 1.3 Product information ............................................................................... 6 2. Installation............................................................
4. SmartView configuration options ................................................. 21 4.1 Screen saver time delay ........................................................................ 21 4.2 Display options ...................................................................................... 21 4.3 Autoscan lock on mode and delay time ................................................ 22 4.4 Mouse mode and mouse switching of channels .................................... 23 4.
1. Introduction Thank you for purchasing the Adder SmartView. Your SmartView is a high performance keyboard, monitor and mouse sharing device which supports a wide range of PC hardware and software platforms. 1.1 Key features Control multiple PCs from a single keyboard, monitor and mouse. SmartBoot feature automatically boots all machines during power up. Mixed AT/PS2 keyboards and PS2/RS232 mice supported as standard. Can be cascaded without limitation to provide a video switching network.
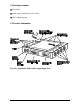
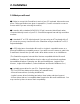
1.2 Package contents SmartView. Power supply suitable for your country. This installation guide. 1.3 Product information Fig. 1(a).
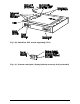
Fig. 1 (b). SmartView (SV2 version supporting 2 PCs) Fig.
2. Installation 2.1 What you will need Cables to connect the SmartView to each of your PC keyboard, video and mouse ports. Cable specifications are given in appendix A. (You do not need to connect a mouse cable if you are not using the mouse). A monitor with a standard VGA/SVGA (15 pin) connector that will work when connected directly to each of your PCs. SmartView supports low and high resolution monitors. A standard AT or PS/2 style keyboard.
Use of PS/2 and RS232 style mice with the SmartView - All of the mouse connections from SmartView to PCs support either a PS/2 or an RS232 mouse. SmartView automatically converts from the PS/2 mouse commands to RS232 serial mouse commands. Serial mice types are selected by using an adapter as described in Appendix A. This adapter is the same as is shipped with Microsoft® auto-sensing mice. The SmartView will operate without a mouse connected if you do not wish to use one. 2.
the monitor and each of the computers in turn. Failure to switch the SmartView and computers on in the correct order can lead to the mouse and/or keyboard not being recognised by the computers when they are switched on. 2.
In configure mode, options are entered by typing a letter followed by a number followed by (enter). Use ESC to abort the entry of an option. The SmartView will remain in configure mode until you type 'E' (enter). For example: to set hotkey option 2 type the following at the 'C' prompt (at SmartView 'C' prompt) To exit configure mode type: H2e Ee 2.6 Summary of SmartView configuration options Full details of each of the configuration options and their uses are given in section 4.
T1 - 2 seconds autoscan delay time before switching to next port (default) T2 - 5 seconds autoscan delay time before switching to next port T3 - 7 seconds autoscan delay time before switching to next port T4 - 10 seconds autoscan delay time before switching to next port T5 - 15 seconds autoscan delay time before switching to next port T6 - 20 seconds autoscan delay time before switching to next port T7 - 30 seconds autoscan delay time before switching to next port T8 - 60 seconds autoscan delay time before
P - Sets password - see section 4.7 for instructions. E - Exits configure mode and returns the SmartView to normal operation mode. 2.7 Other useful installation information PC boot up sequence - When your PCs are powered on they communicate with any attached keyboards and mice and setup parameters required by the particular operating system.
With the PS/2 mouse disconnected, change the channel using the keypad or keyboard hotkeys. The SmartView detects that the mouse has been disconnected and triggers the automatic recovery system. Plug in the PS/2 mouse and the SmartView will re-initialise it. 2.9 Hot plugging the SmartView into running systems and reenabling disconnected CPU PS/2 mouse connections It is adviseable to switch off the systems that are going to be connected to the SmartView before installation.
Type of mouse / system Connected at bootup Driver type Likely expected data format Suggested restoration PS/2 PS/2 IntelliMouse / SmartView IntelliMouse / SmartView PS/2 only IntelliMouse PS/2 only IntelliMouse PS/2 PS/2 PS/2 IntelliMouse F5 F5 F5 F6 To restore lost mouse movement on a CPU connected to the SmartView: 1) Select the CPU that has lost its mouse movement 2) Press the select key on the front of the SmartView for 5 seconds until ‘C’ is displayed. You are now in configure mode.
3. Using the SmartView This section explains the general operation of the SmartView. We recommend that you read this section before starting to use the product. 3.1 Power on status At power on the SmartView selects PC number 1 and displays '1'. If a password has been set then ‘P’ will be displayed and the SmartView will remain locked until a valid password is entered. 3.
3.4 Keyboard hotkey control SmartView can be conveniently controlled by selecting channel, autoscan mode or security locking from the keyboard. All of the hotkey control commands are invoked by holding down the two hotkeys and then pressing a command key. By default, the two hotkeys are ‘CTRL’ and ‘ALT’, although other combinations can be selected by reconfiguring the hotkeys (see section 4.5).
channels (see section 4.9) then only the active channels will be selected. Otherwise the SmartView will cycle through all channels when using HOTKEYs + TAB.
To 'tab through' channels: press ba v release v press v release v press v release vba 3.5 Mouse control The channels can conveniently be changed on ADDERview by using a three button mouse. In order to switch to the next channel simply hold down the central mouse button (the wheel mouse button on an IntelliMouse) and click on the left hand mouse button. The channel will then change. If the SmartView has been set to scan active ports then the next active channel will be selected.
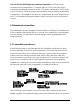
data booster and can each be up to 30 metres away from the next SmartView. The channel can be selected on remote SmartView units using an extension of the HOTKEY control function. For example, consider a situation where two SmartView 4 port units are connected together as shown below. To connect to the computer attached to port 3 on SmartView B the user would hold down the hotkey keys then press ‘2’ followed by ‘3’, whilst keeping the hotkey keys pressed.
4. SmartView configuration options All the options described in this section are entered in SmartView configure mode see section 2.5 for instructions on entering configure mode. 4.1 Screen saver time delay SmartView contains a programmable screen saver which will blank the display after the set time delay with no keyboard or mouse activity. Simply typing at the keyboard or moving the mouse will re-enable the display. The display will flash whilst the SmartView is in screen save mode.
D1 - Display dot flashes to indicate activity, right handed auxiliary display (default) D2 - Display dot does not flash, right handed auxiliary display D3 - Display dot flashes to indicate activity, left handed auxiliary display D4 - Display dot does not flash, left handed auxiliary display D5 - Display dot flashes, auxiliary display port configured for monitor light module D6 - Display dot does not flash, auxiliary port configured for monitor light module 4.
Many modern monitors are fitted with automatic power save relays and will switch off after a few seconds if connected to an inactive PC. If you are using such a monitor you must not use the L2 feature. Constant switching on and off of your monitor's relay will eventually damage your monitor. 4.4 Mouse mode and mouse switching of channels A three button PS/2 mouse or an IntelliMouse can be used to switch channels on the SmartView by default.
U1 - SmartView channels are switchable using a 3 button mouse or IntelliMouse (default) (SmartView reports 2 button mouse mode to PCs) U2 - SmartView channels are not switchable using 3 button mouse or IntelliMouse (SmartView reports 2 button mouse mode to PCs) U3 - SmartView channels are not switchable using 3 button mouse or IntelliMouse (SmartView reports 3 button mouse mode to PCs) U4 - SmartView channels are switchable using 3 button mouse or IntelliMouse (SmartView reports IntelliMouse mode to PCs) U5
4.6 Firmware functions (version query, mouse restore and reset) For technical support purposes, it may be necessary to find the firmware release version for the control software in your SmartView. For example, if the release version is v1.02 the response shown to F1(enter) will be a brief display of the digit ‘1’, then F2(enter) will be a brief display of the digit ‘0’, then F3(enter) will be a brief display of the digit ‘2’.
keyboard (except ctrl, alt, shift and enter). Consequently the following 'password' would be valid: oFRED g 4.8 Cascade query code The SmartViews use a special ‘query code’ to detect whether or not they are connected to another SmartView. By default your SmartView uses query code AD. SmartView units with firmware versions less than 1.18 used query code EF.
Appendix A. Cable and connector specifications IMPORTANT NOTE The maximum cable lengths supported vary widely between devices and cables. It may be possible to use cables that are longer than those specified below with certain PCs and peripherals but this cannot be guaranteed. If you experience problems try using shorter cables. A1. Keyboard, monitor and mouse to SmartView Cable specification: All of the shared devices plug directly into the relevant ports at the front of the SmartView.
RS232 serial mice - these require a special converter to connect the RS232 lines present on the SmartView mouse ports to the RS232 port on a PC. The wiring is identical to that used by Microsoft for their autosensing mouse adapter and is shown below: Cables should be no longer than 30 metres. A3.
Appendix B. Problem Solving Problem: Poor video quality with smearing fuzziness or ripple. Action: Use screened coaxial video cables to connect your devices to the SmartView. Problem: Mouse does not move cursor on screen. Action: Ensure that the mouse and computer are both connected to SmartView before the power is connected and ensure that the SmartView is powered on before the attached computer.
Problem: Mouse causes channel to change. Action: Some cheaper mice are not fully compatible with the SmartView and can lose data causing the channel to be changed (if mouse switching of channels is enabled). If you experience this problem then change the mouse and use a Microsoft, Logitech, IBM, Compaq or Hewlett-Packard type. Ensure that you are using a Microsoft compatible mouse driver on your PC.
Notes SmartView Installation and Use Page 31
Notes SmartView Installation and Use Page 32
SMARTView I N S TA L L AT I O N & U S E ADDER Technology Limited Technology House Trafalgar Way Bar Hill Cambridge CB3 8SQ • England T: +44 (0) 1954 780044 F: +44 (0) 1954 780081 sales@addertec.com www.addertec.com SV-05.