
Technical data


40
3.3.8.5. Settings / Peripherals - AC Current Probe
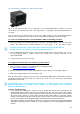
Up to 16 AC Current probes can be attached to the ePowerSwitch*8XM to monitor the current
consumption of an electrical device (PC, server, light, printer…) and trigger actions if predefined limits are
exceeded.
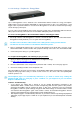
You can connect an AC Current probe to each of the RJ45 connector on the ePowerSwitch*8XM or
behind an xBus peripheral already connected to the ePowerSwitch*8XM (Daisy Chain connection).
To connect an AC Current probe to the ePowerSwitch 8XM, use following procedure:
1. Set the dip switches of the AC Current probe so that the selected I/O address does not conflict with
another AC Current probe already installed (see user's guide of the AC Current probe)
- Do NOT connect the xBus cable and the power cable before setting its DIP switches
- Do NOT use the same address for two different AC Current probes
2. Using a standard RJ45 network cable, connect the AC Current probe to the RJ45 xBus connector on
the ePowerSwitch 8XM or behind another AC Current probe already connected to the
ePowerSwitch*8XM.
3. Connect the power cable to your device
To configure the Current Probe, use following Log in procedure:
1. Open you browser and log in to the Administrator's Configuration Page,
(ex. http://192.168.100.200/sysadmin.htm
).
2. Enter the administrator name and password (default for both = admin). The home page appears.
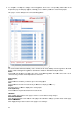
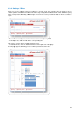
3. Click on the Settings and then on the Peripherals Tab
If the AC Current probe is properly connected to the ePowerSwitch 8XM it will be automatically recognized
and displayed on this page after a delay of 1 to 60 seconds. In this case, the colour of the corresponding
Edit and Info symbol is red.
The Peripheral page is not automatically refreshed, so you need to refresh it by clicking the
peripheral TAB again (or push [F5] or press <CTRL-R> on your keyboard if you use Internet
Explorer or Mozilla Firefox).
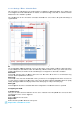
Problem / Troubleshooting
y If you choose any setting that is already in use by another AC Current probe connected to the
ePowerSwitch 8XM, a conflict occurs and the corresponding Edit and Info symbol of the previous
connected AC Current probe will be changed to black. In that case, disconnect your last connected
AC Current probe, remove its power cable, change the DIP switch settings to solve the address
conflict and reconnect the AC Current probe again. If the conflict is solved, all connected AC Current
probes will now appear on the Peripherals page and their Edit and Info Symbol will be red.
y The Peripheral page is not automatically refreshed, so you need to refresh it by clicking the peripheral
TAB again (or push [F5] or press <CTRL-R> on your keyboard if you use Internet Explorer or Mozilla
Firefox).