
Specifications

AdderLink X-Series Installation and Use Page 18
2. Video compensation / configuration mode (see section 2.7)
This mode is entered by typing the hotkey combination (selected using the option
switches) on the keyboard attached to the remote receiver. Once within video
compensation / configuration mode you can adjust the video compensation and
select other options using the keyboard. The selected options are saved and stored
in the remote unit when you exit compensation / configuration mode.
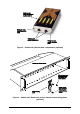
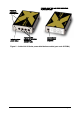
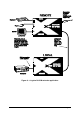
2.6 Setting the option switches
The option switches on the side of the X-KVM remote and local units are used to
select operating options. The switches are continuously read by the X-KVM and may
be changed whilst the X-KVM is powered on. The default setting (all switches OFF)
is suitable for most installations. The switches are shown in figures 7 and 8 and
have the following functions.
REMOTE unit — Switch 1
Set this switch to the OFF position for normal operation. This switch is used to set
the X-KVM remote unit into upgrade mode so that new firmware can be downloaded
into its flash program memory.
REMOTE unit - Switches 2 and 3
These switches select the hotkey combinations that are recognised by the X-KVM.
The chosen hotkey combinations are used to enter compensation / configuration
mode, lock the X-KVM and disable the X-KVM’s video.
REMOTE unit — Switch 4
This switch is used to select the required video compensation mode. When the
switch is in the OFF position, automatic video compensation will is selected. In
automatic compensation mode, the X-KVM will check the length of twisted pair cable
linking the local and remote units when it is powered on. It will then adjust the video
compensation amplifiers. In manual compensation mode, the video compensation
setting may be adjusted by the user.
LOCAL unit — Switch 1
Set this switch to the OFF position for normal operation. This switch is used to set
the X-KVM local unit into upgrade mode so that new firmware can be downloaded
into its flash program memory.