
Specifications


AdderLink X-Series Installation and Use Page 48
7. Upgrading the X-KVM’s flash memory
The X-KVM uses flash memory technology which enables the firmware code to be
upgraded by the user. Upgrades are performed by using a PC program to download
the new firmware via the keyboard connection. The local transmitter and remote
receiver both contain microprocessors with flash rewritable program memory. They
may be independently upgraded but we highly recommend that you always upgrade
both the local and remote units when performing an upgrade.
To perform a flash upgrade you will need to create an MS-DOS boot disk. This boot
disk is used to run the upgrade program automatically without the need for keyboard
control. From DOS systems, a boot disk can be created using the DOS FORMAT
command (e.g. FORMAT A: /S). For Windows 95 and 98, DOS boots disks can be
created in a similar manner. For other versions of Windows refer to Windows Help
for instructions. For example, a DOS disk can be created from Windows XP by
selecting My Computer, right clicking on the A disk icon, selecting Format and then
selecting Create an MS-DOS startup disk.
To upgrade the X-KVM’s firmware
STEP 1
Create an MS-DOS boot disk using a blank floppy disk.
STEP 2
Download the latest firmware upgrade files from the Adder Technology website
(www.addertec.com). The firmware upgrade is available as a compressed ZIP file
containing the following files (xxx is the version number of the firmware — for
example 108 is version 1.08).
XKVMxxx.EXE The download program (e.g. XKVM108.EXE) — this
automatically selects the firmware to use by detecting the unit
that is connected during download.
XREMxxx.HEX The firmware file for the remote receiver (e.g. XREM108.HEX)
XLOCxxx.HEX The firmware file for the local transmitter (e.g. XLOC108.HEX)
AUTOEXEC.BAT The autoexec file for the DOS boot disk that automatically runs
the upgrade file (XKVM.EXE)
Copy these four files to the root directory of the MS-DOS boot disk (you will need to
overwrite the AUTOEXEC.BAT file that is currently on the DOS disk).
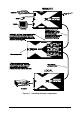
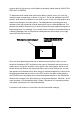
STEP 3 (connecting the local transmitter)