
Specifications

AdderLink X-Series Installation and Use Page 49
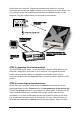
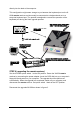
Power down your computer. Disconnect the twisted pair cable from the local
transmitter and connect the local transmitter to your computer as shown below. You
only need to connect the keyboard cable between the local transmitter and the
computer. Plug the monitor directly into the back of the computer.
STEP 4 (upgrading the local transmitter)
Set the X-KVM’s option switch 1 to the ON position. Insert the DOS disk into your
computer’s floppy drive and power on your computer. The upgrade should be
performed automatically. When the upgrade has completed, switch off your
computer and disconnect the local transmitter. Set option switch 1 back to the OFF
position.
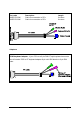
STEP 5 (connecting the remote receiver)
Power down your computer. Power down the remote receiver. Disconnect the
twisted pair cable from the remote receiver. Do not power any of the devices yet.
Connect the remote receiver to your computer as shown below. To do this you will
need a keyboard cable (6 pin mini-DIN male to 6-pin min-DIN male, all lines
connected). If you have a KVM switch product the chances are that you will have
one of these connecting the switch to a computer. You only need to connect the
keyboard cable between the remote receiver and the computer. Plug the monitor