InternetVue™ IV-2020 User Manual
Table of Contents Introduction .................................................................................................................................... 3 Product Specifications ........................................................................................................................ 3 Retail Box Contents ........................................................................................................................... 4 Ports and Connectors .................................
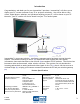
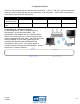
Introduction Congratulations, and thank you for your InternetVue™ purchase. InternetVue™ will allow you to display your PC’s screen contents on any TV or projector wirelessly. You will be able to view videos, digital photos, websites, and just about anything on your PC, will be shown on your TV. Moreover, your PC’s audio will also be heard from your TV or audio system. c b d a Internet e InternetVue™ is a two-part solution – a software component and a hardware receiver/decoder module.
Retail Box Contents Ensure that your InternetVue™ kit has all the following items. Otherwise, contact Tech Support for more information. InternetVue™ Receiver AC Power Adapter Application CD Audio Cable Quick Start Guide Video Cable Ethernet Cable Ports and Connectors InternetVue™ has two sets of output video connectors, and one audio output connector. For video, there are the Component Video and Composite video outputs.
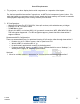
Overall Requirements 1. TV, projector, or other display device with component or composite video inputs. For the best possible InternetVue™ experience, an HDTV with component inputs is best. PCs with dual/quad-core processors and/or faster speed and more memory will result in smoother video playback especially when viewing content from the web. 2. PC Configuration: o Windows XP Home/Pro SP2, 2000 SP4, Vista (all versions) with administrator privileges o Pentium 4 or M, 1.
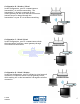
Configuration Options There are four possible ways to interface the InternetVue™, your PC, and your internet connection. However, keep in mind that the internet connection is not necessary. Select which Configuration works best for you from the table below.
Configuration B: Wireless / Wired In this Configuration, your PC communicates to InternetVue™ via wireless networking. The InternetVue™ is directly connected to your router/gateway via the wired network connection. Internet access is relayed through the InternetVue™ to your PC via wireless networking. Configuration C: Wired / Wired In this Configuration, your PC communicates to both the InternetVue™ and your router/gateway through wired network connections.
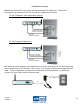
Installation Procedure Make sure that the TV or projector and the InternetVue™ is unpowered. Connect the InternetVue™ receiver box to your TV or projector’s appropriate AV inputs. TV with Component Video Inputs (Best Quality): TV with Composite Video Input: Connect the power adapter to the InternetVue™ DC power jack input first (a), then plug in the power adapter into an AC outlet (b). Turn on your TV or projector and select the appropriate AV input.
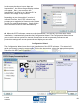
The InternetVue™ will autodetect which output is being used to connect to the TV. In about 30-60 seconds, it will be fully initialized, and the following “Welcome Screen” will come up on your TV or projector: PC2TV-HD PC2TV Welcome Screen shown on your TV This confirms the connection between the InternetVue™ receiver and the TV or projector. Now, you can begin installation of the PC2TV software on your computer by inserting the CD into your PC’s CDROM drive. Follow all onscreen instructions and prompts.
In the event that there is more than one InternetVue™, the Select Output Display window will appear. Here, you can select the InternetVue™ receiver by its “Wireless ID” as shown in the image of step 3 above. Depending on your InternetVue™ receiver’s internal firmware, the PC2TV software may prompt you to upgrade its firmware to the latest version for optimal performance. Simply follow the instructions as this is done automatically.
TV Type Allows you to select between a standard TV or an HDTV. The HDTV setting supports higher resolutions like 1280 x 720 for Photo mode. 3.04.
Connection Summary This shows the video output options, and allows you to select between composite and component. 3.04.
Password Setup This screen allows you to create a password to prevent others from changing your configuration. This is completely optional. 3.04.
Device Name (SSID) This allows you to change the “Wireless ID” broadcasted by the InternetVue™. This is useful when multiple receivers are present. You can assign any four-character alphanumeric suffix to each InternetVue™ box. The InternetVue™ receiver will then have an SSID of “PC2TV-xxxx” where the “xxxx” is the four-character alphanumeric name entered. 3.04.
1 Wireless Network Select the correct settings here for internet access while connected to the InternetVue™ receiver. The correct option here is based on your configuration as described in the beginning of this manual. Configuration A Select “Connect to external networks using wireless” Select the wireless gateway/router you wish to connect to for internet access.
You can also manually enter the wireless gateway/router SSID, channel, security and encryption details by clicking on this button (1 – see previous page). The following window will appear: If the entered passkey, channel, SSID, or security type is incorrect, PC2TV will prompt you to try again. Click YES: 3.04.
Configuration B Select “Connect to external networks using wired ethernet” Configuration C Select “None” Configuration D Select “None” In configurations B and D, only your PC and the InternetVue™ communicate wirelessly; the internet connection to the gateway/router is wired. Wireless security can be enabled between the PC and the InternetVue™ by clicking on the “Enable Display Encryption” checkbox (1). 1 The following window will appear. Enter 8 to 23 characters here.
Configuration Summary This screen displays summary of the selections made and connections between various devices. Click the Cancel button at the bottom of the screen to exit the Configuration Wizard at any time or click on Finish at the end of the wizard. After initial completion of the Configuration Wizard, the standard PC2TV application window will appear the next time it is run. The only way to invoke the Configuration Wizard again is to perform a Factory Reset, or clicking on the Wizard Button, see p.
Factory Reset Sometimes a factory reset is necessary to clear all settings in the InternetVue™ receiver. It will be brought back to the factory default state. The SSID may change, and starting the PC2TV software will invoke the Configuration Wizard once again. Factory Reset Button To perform a factory reset, make sure the InternetVue™ receiver is powered on and running for a few minutes. This is to ensure that it is not initializing. Press the Factory Reset Button for 10 seconds continuously, then release.
Main PC2TV Window The Title Bar shows the name of the InternetVue™ receiver currently connected Click here to toggle the Advanced Settings. Click here to select a different InternetVue™ receiver. You will be shown the “PC2TV Display List” window (see previous page). Signal Strength meter of connected wireless gateway/router Click VIDEO to increase frame rate at a reduced resolution. This will switch you to 800x600 for smoothest playback. Best for videos and movies.
PC2TV Advanced Settings The Advanced Settings are the same as those in the Configuration Wizard, aside from a few additional options. Summary The first screen shows the overall connection summary: 3.04.
Device Settings Clicking on “Device Settings” on the left side shows the next screen: Click here to enable the Security Access Number Click here to start the Configuration Wizard 3.04.
About the Security Access Number feature When enabled, this forces the user to enter a four-digit code displayed on the TV before the InternetVue™ will allow the PC to connect to it. This code changes each time the InternetVue™ receiver is power-cycled. The Security Access Number provides additional security by not allowing users to display video or change PC2TV settings without seeing the TV image.
TV Type You can change the TV Type here, either standard or HDTV: Connection Summary Here, you can select which output connectors to use, either composite or component video: 3.04.
Internet Connection In this screen, the settings for the internet connection can be changed. TCP/IP Settings There are two ways for InternetVue™ to have its IP address assigned. First the through DHCP, the default method. In DHCP, the router/gateway, or DHCP server assigns InternetVue™ an IP address automatically. Secondly, you can enter the IP address, and all other related settings manually. When doing so, ensure that the IP address is unique, and that all other settings are accurate.
Advanced More advanced options can be set here. Password Setup Optional password setting. See p.13 for more info. Upgrade This screen allows you to perform a manual firmware upgrade. It is recommended not perform any manual firmware upgrades unless instructed by Addlogix support. Video Settings The Quality Settings are similar to the VIDEO and PHOTO buttons at the top of the application window.
Troubleshooting Tips If InternetVue does not appear on the list of available wireless networks • • • InternetVue™ is powered off, its wireless signal is too weak, or the antenna has come loose. Check for these conditions, or try moving the PC closer to it. If you are using Microsoft wireless utility: 1. Exit the PC2TV application. 2. Open the utility and view available wireless networks. Press the Refresh button to update the list of available APs.
If the video pauses at the beginning of the sequence for less than 2 seconds and restarts • This is normal behavior. The system is optimizing settings to optimize video compression and display performance.
FCC Notice (USA) This equipment has been tested and found to comply with the limits for a Class B digital device, pursuant to Part 15 of the FCC Rules. These limits are designed to provide reasonable protection against harmful interference in a commercial environment. This equipment generates, uses, and can radiate radio frequency energy and, if not installed and used in accordance with the manufacturer’s instructions, may cause interference to radio communications.