T E C H N O L O G I E S ENT ESC User Guide 1:5 HDD Duplicator Deluxe C (HDUS5SNDX) www.addonics.com v3.1.11 Technical Support If you need any assistance to get your unit functioning properly, please have your product information ready and contact Addonics Technical Support at: Hours: 8:30 am - 6:00 pm PST Phone: 408-453-6212 Email: http://www.addonics.
Table Of Contents Basic Instructions ........... . . Page 3 Functions .......... . . . Page 5 Copy HDD .......... . . . Page 6 Compare HDD .......... . . . Page 6 PreScan Source .......... . . . Page 7 ReScan Bus .......... . . . Page 8 Source Size .......... . . . Page 8 Overwrite .......... . . . Page 9 Setup .......... . . . Page 9 Advanced Setup .......... . . . Page 13 Basic Troubleshooting .......... . . . Page 16 Error Messages List .......... . . .
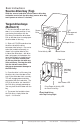
Basic Instructions Source drive bay (Top) Slide the source hard drive into the source drive bay and make sure to lock the drive bay (source drive bay won’t power on unless it’s locked) Target drive bays (Bottom 5) 1. Be sure the lock on each drive door is in an unlock position. If not, use the key that comes with the Disk Array to unlock the drive door. Pull on the door lever to swing open the drive door all the way. 2. Slide a 3.
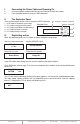
I. Connecting the Power Cable and Powering On a. b. Connect the power cord provided from the wall outlet to the back of the tower. Push the power button to turn on the HDD duplicator. II. The Duplicator Panel There are four buttons and an LCD on the panel of HDD Duplicator. 1 – LCD shows a function or a message. Duplicator Panel 2 – it is used to scroll up function menus. 3 – it is used to scroll down function menus. 4 – it is used to execute a function. 5 – it is used to cancel a function. III.
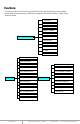
Functions The copy controller has 11 functions in total, with the 11th (Adv Setup) being a hidden system function that only appears when the ESC key is pressed for 2 seconds until there is a beep. These are shown below. 1. Copy HDD 2. Async Copy HDD 3. Compare HDD 4. Async Compare 5. PreScan Source Duplicator Controller 6. ReScan BUS 7. Source Size 8. Secure Erase 9. Overwrite 10. Setup 11. Adv Setup 10-01. Language 10-02. Copy Size 10. Setup 10-03. Startup Menu 11-01. Read Error Skip 10-04.
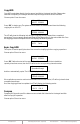
Copy HDD Copy HDD copies data directly from the source hard disk to the target hard disk. Please make sure that the capacity of the target hard disk is equal o r larger than the source hard disk. Choose option 1 from the menu: 1. Copy HDD HDD:11 232.9GB Press ENT to begin copy. The system will auto-detect the hard disks and show the following copying info on the LCD. Copy-36MB/s 0% 232.9GB 00:00:00 The LCD will show the following info during the copying process: elapsed time, completed percentage.
3. Compare HDD HDD: 11 232.9GB Press ENT to begin the comparison. The LCD will display the following info. Comp-23MB/s 0% 232.9GB 00:00:00 Once the comparison is complete the LCD will display the following info as well as the amount of data on the source hard disk. Compare OK:11 Fail: 0 Diff: 0 Async Compare Compare HDD is used to see if the data on a source hard disk is identical to the target hard disk after the Copy HDD operation.
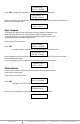
ReScan Bus ReScan Bus allows swapping the source or target in and out without having to reboot the system. Choose option 6 from the menu: 6. ReScan BUS Press ENT to re-scan hardware. The LCD will display the follo wing info. Re-Scan BUS NOW? Yes When the scan is complete the LCD will display the fol lowing info. Bus re- scan OK! Source Size Source Size is used to show the capacity of the source. Choose option 7 from the menu: 7. Source Size Press ENT and the LCD will show the following info.
In Process Elapsed 01:00 Overwrite Overwrite is used to overwrite the data of the hard disk, it will erase all HDDs connected to the duplicator (including Source HDD). There are 3 sub-options: One pass, 3 pass and 7 pass. Choose option 9 from the menu: 9. Overwrite Press ENT to access option. By default it is One pass Use the Up and Down arrow keys to choose other options. 9-01. Overwrite One pass Press ENT to access option. By default it is set to No. Use the Up and Down arrow keys to choose Yes.
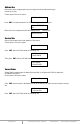
Copy Size This option is used to specify the size of the source hard disk for simplifying further copying operations. 10-02. Setup Copy Size Press ENT and the LCD will display a detailed list of options as shown below Copy Size 100%~1% (*MB) Use the Up and Down arrow keys to choose different copy si zes. The system will offer their corresponding percentages so the user can specify the amount to copy from the source hard disk. Press ENT to confirm and save the changes.
Device Info This option is used to display the details of all hard disks connected to the copy controller. 10-06. Setup Device Info Press ENT and the LCD will display each hard disk' information in order as shown below. 0 Source CH: 0 Hitachi 232.9GB System Info This option displays system information. 10-07. Setup System Info Fast Copy This option displays Fast Copy. Fast Copy only copies data on the source drive to the target drives.
Press ENT to enter the following figure. The default is Off. Use the Up and Down arrow keys to choose 5 Sec-50 Sec. Auto Start Timer Off Tolerance Size This option is used to set the tolerance in terms of percentage difference between the source and target capacity. This is to ensure that when the target drive is smaller than the source drive, the duplication process will not start. 10-11. Setup Tolerance Size Press ENT to enter the following figure. The default is Off.
Adv Setup Adv Setup offers expert users access to more advanced system settings. To access this option, hold down the ESC key for two seconds until it appears. 11. Adv Setup Read Error Skip This function sets the system to ignore any errors during the copying process. Normally if there is an error during copying a warning is displayed on the LCD. By using this function, users can also copy a HDD with errors. 11-01. Adv Setup Read Error Skip Press ENT to enter the following screen.
Press ENT again and the LCD will prompt you to confirm the er ase operation. All data will be lost,Erase? No Full Erase HDD This function is used to full erase all data on the HDD. Please backup any important data before using this function. 11-05.Adv Setup Full Erase HDD Press ENT to enter the following screen. Use the Up and Down buttons to select the HDD to erase. Quick Erase HDD ALL/Target CH:* Press ENT again and the LCD will prompt you to confirm the er ase operation.
Load Default Press ESC to return to the main menu then use the ENT button to select. This function resets all settings to their factory default. This function helps the system recover from errors caused by an illegal operation. 11-07.Adv Setup Load Default Press ENT to enter the following screen. Use the Up and Down buttons to confirm reset to factory defaults. Load Default Config? Yes If Load Default OK, this will be displayed on the LCD as shown below.
Basic Troubleshooting LCD If the LCD blank after the device is turned on, check that the power cable is properly connected and that the power supply is on. Error Message When the system is running a copy operation or hardware diagnostics, if the operation is manually terminated by pressing ESC an error message will be shown by the LCD. This may lead to an illegal operation and cause the device to stop reminding. If this happens, the device must be restarted.
Error Messages List NO# Error Messages 1 Source Drive Not Exist! Description 2 User Abort! 3 No Drive Exist No HDD exist during operating Device Info 4 X Space Not Enough Target Drive Space Not Enough When source capacity is small than target Copy, Compare 5 X Space Not Enough Target Drive Fail! When source capacity is small than target Async Copy, Async Compare 6 PreScan Fail Lose SATA connection during copy or bad sector on HDD PreScan Source 7 Source Drive Read Fail! Lose target
Firmware Update Procedure (Requires one hard drive containing the firmware file): 1. 2. 3. 4. Create a 50MB HDD partition with FAT/FAT32 or NTFS files system on any SATA hard drive Download the firmware and unzip the file to .BIN file format Copy the .BIN file onto the 50 MB partition of the HDD Insert this drive to the Source slot of the duplicator. For subsystem, connect the drive to the Source SATA port 5.