T E C H N O L O G I E S User Guide 1:9 HS HDD Duplicator Pro (HD9SITDRHS) www.addonics.com v3.1.11 Technical Support If you need any assistance to get your unit functioning properly, please have your product information ready and contact Addonics Technical Support at: Hours: 8:30 am - 6:00 pm PST Phone: 408-453-6212 Email: http://www.addonics.
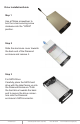
Drive InstallationGuide Step 1 Use a Philips screwdriver to turn the cover securing screw clockwise into the "OPEN" position. Step 2 Slide the aluminum cover towards the back end of the Diamond enclosure and remove it. Step 3 For SATA Drive: Carefully place the SATA hard drive with the label facing up into the Diamond Enclosure. Push the hard drive towards the back end to secure the drive connectors onto the Diamond enclosure’s SATA connector. www.addonics.
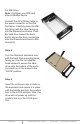
For IDE Drive Note: Configure your IDE hard drive as Master device Connect the 4-Pin Molex cable to the power connector on the IDE hard drive. Carefully place the IDE hard drive with the label facing up into the Diamond enclosure. Push the hard drive toward the back end to secure the drive connectors onto the Diamond enclosure’s IDE connector. Step 4 Turn the Diamond enclosure over with the hard drive mounting holes facing up.
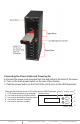
Connecting the Power Cable and Powering On a.Connect the power cord provided from the wall outlet to the back of the tower. b. Turn on the main power switch on the rear of the chassis. c. Push the power button on the front of the unit to turn on the HDD duplicator. There are four buttons and an LCD on the panel of HDD Duplicator. 1 – LCD shows a function or a message. Duplicator Panel 2 – it is used to scroll up function menus. 3 – it is used to scroll down function menus.
Quick Start By default, the duplicator will initialize, scan for drives and offer the copy function. Insert the source and target drives, power up the unit, wait for the copy function to appear, then press ENT. Canceling Functions When selecting menu options, canceling is done by pressing ESC. When the unit is busy performing an operation such as copy, verify, or overwrite, the operation can be canceled by holding the ESC button until the unit beeps.
5. PreScan Source Reads all blocks on the source drive to confirm no I/O errors are encountered. 6. ReScan BUS Manually scans all ports and reports how many units were found. 7. Source Size Examines the source drive and reports total space and space used, if drive contains compatible partitions. Press up/down to change display, ESC to exit. 8. Secure Erase Scans all ports, then erases all data on all connected drives. NOTE: some drives will remain in a locked state when the process is complete.
Setup options 10-1. Language Use this option to select the language of the system, currently only English is supported. 10-2. Copy Size Controls how much of the source drive to use for copy operations, in percentage. Default setting is ALL (100%). 10-3. Startup Menu Sets the first menu option to appear after boot. Default setting is Copy HDD. 10-4. Auto Compare Controls whether or not targets are compared automatically when copy is complete. Default setting is OFF. 10-5.
10-9. Auto Start Drive When source drive is present, inserting a target drive will cause copy process to begin automatically. Default setting is OFF. 10-10. Auto Start Timer Sets delay in time after target insertion before beginning auto copy process if Auto Start Drive is ON. Default setting is OFF (no delay). 10-11. Tolerance Size Sets the minimum target size in percentage compared to the source that is allowed to use for copying. Default is 100% (equal in size).
12-03. Compare Firmware Used to confirm correct firmware. Connect a drive formatted as FAT containing one partition with the firmware file in the root directory. NOTE: This function scans the entire disk before proceeding. Providing a drive that is as small as possible is strongly recommended. 12-04. Quick Erase HDD Scans the ports, then quickly erases all sectors on all connected drives. 12-05. Full Erase HDD Scans the ports, then completely erases all sectors on all connected drives. 12-06.
CONTACT US www.addonics.com Phone: Fax: Email: 408-573-8580 408-573-8588 http://www.addonics.