
5DOF Robotic Arm Kit for Ardunio Uno R3 - Tutorial
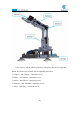
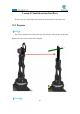
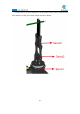
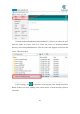
Table Of Contents
- Contents
- Components List
- Introduction of Robotic Arm
- Introduction of Adeept Arm Drive Board
- Lesson 0 Building the Arduino Development Environm
- 1.Arduino development language
- 2.Arduino program structure
- 3. The construction of the Arduino development env
- 4. Introduction of Arduino software interface
- 5.Connecting the Adeept Arm Drive Board and the co
- 6.The solution for situation that Arduino IDE cann
- 7、
- 8. Configuring the "libraries" folder of the Ardui
- Lesson 1 How to Read the Data of the Potentiometer
- Lesson 2 Controlling the Servo
- Lesson 3 Displaying Text on the OLED Screen
- Lesson 4 Saving Data with EEPROM
- Lesson 5 Servo 90 degree adjustment
- Lesson 6 How to Assemble the Robotic Arm
- Lesson 7 GUI application control mode
- Lesson 8 GwBlock graphical control mode
- Lesson 9 Potentiometer control mode
- Lesson 10 Learning mode
- Lesson 11 Processing controls robotic arm
- Lesson 12 Imitation function(Pen)
- Lesson 13 Processing controls robotic arm to write

167
7.Next, unplug the USB cable connected to the robotic arm.Powered by a fully
charged battery.
8.After completing the above preparations, gently support the robotic arm and
then turn on the power. You will see the working status of the current situation and the
number of the remaining motions the robotic arm needs to be record display on the
OLED.At this point, the robot arm goes into imitation mode.
【
Note
】:
When learning this lesson, you must first do some configuration according to part
8 of lesson 0, otherwise you will encounter many errors when you download the
program to the Adeept Arm Drive Board.
12.3 How to start the imitation mode of robotic arm
12.3.1 Introduction to imitation Mode
In the imitation mode, the robot arm can record different motion track or actions
(up to 333 can be recorded, the recorded can be written into EEPROM), After
re-powering, press the “BUTTON” for more than 8 seconds to enter the sport mode.
In the motion mode, the working status of each servo will be displayed on the OLED,
and the manipulator will automatically perform the previously recorded motion track
or actions.