
Quick Installation Guide
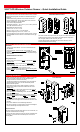

Curved Surfaces:
Suggested mounting hardware such as the strap ties and cable ties are not
supplied.
Mount using self locking stainless steel strap ties.
Self Locking Stainless Steel Strap Tie
Alternately you can use extra heavy duty Nylon 6/6 UV and Temperature
Rated cable ties (0.5 inch wide).
If desired you may use screws in addition to the ties.
CURVED SURFACES
ROUTING EXTERNAL WIRING – Optional for use with external closed
contact switches, such as the Honeywell Home N7945-2GY:
Note: Use minimum of 22AWG jacketed cable. Loop 1 = NORMALLY
CLOSED 'Hardwire Contact'. A form C (SPDT) contact (such as the 7945-
2GY) must be used with all 3 wires connected. A 2-wire Normally Closed
contact can be used, but a Form C contact is recommended to provide the
best RF immunity against false alarms, and maximum stability in extremely
cold environments.
UL: Maximum wire length cannot exceed 3 feet.
1. Strip cable jacket back 4-inches to allow enough slack to remove Sealing
Cover when changing batteries.
2. Pass cable through the access hole in Sensor Mounting Plate. Use cable
notch on mounting plate to pass jacketed portion of cable through. Then
attach the Sensor Mounting Plate.
3. Route cable to the external contact switch and fasten at intervals to secure
cable.
4. Remove the Sealing Cover and thread wires through the rubber wire seal.
If installed, REMOVE ANY BATTERIES.
5. Connect wires to terminal block in battery chamber, then INSTALL the
batteries.
6. Replace the Sealing Cover. (Note, orient the cover so the screw hole lines
up with the screw hole in the sensor cover, and press to close.) Apply
silicone caulking to rubber wire seal.
7. Engage Sensor tabs into Sensor Mounting Plate mating holes and swing
closed. Secure with cover screw.
PAINTING THE SENSOR:
The sensor and magnet may be painted to coordinate its color with the mounting surface. Use only paints that are
made for plastic and follow the manufacturer’s direction for preparing the plastic and applying the paint. Observe the
required drying and curing times.
DO NOT USE METALLIC PAINT COLORS.
Recommended Paints:
Krylon® "Fusion for Plastic"
Rust-Oleum® "Plastic"
Dupli-Color® "Vinyl & Fabric Coating"
Enrolling the Control Panel
1. Install the batteries to activate the SiXCT-OD. (Use the magnet if the batteries have already been installed, but enrollment did not complete.)
2. The LED flashes (up to about 20 seconds*) during enrollment.
• Both services (Reed and Terminal Block) are enrolled in sequential (or next available) zone numbers.
• The device sends its unique MAC ID (Serial Number); the controller registers the device and displays the transmitter data on screen.
*NOTE: Enrollment time varies depending on the signal strength between the device and the controller.
3. When done, the LED is ON for 3 seconds.
NOTE: If the device is not successfully enrolled during the enrollment period, the LED turns off and the device powers down. Activate a tamper, wired service (loop) or
the reed switch to restart the enrollment process.
NOTE: The transmitter's MAC number may be found on the carton, and in the Battery Chamber.
IMPORTANT: Once enrolled in a system, the SiXCT-OD cannot be used with another controller until it is removed from the current controller. See the Controller’s
instructions for details.
Final Checkout
Ensure the following:
All mounting hardware is secure.
If mounted on curved surfaces, check that the Sensor or Magnet cannot rotate. Use mounting screws if necessary to correct this.
Exercise the door or gate and check that physical tolerances do not exceed the allowable magnet gap.
Perform multiple system tests exercising the door or gate to ensure there are no false alarms.
FEDERAL COMMUNICATIONS COMMISSION (FCC) & INDUSTRY CANADA (IC) STATEMENTS
The user shall not make any changes or modifications to the equipment unless authorized by the Installation Instructions or User's Manual. Unauthorized changes or modifications could void the user's
authority to operate the equipment.
CLASS B DIGITAL DEVICE STATEMENT
This equipment has been tested and found to comply with the limits for a Class B digital device, as defined by FCC Rules Part 15.105. The Class B Digital Device statement can be viewed at:
https://customer.resideo.com/en-US/support/residential/codes-and-standards/FCC15105/Pages/default.aspx
FCC / IC STATEMENT
This device complies with Part 15 of the FCC Rules, and Industry Canada’s license-exempt RSSs. Operation is subject to the following two conditions: (1) This device may not cause harmful
interference, and (2) This device must accept any interference received, including interference that may cause undesired operation.
Cet appareil est conforme à la partie 15 des règles de la FCC et exempt de licence RSS d’Industrie Canada. Son fonctionnement est soumis aux conditions suivantes: (1) Cet appareil ne doit pas causer
d’interférences nuisibles. (2) Cet appareil doit accepter toute interférence reçue y compris les interférences causant une réception indésirable.
RF EXPOSURE Warning – The antenna(s) used for this transmitter must be installed to provide a separation distance of at least 7.8 in (20 cm) from all persons and must not be co-located or operated
in conjunction with any other transmitter except in accordance with FCC and ISED multi-transmitter product procedures.
Mise en Garde Exposition aux Fréquences Radio: La/les antenne(s) utilisée(s) pour cet émetteur doit/doivent être installée(s) à une distance de séparation d'au moins 20 cm (7,8 pouces) de toute
personne et ne pas être située(s) ni fonctionner parallèlement à tout autre transmetteur ou antenne, excepté en conformité avec les procédures de produit multi transmetteur FCC et ISED.
SUPPORT, WARRANTY, & PATENT INFORMATION
For the latest documentation and online support information, please go to:
https://mywebtech.honeywellhome.com/
For the latest warranty information, please go to:
https://www.security.honeywellhome.com/hsc/resources/wa/index.html
For patent information, see https://www.resideo.com/patent
MyWebTech
Warranty
Patents
The product should not be disposed of with other household waste. Check for the nearest authorized collection centers or authorized recyclers. The correct
disposal of end-of-life equipment will help prevent potential negative consequences for the environment and human health.
This product manufactured by Resideo and its affiliates.
The Honeywell Home Trademark is used under license from Honeywell International Inc.
Ê800-25523+Š
800-25523 4/19 Rev A
2 Corporate Center Drive, Suite 100
P.O. Box 9040, Melville, NY 11747
2019 Resideo Technologies, Inc.
www.resideo.com