PRODUCTION RELEASE & REVISION REV DESCRIPT'N/BUYER DWG No INITIAL DATE CHK PARTS No. BY ------------------- 50301506 ------------------- 50301611 Y.Y.KIM Y.Y.KIM N.C.PARK 09-25-M2 N.C.PARK 12-10-M2 210(+/-5)mm A A NOTES 148(+/-5)mm 1.MODEL: AMC15LCD, AMC15LCDX / ADEMCO 2.MATERIAL: ART PAPER WHITE BIND : STAPLES-2 FINISH: ------------4.COLOR: TEXT-BLACK 5.SIZE: 148(+/-5)mm x 210(+/-5)mm R: 0.0 6.ANY CHANGE OR ALTERNATION MUST BE APPROVED BY HITRON ENGINEERING.
15-Inch Color TFT-LCD Monitor Installation and Operating Instructions AMC15LCD AMC15LCDX
All information was correct at the time of publication. ADEMCO Video reserves the right to make changes and improvements to the product without notice.
WARNING: TO REDUCE THE RISK OF FIRE OR ELECTRIC SHOCK, DO NOT EXPOSE THIS PRODUCT TO RAIN OR MOISTURE. DO NOT INSERT ANY METALLIC OBJECT THROUGH VENTILATION GRILLS. WARNING RISK OF ELECTRIC SHOCK DO NOT OPEN WARNING: TO REDUCE THE RISK OF ELECTRIC SHOCK, DO NOT REMOVE COVER (OR BACK). NO USER-SERVICEABLE PARTS INSIDE. REFER SERVICING TO QUALIFIED SERVICE PERSONNEL.
15-Inch Color Monitor IMPORTANT SAFEGUARDS 1. READ INSTRUCTIONS - Read the safety and operating instructions before operating the monitor. 2. RETAIN INSTRUCTIONS - Retain the safety and operating instructions for future reference. 3. CLEANING - Unplug video monitor from the wall outlet before cleaning. Do not use liquid cleaners or aerosol cleaners. Use a damp cloth for cleaning. 4.
15-Inch Color Monitor 11. POWER CORDS - Do not allow anything to rest on the power cord. Do not locate video monitor or equipment where the cord can be damaged by persons walking on it. 12. HEED WARNINGS - Follow all instructions marked on the video monitor. 13. LIGHTNING - During lightning storms or when the monitor will be left unattended and unused for long periods, unplug the monitor and associated equipment from the wall outlet.
15-Inch Color Monitor FCC COMPLIANCE STATEMENT INFORMATION TO THE USER: THIS EQUIPMENT HAS BEEN TESTED AND FOUND TO COMPLY WITH THE LIMITS FOR A CLASS B DIGITAL DEVICE, PURSUANT TO PART 15 OF THE FCC RULES. THESE LIMITS ARE DESIGNED TO PROVIDE REASONABLE PROTECTION AGAINST HARMFUL INTERFERENCE IN A RESIDENTIAL INSTALLATION.
15-Inch Color Monitor Table of Contents Chapter 1 - Introduction 1 Features 1 Chapter 2 - Installation 2 Connections 9 Chapter 3 - Operation 10 User Controls 12 Appendix A - Specifications Appendix B - OSD Language Chart Appendix C - Bracket Features Appendix D - Stand Features Appendix E - Troubleshooting 15 17 18 19 20 List of Illustrations Figure 1 - Typical configuration Figure 2 - Front panel controls Figure 3 - Rear panel connectors 1 10 11 AMC15LCD v
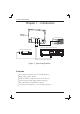
15-Inch Color Monitor Chapter 1 - Introduction AMC15 LCD Monitor PC Typical Time-Lapse Recorder Rear Panel Camera or other video source VIDEO AUDIO OUT IN Optional Loop-out to another video device Figure 1 -Typical configuration Features Go-Anywhere Professional Color LCD Monitor Bright, High Quality Picture NTSC and PAL Composite and Y/C Connectors. Thin and Lightweight, Rugged Metal Cabinets Many Mounting and Installation Options Low Power Consumption. - 12 Volts DC Operation.
15-Inch Color Monitor Chapter 2 - Installation LCD monitors may be mounted in any position or orientation. Considerations for mounting include regard for how the monitor is going to be used, routing of connecting cords, and locations away from heat sources (including direct sunshine on the black case). Mounting attatchment points include 10-32 inserts. Cooling is not required, but some airflow around the case will allow the small amount of heat to be dissipated.
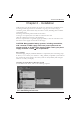
15-Inch Color Monitor Click Add New Hardware. Click Next.
15-Inch Color Monitor Click Next. Click Next after selecting No, the device isn't in the list.
15-Inch Color Monitor Click Next after selecting No, I want to select the hardware from a list. Click Next after selecting Monitors.
15-Inch Color Monitor Click Have Disk.... Insert the supplied 3.5 floppy disk in A Drive. Select OK.
-Inch Color Monitor Select Next after selecting the same model which you purchased. Click Finish.
15-Inch Color Monitor Microsoft Windows 2000 Operating System 1. Click "Start", "Setting", "Control Panel". 2. Double click the "Display" Icon. 3. Choose the "Settings" tab and then click "Advanced..". 4. Choose "Monitor". Case1: If the "Properties" button is inactive, it means your monitor is properly configured. Please stop the installation; there is no need to continue. Case2: If the "Properties" button is active, click the "Properties" button then follow next steps continuously. 5.
15-Inch Color Monitor CONNECTIONS To make a normal connection to the monitor, route a cable from a camera or other video source to one of the BNC jacks or from a PC to the PC jack on the back of the monitor. Either the left or right BNC jack can be used for input. The other jack may be connected to another device using the same input signal.. Auto Termination The input circuit of the monitor normally terminates the incoming cable with 75 , but these BNC connectors are auto-terminating.
15-Inch Color Monitor Chapter 3 - Operation 7 1 2 3 4 5 6 Control Buttons, Video Monitor Front. Use a cloth dampened with a mild cleaner to clean the screen. Figure 2 - Front panel controls 1. Power On/Off When power is applied, the monitor will come on. This button then turns the monitor on and off. 2. Menu On/Off This button is used to display or turn off the control menu. 3. Select Down This button is used to move down the menu list. 4.
15-Inch Color Monitor 5 4 2 1 3 6 Typical Color LCD Video Monitor Back Figure 3 - Rear panel connectors 1. Input Connector Recess Recessed wiring location for all cables. Connect the plug from the supplied table-top power supply into the 12 VDC connector. Input at the monitor is 12 volts DC from the TT universal AC supply (100-240 VAC, see specifications table for AC/DC details). 2. Input Video BNC (and Y/C) and PC Connectors Attach the video cable from a camera, VCR, or other source here.
15-Inch Color Monitor USER CONTROLS - Menu Operations PC Brightness Contrast Clock Phase Auto H Position V Position RGB Offset Image Effect Volume Language Input Recall : 25 : 41 : 125 : 16 : Stop :0 :0 :0 :5 : 10 : English : PC : No Pressing the MENU button will bring up the Menu shown above. Select the item you want to adjust using the , buttons As shown, the Brightness may be adjusted with the or buttons. To exit the menu, press the MENU button.
15-Inch Color Monitor Language : English sets the OSD language of the menu to English. Deutsch sets the OSD language of the menu to German. Fran ais sets the OSD language of the menu to French. Italiano sets the OSD language of the menu to Italian. Espa ol sets the OSD language of the menu to Spanish. Polski sets the OSD language of the menu to Polish. Input selects between the PC, composite (BNC) or Y/C (4 pin S-video) for the video source. Recall sets the monitor to the original factory setting.
15-Inch Color Monitor Sharpness adjusts the sharpness of the picture. Tint adjusts all the colors on the screen, but is most noticeable to the eye in reds and yellows, and is also usually set for pleasing facial tones. (Appears in NTSC mode only). Language: English sets the OSD language of the menu to English. Deutsch sets the OSD language of the menu to German. Fran ais sets the OSD language of the menu to French. Italiano sets the OSD language of the menu to Italian.
15-Inch Color Monitor Appendix A - Specifications (15 inch) LCD LCD panel Active display area (Diagonal) Pixel format Pixel pitch Color depth Contrast ratio Brightness Viewing angles (L/R/U/D) Light source / Lifetime Response time(tr/td) VIDEO Video Mode Scanning method Video input signals Composite S-video Video connector Composite S-video Termination Audio input connector Audio Amplifier Resolution PC Input signal Input connector Input resolution Plug & Play User controls AMC15LCD 15 15.
15-Inch Color Monitor OSD Language Power requirement Power consumption DC power connector AC power connector Dimensions Weight Operating temperature Storage temperature Case color Case material Accessories English/French/German/Italian /Spanish/Polish 12VDC 3.0A 30 Watts Barrel, 5.5/2.5mm (+Center) IEC-320 Male, 100-240VAC 349.2mm(W) x 285.7mm(H) x44.5mm(D) 6 lbs.(2.
15-Inch Color Monitor Appendix B - OSD Language Chart English German French Italian Spanish Polish No Signal No Signal No Signal No Signal No Signal No Signal NTSC NTSC NTSC NTSC NTSC NTSC PAL PAL PAL PAL PAL PAL Volume Lautstarke Volume Volume Volumen Glosnosc Contrast Kontrast Contraste Contrasto Contraste Kontrast Brightness Helligkeit Luminosite Luminosita Brillante Jansnosc Sharpness Scharfe Nettete Definizione Nitidez Ostrosc Color Frabkontrast Couleu
15-Inch Color Monitor Appendix C - Bracket Features (Optional) - Light duty wall & ceiling mount - Adjustable swivel head - Die cast and aluminum - Cable feeds through hole concealing wiring 1 - PT 1 / 4 threaded pipe - Maximum load 20 lb ( 9.0kg ) The Bracket is light duty wall & ceiling mount designed for use with LCD monitor. This mount is for use in wall & ceiling mounting applications and is capable of supporting loads up to 20 lb ( 9.0kg ). o 75.0(100.0) 15 75.0(100.
15-Inch Color Monitor Appendix D - Stand Features (15'', Optional) 4 2 1 3 1. SCREW 2. BRACKET 3. HINGE 4. HINGE_COVER 5. STAND 5 In order to install the desk-top stand at LCD monitor properly, First, fix the metal plate provided to the hinge of desk-top stand with 4 screws of M4 size and screw the desk-top stand to LCD monitor. Lastly, put the plate cover on the hole located on the rear side of LCD monitor .
15-Inch Color Monitor Appendix E - Troubleshooting Problem Possible Solution No Video Check that all components in the system (monitor, cameras, VCRs, multiplexers, etc.) have power and are turned on. Check that the camera lens cap is removed and the lens is set to proper aperture. Check cable(s) for proper connections and condition. Connect a known good video source directly to the monitor to make certain the monitor is not the Problem.
(Headquarters) 175 Eileen Way Syosset, NY 11791 USA 1-516-921-6704 Customer Service: 800-467-5875 Applications: 877-653-0302 Technical Support: 877-718-0746 Fax: 516-921-0491 Web site: www.ademco.