BARCODE SCANNER USER'S GUIDE NUSCAN 2100 Series
Table of Contents 1. 2. 3. 4. 5. 6. 7. 8. 9. 10. 11. 12. 13. 14. Limited Warranty.......................................................................................1 Introduction ...............................................................................................2 Contents....................................................................................................3 Barcode Symbologies...............................................................................
The NUSCAN 2100 Series scanners are ready to scan most kinds of barcodes. This barcode scanner does not require software or drivers to operate. The scanner enters data as keyboard data. This manual should only be used to make changes in the configuration of the scanner for specific applications. If you are unsure of the scanner configuration or have scanned the incorrect codes, please scan in the manual on page 5 the “Start” barcode then the “Reset” barcode and “End of Configuration” barcodes.
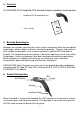
2. Introduction Bar coding is the most common Automated Data Collection (ADC) technology providing timely, error-free information that can be used to increase productivity, accuracy and efficiency in the workplace. The Charged Coupled Device (CCD) technology is a technique whereby a barcode is photographed, digitized and electronically sampled by built-in photo detectors.
3. Contents The NUSCAN 2100 Handheld CCD Barcode Scanner package should contain: Handheld CCD Barcode Scanner User's Guide 4. Barcode Symbologies Barcodes are symbols consisting of a series of bars and spaces which can be applied to packages, cartons, bottles and other commercial products. The bars and spaces in each symbol are grouped in such a way to represent a specific ASCII character or function. The interpretation of these groups is based on a particular set of rules called Symbologies.
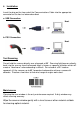
6. Installation Insert the plug on the free end of the Communications Cable into the appropriate connector on the host as below described: a. USB Connection Host b. PS/2 Connection Host Test Scanning Do not hold the scanner directly over a barcode at 90˚. Scanning light bounces directly back into the scanner from the barcode label is known as specular reflection which will create a "dead zone" where decoding is difficult.
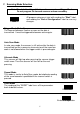
7. Scanning Mode Selection Note: The default setting of the barcode scanner is on Trigger Mode. Do not program the barcode scanner unless necessary. Start All program setup must start with reading the “Start” label, and reading the “End of Configuration” label to save any changes. Trigger Mode (Default) The scanner becomes inactive as soon as the data is transmitted. It must be triggered to become active again.
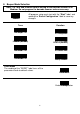
8. Beeper Mode Selection Note: The Tone and Duration default setting of the barcode scanner is on Medium. Do not program the barcode scanner unless necessary. All program setup must start with the “Start” label, and reading the “End of Configuration” label to save any changes. Start Tone Duration High Long Medium (Default) Medium(Default) Low Short Disable Very Short Reset Mode The reading of the "RESET” label turns all the parameters back to default values.
9. Default Parameters These tables give the default settings of all the programmable parameters.
8 11.
OPERATIONAL Light Source 617 nm visible red LED Optical System 2,500 pixels CCD Depth of Field 0 up to 6 inch (UPC/EAN 100%, PCS=90%) Scan Angle 42° Scan Rate 125 scans per second Minimum Bar Width 0.125 mm (5 mil) (0.1 mm actually) (Code 39, PCS=90%) Print Contrast Min. 30% @ UPC/EAN 100% Indicators (LED) Blue LED Beeper Operation Programmable tone & beep time System Interfaces Keyboard, RS-232C, HID USB, wand PHYSICAL Dimensions (L)6 × (W)2.5× (H)4.
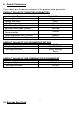
If you need to make changes in the configuration of the scanner for specific applications, a full Programming Guide can be downloaded at: http://www.adesso.com/PDF%20files/NUSCAN2100usersguide.pdf 13. Trouble Shooting a. Problem: Nothing happens when you follow the operating instructions. Possible Cause Interface cables are loose. Possible Solution Check for loose cable connections. b. Problem: Light comes on, but symbol does not decode.
Possible Cause Scanner is not programmed to work with the host. Possible Solution Be sure proper host type is selected. For RS-232, ensure the scanner’s communication parameters match the host’s settings. For keyboard emulation configuration, ensure the system is programmed for the correct keyboard type, and that the CAPS LOCK key is off. Be sure editing options (e.g. UPC-E to UPC-A Conversion) are properly programmed. 14.