LASER BARCODE SCANNER USER'S GUIDE NUSCAN 3200 series
Table of Contents 1. 2. 3. 4. 5. 6. 7. 8. 9. 10. 11. 12. 13. 14. Limited Warranty ............................................................................. 1 Introduction .................................................................................... 2 Contents ......................................................................................... 3 Barcode Symbologies ....................................................................... 3 Product Introduction ................................
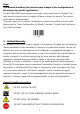
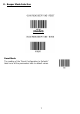
Note: This manual should only be used to make changes in the configuration of the scanner for specific applications. The NUSCAN 3200 Series scanners are ready to scan most kinds of barcodes. This laser barcode scanner does not require software or drivers to operate. The scanner enters data as keyboard data. If you are unsure of the scanner configuration or have scanned the incorrect codes, please scan the “Reset Configuration to Defaults” barcode. This will reset the scanner to its factory settings. 1.
2. Introduction The NUSCAN 3200 Laser Barcode Scanner combines the best scanning performance and value. NUSCAN 3200 comes in multiple modes to handle any task. Its flexible architecture gives users different configurations to choose from, with different combinations of communications. With its rugged high class ID design and ergonomic styling, NUSCAN 3200 offers superior service life and reduces user fatigue.
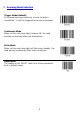
3. Contents The NUSCAN 3200 Long Range Laser Barcode Scanner package should contain: NUSCAN 3200 Long Range Laser Barcode Scanner User’s Guide 4. Barcode Symbologies Barcodes are symbols consisting of a series of bars and spaces which can be applied to packages, cartons, bottles and other commercial products. The bars and spaces in each symbol are grouped in such a way to represent a specific ASCII character or function.
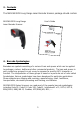
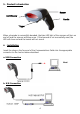
5. Product Introduction Buzzer Exit Window Handle Trigger When a barcode is successfully decoded, the blue LED light of the scanner will turn on and off and the scanner will beep once. If the barcode is not successfully read, the LED will show red and the buzzer will not sound. 6. Installation Insert the plug on the free end of the Communications Cable into the appropriate connector on the host as below described: a. USB Connection Host b.
c. Serial Port (RS-232) Connection NOTE: For Serial port (RS-232), please plug the power connector of 5V power adapter to RS232 cable. 1 1. 2. 3. 4. Be sure that Host computer is turned off. Ensure that all connections are secure. Turn on your Host. Aim the scanner at a barcode. Ensure that the scanner is in trigger mode (default), and press the trigger. On successful decode, the blue LED light will turn on and off and the scanner will beep once.
7. Scanning Mode Selection Trigger Mode (Default) The scanner becomes inactive as soon as the data is transmitted. It must be triggered to become active again. Continuous Mode When set this code, laser light is always ON. Can read barcode continuously after code transmission. Pulse Mode When set this code, laser light will flash when standby. Can read barcode continuously after code transmission. Reset Mode The reading of the "RESET” label turns all the parameters back to default values.
8. Beeper Mode Selection (Deafult) Reset Mode The reading of the "Reset Configuration to Defaults” label turns all the parameters back to default values.
9. Default Parameters These tables give the default settings of all the programmable parameters.
10. Barcode Scan Field Depth of Field (Up to 42 cm): Based on Symbol’s Standard Code 39 PCS=0.
11. Technical Specifications OPERATIONAL Light Source 650nm Laser Diode Optical System Linear CCD Scan Speed 80 scans per second Minimum Bar Width 4 mil Print Contrast 45% or more @ UPC/EAN 100% Reading Indicators (LED) Two-color LED (blue and red) Beeper Operation ON/OFF System Interfaces USB, K/B or RS-232 PHYSICAL Height 7.16 Inches (182 mm) Depth 3.66 Inches (93 mm) Width 2.40 Inches (61 mm) Weight 0.
12. Programming Guide If you need to make changes in the configuration of the scanner for specific applications, a full Programming Guide can be downloaded at: http://www.adesso.com/productmanuals/UserGuide_NuScan3200.pdf 13. Trouble Shooting a. Problem: Nothing happens when you follow the operating instructions. Possible Cause Interface cables are loose. Possible Solution Check for loose cable connections. b. Problem: Light comes on, but symbol does not decode.
d. Problem: Scanned data is incorrectly displayed on the host. Possible Cause Scanner is not programmed to work with the host. Possible Solution Be sure proper host type is selected. For RS-232, ensure the scanner’s communication parameters match the host’s settings. For keyboard emulation configuration, ensure the system is programmed for the correct keyboard type, and that the CAPS LOCK key is off. Be sure editing options (e.g. UPC-E to UPC-A Conversion) are properly programmed. 14.