ADIMLab-gantry Assembly specifications Version V 1.3.
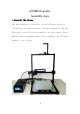
ADIMLab-gantry Assembly steps 1.Install the frame The whole machine is basically installed before delivery, divided into the gantry bracket, the base components, and the 3D printer control box three modules, we only require three modules can be assembled simply.
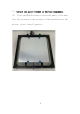
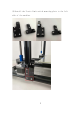
1.1 Install the gantry bracket to the base components. (1) Place two M5 * 25 screws to secure the gantry to the base flat. Pay attention to the reference of the installation of the picture, do not install opposite.
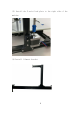
(2)Install the Z-axis limit switch mounting plate to the left side of the machine.
(3) Install the Z-axis fixed plate to the right side of the machine.
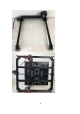
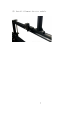
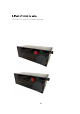
(5) Install filament detector module.
2.
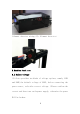
filament detector wiring(⑤:filament detector) 3. Machine test run 3.1 Select voltage: (1) Crate provides two kinds of voltage options, namely 110V and 220V,the default voltage of 220V, before connecting the power source, selectthe correct voltage. (Please confirm the correct and then turn on thepower supply, otherwise the power Will be broken.
3.
(2) “Info screen”click button,select“Prepare”,click ok: (3)Select“Auto home”in Submenu,click ok: Normally, the three axes will return to the position of the original point,as follows.
3.
(3) Select“Preheat PLA”in Submenu,click ok: If the two temperatures in following picture are on the rise, the heating is normal. If“Auto home”and“Preheaet PLA”normal,It mean your 3D printer is already connected.
4.Machine levelling 4.1Adjust the level of the X-axis bar.: (1) “Info screen”click button,Select“Prepare”,click ok: (2) Select“X Height adjustment”,click ok: (3)Zaxis automatic raise 30mm,Use a solid glue stick or print to measure the distance between the ends of the X-axis guide and the base.
(5) Adjust the height of the X-axis guide by rotating the Z-axis blue coupling so that the metal parts at both ends of the X-axis 15
guide are just enough to touch the glue stick or print. 4.2Hodbed Leveling: (1) “Info screen”Select“Prepare”,click ok: (2) Select“Manual Bed Leveling”in Submenu,click ok: (3) Home to the original point,Extruder moves to the first adjustment point in the lower left corner of the hot bed.
(3)Adjust hand screw nut under the platform,Make the nozzletouch the hot bed: (4)Click knob,ExtruderMove to the second adjustment point, Adjust hand screw nut under the platform,Make the nozzle just touch the hot bed: 17
(5) Click knob,Extruder move to the third adjustment point, Adjust hand screw nut under the platform,Make the nozzle just touch the hot bed: (6) Click knob,Extruder move to the fourth adjustment point, Adjust hand screw nut under the platform,Make the nozzle just touch the hot bed: 18
(7) Click knob,Extruder move to the middle of the hodbed, check the distance between the nozzle and the hot bed.
(8) If the distance between the nozzle and the hot bed is too high or too low,select“Next Point”repeat(4)-(8)operating 5.Machine printing test (1)Insert the filament.
(2)Filament through the filament dector module : (3)Press Extruder plunger, insert filament.
(4)“Info screen”click button,select“Print from SD”,click ok (5)Select“505020.
(7)Preheating ok,star printing: The end Youtube video: Our channel: ADIMLab 3D Printer 23