User Guide ADIMLab Desktop 3D printer Version V1.1.
Contents Ⅰ. Overview ........................................................................................... 3 Ⅱ. Thanks and Commitment ................................................................ 4 Ⅲ. What is 3D Printer? ......................................................................... 5 3.1 3D printing steps ........................................................................ 5 3.2 3D Modeling ............................................................................... 5 3.
Ⅰ. Overview Thank you for your support of our company's products, the guidelines only apply to HCmaker 7 3D printer.
Ⅱ. Thanks and Commitment Thanks Thanks for your purchase and support for HCmaker 7 3D printer . You may also purchased our other 3D products or well understand 3D printing technology. But we still want you to read this guide, it contains a lot of important information about the use of the product so that customers get a better 3D experience. By reading and understanding of the operation, you can immediately start your first print.
Ⅲ. What is 3D Printer? In short, 3D printers are used to three-dimensional computer model into real objects can be touched. The most common 3D printing technology is called FDM (Fused Deposition Modeling), namely melting precipitation manufacturing technology, HCmaker 7 belong to this one. The way it works is melted on the printing platform supplies plastic called high temperature. After cooling supplies curing, this process occurs at the instant it from the print head is pushed out .
3.3 Slice output 3D model Slice software can translate 3D models into G-code that 3D printer can read. Slice software HCmaker 7 used is the most common type of Cura, Repetier-Host (PS: Cura is quick and easy Slice software with fast speed, short printing time and easy to operate; Repetier-Host as a fine slice software, requires many kinds of setting about the parameters, representing more suitable for fine print, it needs to have a certain understanding, it is a good software to adjust the fine print).
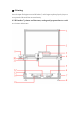
Ⅳ. Printing Once the input file begins to run in HCmaker 7, and it begins to pile up layer by layer so as to print the 3D model into an actual entity. 4.1 HCmaker 7 printer architecture, setting and preparations to work 4.1.
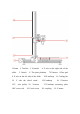
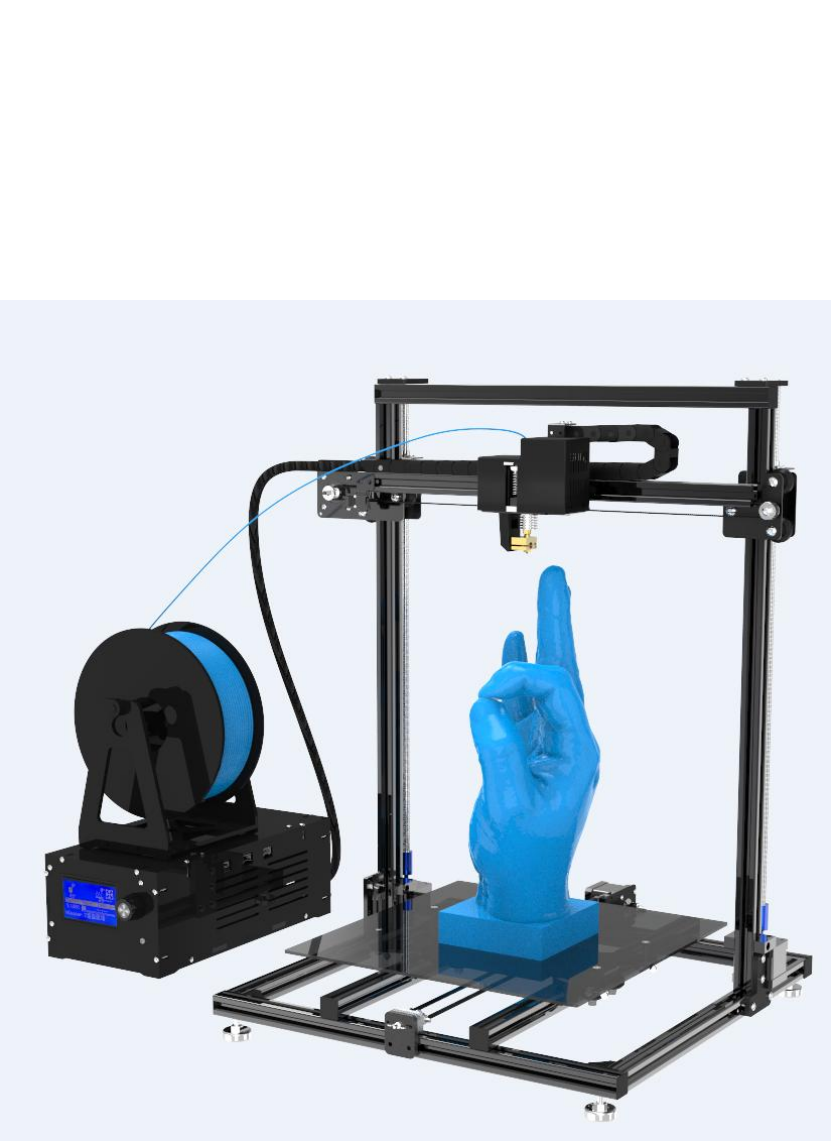
1.Frame 2. Towline 3. Extruder slider 5. Nozzle 6. The print platform 9. Z axis on the left side of the slider 12. Y axis the wheel stand 15.Y axis pulley 16. X-motor 18.Z -screw rod 4. Z axis on the right side of the 19. Z axis screw 7.Z2-motor 8.Foot pad 10.X-endstop 11. Cooling fan 13.Z-endstop 14. Z1-motor 17.Z-endstop mounting plate 20. coupling 21.
Ⅴ.HCmaker 7 printer software and printing steps 5.1 Software copy Insert the SD card into the computer, SD card file "4. control software, Repetier-Host installation and introduction", there are various systems Repetier-Host control software installation package, You can copy the required installation to your computer. 5.2 Install control software 1)Please unzip the downloaded RepetierHost, and then follow the prompts to complete the installation. (refer to SD card data 4.
Choose Languages
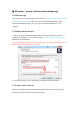
Select Printer Settings Choose their own corresponding serial port, such as: COM3, COM4 and so on (in the serial drop-down menu selection), in the drop-down menu set baud rate of 250000.
Set nozzle diameter Set printer shape
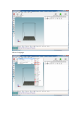
Open the slice setting Popup slice settings
Select file to load config (slice settings on SD card 6.
Save configuration (three items need to be saved)
Click the connection button to turn green, and the connection is successful.
5.4 Slic3r setting Slicing software basic configuration, here briefly introduces several important configuration (details please refer to SD card 7.
Filament Settings Printer Settings
5.5 Start printing 1)Get print model (common ways to download online and their own modeling, file formats, such as STL, AMF, etc.
3)Set print parameters, slice the model, and open the printer power Set HCmaker 7parameters
Start slicing Slicing completed
4)Install filament Intercept a small PTFE tube, length 10-20mm, insert into the extruder inlet. One hand presses the lever first, the other hand advances the material. Note: consumables head can not be larger than the wire diameter, front end straightened, easier to insert supplies, supplies need to push to the bottom.
2 ○ Offline printing: save G code to SD card, insert printer slot, select model print Save file (Note: file names need to be saved as English letters or numbers)
Copy SD card, insert printer, select model, start printing (rotate button, select options, press button "OK") Main interface Press the button and select SD card to print
Select the model and click Print 5)Print complete, remove the model. After the print is finished, after the platform is cooled, the model is removed (the lateral force is easier to take off the model), and the observation and measurement are carried out.
Press the button, rotate the button, and select the ready Rotate the button, drop the menu, and select preheat PLA Rotate the button, select preheat PLA 1, or preheat PLA all
Preheat to a specified temperature (e.g., 200℃), Follow the steps below to replace supplies Ⅵ.Support and service Our all the staff will by your side all the time and we are happy to solve any problems you encountered in the use of HCmaker 7 process. If you can't find the answer from the user’s guide or technical card, you can enter into our official website to search for the solution,by the way,you can contact us by phone or QQ group.