Bariatric Padded Blood Drawing Chair ADI997-01-HD-SERIES USER GUIDE
Thank you for your purchase. AdirMed maintains a strong practice of ongoing development of products and commercial research. We recognize that starting and maintaining a medical practice is expensive. We’ll help make the process cost-effective and elegant. Additionally, our team of specialists will ensure everything you need works as efficiently as possible, so youcan effectively treat your clients.
Table of Contents 1 Parts List 2 Hardware List 3 Assembly Instructions 10 Notes 12 Limited Warranty 13 Disclaimer
Parts List A Leg (x2) D Seat Support G Backrest J Front Flip Armrest (x2) 1 B Center H Support E C Footrest F Backing Rails(x2) Seat Cushion H Left Arm Rest K Right Arm Rest I Adjustment Knob (x4) L Seat Support Bar
Hardware List 1 Medium Screw (x4) 2 Large Screw (x 12) 3 Small Screw (x 12) 2
Assembly Instructions Note: When assembling the chair, do not over-tighten the screws. Finish the whole assembly and then tighten firmly. Step 1: A. Locate both Legs (A) and the Center H Support (B).
Step 2: A. Attach both Legs (A) to the Center H Support (B) using eight Small Screws (3). A A B Step 3: A. Locate the Footrest (C), and place it between both Legs (A), as pictured. B. Secure it into place with two Large Screws (2).
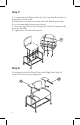
Step 4: A. Locate and place the Seat Support (D) between both Legs (A), as pictured. B. Secure into place with four Small Screws (3).
Step 5: A. Locate both Backing Rails (E) and the Seat Cushion (F). B. Attach both Backing Rails (E) to the Seat Cushion (F) with four Medium Screws (1). F E Step 6: A. Locate and attach the Backrest (G) with four Large Screws (2), as pictured.
Step 7: A. Locate the Seat Support Bar (L), line it up with the holes on the bottom of the chair. B. Attached the constructed seat with the Seat Support Bar (L) to the assembled base, as pictured. C. Insert 6 Large Screws (2) through the Center H Support (B) and into the seat. D. Tighten the screws until secure. L Step 8: A. Locate the Left Arm Rest (H) and the Right Arm Rest (K), insert it into the left and right pole.
Step 9: A. Insert two Adjustment Knob’s (I) into the left and right pole, as pictured. I Step 10: A. Locate and insert both Front Flip Arm Rest’s (J) into the Left Arm Rest (H) and Right Arm Rest (K). B. Insert the two remaining Adjustment Knobs (I), as pictured.
Step 11: A. Ensure all your screws are tightened and secure. B. Your Blood Drawing Chair is now ready to be used.
Notes 10
Notes 11
Limited Warranty 1. AdirCorp (the company) warrants to the purchaser that the product will be free from defects in workmanship and materials for a period of two (2) years from the date of purchase. 2. These warranties are not assignable or transferable to any other person. 3.
Disclaimer By purchasing products from AdirCorp, the user agrees as follows: TO THE MAXIMUM EXTENT PERMITTED BY LAW, THE PRODUCTS AND INFORMATION ON THIS SITE IS PROVIDED “AS IS” AND WITH ALL FAULTS AND ALPINE INDUSTRIES.
ADI997-01-HD-SERIES © 2022 AdirCorp adircorp.