
User Manual


5
myDMX 3.0 / Quick Start
1.3.Programming a Scene
Selecting and arranging your lights
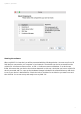
Click the EDIT tab towards the top left to access the edit screen. The edit screen is where all
programming is made.
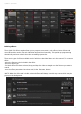
Each lighting fixture in myDMX 3.0 is represented by a square in the fixtures window (bottom right
section of the software). Multi-beam lights such as LED bars will be formed of several squares. Click and
drag the squares to position. Lights can also be rearranged into common shapes using the shape wizard
(1). Depending on how many fixtures you have patched, you can zoom in and out and reset the
positioning using the 4 icons in the upper left (2). For quick selection, groups can be created by selecting
some fixtures and clicking the 'Create Group' button (3).
Controlling your lights with the faders
To select a fixture, click one of the squares in the fixture window on the right, and then move the
corresponding faders on the left. The lights will change in real-time. There are several ways to view the
output:
See the actual lighting fixture respond in real-time
See the color and beam state in the fixture window
See the raw DMX data being sent in the DMX output window (Tools -> DMX levels)
See a 3D representation of your light in the 3D visualizer* (Tools -> 3D visualizer)
*Available as an upgrade (Additional Charge)
With some fixtures, you'll need to move several faders before seeing a light beam. In the example below,
the dimmer, iris and zoom channels all need to be set. This can be done quickly by clicking the 'Beam On'
button (1). You can also quickly position your fixtures in the center by pressed the 'Center' button (2).