
User`s manual


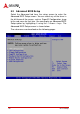
Table Of Contents
- NuPRO-935A
- Revision History
- Preface
- Table of Contents
- List of Figures
- List of Tables
- 1 Introduction
- 2 Hardware Information
- 2.1 Rear Panel I/O Ports
- 2.2 Board Layout
- 2.3 Onboard Connectors
- ATX 12V Power Connector (CN7)
- CPU Fan Connector (FAN2)
- System Fan Connector (FAN1)
- IDE Connector (CN10)
- Floppy disk drive connector (CN8)
- Parallel Port (CN13)
- HD Audio Daughter Board Connector (CN4)
- COM1 Connector (RS-422/485/485+) (CN6)
- COM1/COM2 Connector (RS-232) (CN5/6)
- USB 2.0 Connector (CN11-12)
- External Keyboard/Mouse Connector (CN19)
- Serial ATA Connectors (CN2-3)
- System Panel Connector (CN1)
- 2.4 Jumpers
- 3 Getting Started
- 4 Driver Installation
- 5 BIOS Setup
- Appendix A - Watchdog Timer
- Appendix B System Resources
- Important Safety Instructions
- Getting Service

46 BIOS Setup
5.3 Advanced BIOS Setup
Select the Advanced tab from the setup screen to enter the
Advanced BIOS Setup screen. You can select any of the items in
the left frame of the screen, such as SuperIO Configuration, to go
to the sub menu for that item. You can display an Advanced BIOS
Setup option by highlighting it using the < Arrow > keys. The
Advanced BIOS Setup screen is shown below.
The sub menus are described on the following pages.