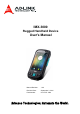
IMX-3000 Rugged Handheld Device User's Manual Manual Revision: Revision Date: Part Number: 1.00 September 3, 2014 50-1Z175-1000 Advance Technologies; Automate the World.
IMX-3000 Revision History Revision Date Description 1.
IMX-3000 Preface Copyright 2014 ADLINK Technology, Inc. This document contains proprietary information protected by copyright. All rights are reserved. No part of this manual may be reproduced by any mechanical, electronic, or other means in any form without prior written permission of the manufacturer.
IMX-3000 Notices Product Notes For user safety, please read and follow all instructions, WARNINGS, CAUTIONS, and NOTES marked in this manual and on the associated equipment before handling/operating the equipment. To avoid damaging the product due to improper operation, please read the manual thoroughly before use. • IMX-3000 working temperature: For 1D and 2D models, the operating temperature range is -10°C to 50°C. à For the CCD model, the operating temperature range is -10°C to 40°C.
IMX-3000 FCC Warning Statement For FCC 15b Devices This equipment has been tested and found to comply with the limits for a Class B digital device, pursuant to part 15 of the FCC rules. These limits are designed to provide reasonable protection against harmful interference in a residential installation. This equipment generates, uses and can radiate radio frequency energy and, if not installed and used in accordance with the instructions, may cause harmful interference to radio communications.
IMX-3000 Unauthorized antennas, modifications, or attachments could impair call quality, damage the phone, or result in violation of FCC regulations. Do not use the phone with a damaged antenna. If a damaged antenna comes into contact with the skin, a minor burn may result. Please contact your local dealer for replacement antenna. Body-worn Operation This device was tested for typical body-worn operations with the back of the phone kept 2.0cm from the body.
IMX-3000 Laser Compliance This device is classified as a Class 2 Laser Product and complies with: • 21CFR1040.10 and 1040.11 except for deviations pursuant to Laser Notice No. 50, dated July 26, 2001. • EN60825-1:1994+ A1:2002 +A2:2001 • IEC60825-1:1993+A1:1997+A2:2001 CAUTION: CLASS 2 LASER RADIATION DO NOT STARE INTO THE BEAM Output Radiation < 1mW.
IMX-3000 Table of Contents Revision History.................................................................................................................... 2 Preface ................................................................................................................................... 3 Notices ................................................................................................................................... 4 1 Introduction ..................................................
IMX-3000 3.4 Home Screen .............................................................................................................. 24 3.5 Extensions to the Home Screen.................................................................................. 25 3.5.1 Customizing the Home Screen ............................................................................. 25 3.6 Using Applications....................................................................................................... 26 3.
IMX-3000 5.2 Video Mode ................................................................................................................. 38 5.2.1 Shooting a video ................................................................................................... 38 5.2.2 Setting Flash mode............................................................................................... 38 5.2.3 Setting Video quality .............................................................................................
IMX-3000 1 Introduction 1.1 Overview The IMX-3000 is ADLINK's newest industrial mobile computer, a clear choice for a variety of industrial applications, featuring the Android 4.0 operating system and a compact housing for easy transport. Near Field Communication (NFC), a barcode scanner, and 3G/WLAN wireless capability improve real-time information delivery and fulfill a host of industrial requirements on the application level.
IMX-3000 1.3 Specifications Physical • • Processor Memory & Storage Display Buttons Expansion Slots • • • • • • • • Wireless LAN Wireless WAN • Wireless PAN GPS Data Capture • • • • • • • Built-in Sensors • • • • Notification Camera • • • Audio • • • • Battery • Power Adapter • • OS • Dimensions 140.9 x 72.9 x 27.3mm (L x W x H) Weight 177g ± 5g (excluding battery) 1.2GHz dual CPU 768MB DDR SDRAM / 4GB eMMC Flash 3.
IMX-3000 Environmental Certifications Operating Temperature • CCD: -10°C to 40°C • 1D/2D: -10°C to 50°C Storage • -20°C to 60°C Operating Temperature • CCD: -10°C to 40°C Charging Temperature • 0°C to 40°C Humidity • 10% to 90% @ 25°C, non-condensing Drop Spec • 1.
IMX-3000 1.4 IMX-3000 Layout 5 6 78 9 1 10 13 14 2 11 16 12 17 15 3 4 1 Power Key 7 Proximity Sensor 13 Camera and Flash LED 2 3 4 5 6 LCD Display & Touch Panel Function Keys Microphone Power LED Light Sensor 8 9 10 11 12 Receiver Scan Window Lanyard Loop Earphone Socket USB Port 14 15 16 17 Speaker Battery Cover Volume Up Volume Down 1.5 Package Contents The IMX-3000 is shipped with the components listed below.
IMX-3000 2 Getting Started 2.1 Removing Protective Film Remove protective films from the scanner window, camera and touch display before use. 2.2 Installing the Battery 1. Remove the rear cover by sliding it downwards as shown.
IMX-3000 2. Insert the battery into the device as shown and press down to secure it in place. 3. To remove the battery, squeeze the tabs on either side of the battery and lift it out of the device. 2.3 Charging with the Adapter 1. Select the correct plug for your region and insert it into the adapter as shown 2. To remove the plug, pinch the locking tabs (1) and slide the plug off of the adapter (2). 3. Open the cover on the left side of the device to expose the micro-USB socket.
IMX-3000 2.4 Charging with the Charging Cradle The IMX-3000 can also be charged with the optional charging cradle. Connect the DC adapter to the charging cradle to charge the IMX-3000 and secondary battery simultaneously. The LED on the charging cradle will change from red to green when charging is complete. 1 1 Device Charging LED 2 3 Secondary Battery Secondary Battery Charging LED 2 3 • • The device can only be charged between 0°C and 40°C.
IMX-3000 2.5 Waking from a Low Charge State When the battery charge level drops to 5% or lower, the device will enter a "protective mode" and cannot be turned on. Should this occur, charge the device for at least 20 minutes and then press and hold the Power button to turn the device on. 2.6 Installing a microSD Card 1. Remove the battery as described above. 2. Lift up the SIM card locking plate to the right to expose the microSD card slot.
IMX-3000 3. Lift up the microSD card locking plate and insert the microSD card with the contacts pointing downwards. 4. Close the microSD card locking plate and slide it upwards to lock it in place 2.7 Installing a SIM Card 1. After installing a microSD card (if necessary) as described above, insert the SIM card oriented as shown on the locking plate. 2. Close the locking plate to secure the SIM card and slide it to the left to lock it in place 3.
IMX-3000 2.8.2 Android Wizard 1. The Android Wizard will appear and show how to set app shortcuts on the Home screen. Touch "OK" to continue. 2. Touch the Applications icon , and another wizard will appear. Touch "OK" to continue.
IMX-3000 2.8.3 Button Definitions Icon Keys Home Description Press this key to go back to the Android Home screen. Menu Press this key to open a menu with items that affect the current screen or application. Back Press this key to go back to the previous screen you were working in. Search Press this key to open Google search for searching your contacts, the Internet and applications. Scan When the barcode reader is enabled, press start barcode scanning. 2.8.
IMX-3000 2.8.5 Status Icons Icon Status Description Battery capacity Battery capacity remind indicator Battery charging Battery is charging.
IMX-3000 3 Basic Skills This chapter describes how to perform basic operations with the device. 3.1 Turn On / Wake Up The device sleeps after a period of inactivity (1 minute by default). You can also manually put your device to sleep by briefly pressing the power button. 1. To turn on or wake up the device, press the power button. 2. At the lock screen , drag the lock icon in any direction. 3.2 Turn Off To shut down the device, press and hold the power button until a menu pops up.
IMX-3000 3.3 Navigating the Touchscreen • Be careful not to damage the touchscreen with sharp objects. Use your finger or a stylus specifically intended for touchscreens. The following actions can be performed with the touchscreen.
IMX-3000 3.5 Extensions to the Home Screen You can swipe left or right on the Home screen to see additional screens. Extensions to the Home screen provide more space for widgets, shortcuts, and other items. On the screen to the left of the main Home screen, you will find the Quick Settings widget. You can drag this widget to your desired location.
IMX-3000 3.6 Using Applications Touch on the Home screen to open the Applications & Widgets screen. This screen holds icons for all of the applications on your device. Touch an icon to open the application. 3.7 Status Bar and Notifications Panel The Status bar appears at the top of most screens. It displays the time, battery and other status icons, and notification icons. Status Icons Notification Icons The Notifications panel can be opened by swiping down from the top of the screen.
IMX-3000 3.8 Entering Text You can enter text, numbers, and symbols using the onscreen keyboard. Some applications open the keyboard automatically. Others require you to touch the input field where you want to enter text to open the keyboard. To enter text, touch the keys on the keyboard to type. To enter numbers or symbols, touch the Symbols key to switch to the numbers and symbols keyboard.
IMX-3000 4 Wireless Connections 4.1 Connecting to a Wi-Fi Network 1. Touch on the Home screen → Settings → Wi-Fi. 2. Slide the switch to turn on Wi-Fi. → 3. The IMX-3000 scans for available Wi-Fi networks and displays their names. Secure networks are indicated with a lock icon. 4. Touch a Wi-Fi network to connect to it. You will be prompted to enter a password or other credentials if the network is secured.
IMX-3000 • When Bluetooth is turned on, the Bluetooth notification icon will display on the status bar. You can start exchanging data with the Bluetooth device. • Touch the Menu button • When Bluetooth is turned on, the IMX-3000 will search and display available devices and the notification will display on the status bar. to see more functions. 4.3 Using GPS and Assisted GPS 4.3.1 Enabling GPS 1. Touch on the Home screen → Settings → Location Services . 2. Enable GPS satellites 4.3.
IMX-3000 4.3.3 Get GPS Location in Google Maps 1. Touch on the Home screen → Maps . 2. Your current location will be displayed in Google Maps. • It may take several minutes for GPS to determine your location for the first time. GPS will be more time efficient after satellite locations have been saved.
IMX-3000 4.4 Connecting to the Network 4.4.1 Carrier information Touch on the Home screen → Settings → About phone → Status. The carrier and SIM card relate information will be displayed. 1. Network 2. Signal strength 3. Mobile network type 4. Service state 5. Roaming 6. Mobile network state 7. Phone number 4.4.2 Setting Airplane Mode 1. Touch on the Home screen → Settings → More. 2. Enable Airplane mode by touching the check box. • All wireless functions will stop in Airplane mode.
IMX-3000 4.4.3 Enabling 2G Networks 1. Touch on the Home screen → Settings → More → Mobile network settings. 2. Enable 2G networks by touching the check box. • The 2G icon will replace the 3G icon in status bar. 4.5 Setting Up a VPN 1. Touch on the Home screen → Settings 2. Set up a VPN by selecting the desired APN.
IMX-3000 4.6 Enabling NFC 1. Touch on the Home screen → Settings → More 2. Enable/Disable NFC • An NFC application must be installed to use this function.
IMX-3000 5 Camera Launch Camera by touching • on the Home screen, then → Camera Remove the protective film on lens before using the camera. 5.1 Picture mode 5.1.1 Taking a Picture 1. Drag the control to the Photo position 2. Frame your subject on screen 3. Touch the onscreen Shutter icon to take a picture. 5.1.2 Zooming In and Out Drag the Zoom scroll to zoom in or zoom out.
IMX-3000 5.1.3 Setting the Flash Mode 1. Touch the Settings icon 2. Touch 3. Touch . to set the desired flash mode. to close the menu. 5.1.4 Setting the Storage Location 1. Touch the Settings icon 2. Touch . → Storage Location to set picture/video storage location.
IMX-3000 5.1.5 Setting the Picture Size 1. Touch the Settings icon 2. Press . → Picture size. 3. Press < or > to select picture size. 4. Picture size Options Size (WxH) Full HD (1944x2595) 1944 x 2592 HD (1536 x 2040) 1536 x 2048 High (1200x1600) 1200 x 1600 Medium (480x640) 480 x 640 Low (144x176) 144 x 176 5.1.6 Setting Picture Quality 1. Touch the Settings icon 2. Press . → Picture quality.
IMX-3000 3. Press < or > to select the picture quality. Options Super fine Jpeg 100% Jpeg 95% Jpeg 85% Jpeg 75% Jpeg 65% 5.1.7 Setting ZSL ZSL stands for zero shutter lag. 1. Touch the Settings icon 2. Press . → ZSL to set ZSL on or off. 5.1.8 Resetting the Camera Settings Reset the camera settings to factory default. 1. Touch the Settings icon 2. Press . → Reset defaults.
IMX-3000 5.2 Video Mode 5.2.1 Shooting a video 1. Drag the control to the Video position 2. Frame your subject on screen 3. Touch the Start icon to start shooting a video. 4. Touch the Stop icon to stop shooting a video. 5.2.2 Setting Flash mode 1. Touch the Settings icon 2. Touch . to set the desired flash mode. 3. The flash mode can be set to On or Off. 4. Touch to close the menu.
IMX-3000 5.2.3 Setting Video quality 1. Touch the Settings icon . 2. Touch → Video quality. 3. Touch to close the menu.
IMX-3000 6 Connecting to a PC To connect the device to a PC, first install the USB drivers. Download the Windows driver from the ADLINK website at http://www.adlinktech.com/PD/web/PD_detail.php? cKind=& pid=1252. After connecting the device to a USB port on a desktop PC, the USB drivers can also be found on a virtual CD drive called "USB Driver Disk". The following instructions are for installing the USB drivers under Windows 7.
IMX-3000 6.1 Installing the USB Drivers 1. Connect the device to a USB port on a desktop PC with the Micro USB cable provided.
IMX-3000 2. Extract the contents of the USB driver archive, or use the files found on the virtual CD drive on the device. Right-click on the executable file DriverSetup.exe. Check the compatibility mode box and select (Windows XP Service Pack 3). Click "OK". 3. Click "Install Driver".
IMX-3000 4. Click "Install this driver software anyway". 5. Click "Install this driver software anyway". 6. Click on to close the driver setup program.
IMX-3000 6.2 Enabling Media Transfer Protocol (MTP) 1. Swipe down to view the Notifications panel and touch Connected as a media device. 2. Select Media device (MTP).
IMX-3000 3. You will now be able to access the files on the device from the desktop PC.
IMX-3000 7 Management The Settings application allows you to configure and customize your device. To open Settings, touch on the Home screen → Settings . 7.1 Wireless and Networks Settings Item Description Wi-Fi Configure and use Wi-Fi Bluetooth Configure and use Bluetooth Data usage View the amount of data uploaded or downloaded by your device during a given period. You can set conditions for data usage. More ... Airplane mode Turns off all wireless radios.
IMX-3000 7.2 Device Settings Item Sound Display Storage Description Configure sound settings such as volumes, silent mode, ring tones, notification sounds, vibration, touch sound, etc. Set brightness, wallpaper, auto-rotate screen, sleep timeout, font size, touch key light duration, and proximity switch View the amount of storage used and available on your device Battery View battery usage data Apps Manage installed applications and change the preferred installation location. 7.
IMX-3000 7.4 System Settings Item Description Date & time Use automatic date and time or to enter manually, choose date and time format Accessibility Set up your device’s accessibility settings Developer options Set up your devices developer options About phone Install a system upgrade, get status information (battery status/level, network, signal strength, mobile network type, service state, roaming status, IMEI, Wi-Fi MAC address, Bluetooth address, serial no.
IMX-3000 8 Utilities 8.1 Button Utility The Button Utility allows the following keys to be re-assigned or set as a shortcut key for launching an application. When the Reader Utility is running in the foreground and shown on the display, the system will never go to sleep. 1. 2. 3. 4. Volume Up key (Side key - up) Volume Down key (Side key - down) Search key Scan button Launch the Button Utility by touching , then touching the Button Utility icon . 8.1.1 Re-assigned Key Value 1.
IMX-3000 8.1.2 Set Key to Launch an Application 1. Select the .apk radio button, and then touch to set the shortcut of application in the menu. 2. You may re-assign the key to open any Android application. 8.2 Reader Utility Launch the Reader Utility by touching , then touching the Reader Utility icon . 8.2.1 Overview Menu Scan engine type (auto detected) Barcode type Barcode content Soft scan key 8.2.
IMX-3000 8.2.3 Background Scanning • Hide the Reader Utility by launching another application or pressing the Back/Home key. • Acquire barcode data by pressing the Scan button any text area that you focus on. . The barcode data can be sent to 8.2.4 Settings 1. Notifications • • • • LED Notification: Press check box to enable LED notification. Green LED will turn on when good read. Sound Notification: Sound will play in good read.
IMX-3000 • • • Suffix Output Code Add the suffix code in end of barcode content. Delimiter Add a delimiter in end of barcode content. Auto Enter Add an ENTER character in the end of one scan 2. Auto enable background scan when system boot • The Reader Utility will be enabled in the background when the system boots. 3. Reset to default • Revert to factory default settings. 8.2.
IMX-3000 Continuous mode Mode Enable Hands Free Disable Hands Free Press the Scan button, then Press and hold the Scan button. release it. Align the aiming beam Align the aiming beam with the with the barcode to scan the barcode to scan the barcode. The scan engine will trigger Ignore same barcode. The scan engine will trigger continuously at 2 second code continuously at 2 second intervals. In this mode, repeated intervals. In this mode, repeated barcode data will be ignored.
IMX-3000 9 Care and Maintenance • • • • • • • • • Avoid exposure to excessive moisture and extreme temperatures. Avoid exposure to direct sunlight or strong ultraviolet light for extended periods of time. Do not place anything on top of your device or drop objects on your device. Do not drop your device or subject it to severe shock. Do not subject your device to sudden and severe temperature changes. This may result in moisture condensation inside the unit and subsequent damage.
IMX-3000 Safety Instructions For user safety, please read and follow all instructions, WARNINGS, CAUTIONS, and NOTES marked in this manual and on the associated equipment before handling/operating the equipment. • • • • • • • • • Read these safety instructions carefully. Keep this user’s manual for future reference. Read the specifications section of this manual for detailed information on the operating environment of this equipment.
IMX-3000 Getting Service ADLINK Technology, Inc. Address: 9F, No.166 Jian Yi Road, Zhonghe District New Taipei City 235, Taiwan Tel: +886-2-8226-5877 Fax: +886-2-8226-5717 Email: service@adlinktech.com Ampro ADLINK Technology, Inc. Address: 5215 Hellyer Avenue, #110, San Jose, CA 95138, USA Tel: +1-408-360-0200 Toll Free: +1-800-966-5200 (USA only) Fax: +1-408-360-0222 Email: info@adlinktech.com ADLINK Technology (China) Co., Ltd. Address: 300 Fang Chun Rd.
IMX-3000 ADLINK Technology Japan Corporation Address: KANDA374 Bldg. 4F, 3-7-4 Kanda Kajicho, Chiyoda-ku, Tokyo 101-0045, Japan Tel: +81-3-4455-3722 Fax: +81-3-5209-6013 Email: japan@adlinktech.com ADLINK Technology, Inc. (Korean Liaison Office) Address: 802, Mointer B/D, 326 Seocho-daero, Seocho-Gu, Seoul 137-881, Korea Tel: +82-2-2057-0565 Fax: +82-2-2057-0563 Email: korea@adlinktech.com ADLINK Technology Singapore Pte. Ltd.