WAC 5 6 8 USER MAN final 3/2/05 12:23 PM Page ROOMAIR CONDITIONER Use and Care Manual v 8,1 ]_/ <;0 @ ...<,..,._, _,,. ;s.,.,, ,,:_ Remote control AAW-05CR1 AAW-06CR1 AAW-08CR1 AAW-08DR1 FHU FHU FHU FHU Mechanical control AAW-05CM1 FHU AAW-06CM1 FHU AAW-08CMIFHU AAW-08DM1 FHU Thank you for purchasing an Admiral _room air conditioner. Please read this "Use and Care Manual" carefully before installing and using this appliance. Keep this manual for future reference.
WAC 5 6 8 USER MAN final 3/2/05 12:23 PH Page 3 O Page Introduction .................................................. Parts Identification ........................................... Air Conditioner Safety ......................................... 2 2-3 4-5 Electrical Specifications Tips Before Installation Installation Instructions ...................................... 8-10 Operating Instructions ...................................... Care and Maintenance .........................
WAC 5 6 8 USER MAN final 3/2/05 12:23 PM Page 4Q INTRODUCTION Thank you for choosing provides If properly instaflation instaflation information maintained, this room air conditioner necessary to cool your home. This USE AND CARE MANUAL for the proper care and maintenance your air conditioner difficulties, read instructions completely before starting. and operation of your room air conditioner. Mechanicam control Interior Air Outlet of your new room air conditioner.
WAC 5 6 8 USER MAN final 3/2/05 12:23 PM Page 50 INTRODUCTION _,- Remote control model )ntal Air Vane Interior Air Outlet Vertical Air Vane Fresh Air Lever (for 8K model only) Cabinet Air Filter(Inside) Front Panel o Interior Air Inlet Grille Remote Exterior Air Inlet Control Control Control Panel Panel _- Power Remote Cord Control Note: The figures in this manual are based on the external view of a standard model.
WAC 5 6 8 USER MAN final 3/2/05 12:23 PH Page 6Q AiR CONDiTiONER SAFETY Your safety and the safety of others are very important. We have provided many important safety messages in this manual and on your appliance. Always read and obey all safety messages. This is the SAFETY ALERT SYMBOL. This symbol alerts you to potential hazards that can kill or hurt you and others. All safety messages will follow the safety alert symbol and either the word "DANGER" or "WARNING.
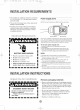
WAC 5 6 8 USER MAN final 3/2/05 12:23 PH Page 7 0 INSTALLATIONREQUIREMENTS The portable air conditioner should be connected to a 115 V, 60 Hz, 15- or 20-amp fused 3-prong grounded outlet. Power Supply NOTE: o o The use of a time-delay fuse or time-delay breaker is recommended. Your unit's Cord device may differ from the one shown. circuit B All wiring must comply with local and national electrical codes and be installed by a qualified electrician.
WAC 5 6 8 USER MAN f_nal 3/2/05 12:23 PM Page 80 ELECTRICALSPECIFICATIONS 1. All wiring electrical must comply with local and national codes and must be installed licensed electrician. by a Once you have any questions regarding the following contact a licensed electrician. If the air conditioner has a serial plate rating of 115 volts and up to and including 7.5 amps the unit maybe on a fuse or circuit breaker with other devices.
WAC 5 6 8 USER MAN final 3/2/05 12:23 PH Page 90 TiPS BEFOREiNSTALLATiON Your RoomAir Conditioner unit is designed to be highly efficient and save energy. Follow these Your RoomAir Conditioner was designed for easy installation in a single or double-hung recommendations window. NOTE: This unit is NOT designed for vertical (slider type) windows. for greater efficiency. 1. Select thermostat setting that suits your comfort needs and leave the thermostat at that chosen setting.
WAC 5 6 8 USER MAN final 3/2/05 12:23 PM Page 1_ iNSTALLATiONiNSTRUCTiONS F. Your unit was designed to evaporate condensation under normal conditions. However, under extreme Because the compressor is located on the controls side of the unit (right side), this side will be heavier and more awkward to manipulate. Inadequate support on control side of the unit can result in personal injury and damage to your unit and property.
WAC 5 6 8 USER MAN final 3/2/05 12:23 PM Page i s iNSTALLATiONiNSTRUCTiONS _W P_I96_IW _'_":'_'__,*'"_ _,,_fs_ (}B _::_1::'_ _:_ 1. If your air conditioner cabinet 18" wide, it will fit window openings 21" to 32" in wide. Minimum opening height is 14" from bottom of sash to sill (Fig. 1 ). Fig. 1 2. Insert the guide panels into the guides of the air conditioner. Fasten the curtains to the unit with screws (Fig. 2). 2/5 " Screws Fig. 2 3. Cut the adhesive-backed seal strip the window width.
WAC 5 6 8 USER MAN final 3/2/05 12:23 PM Page 1_ iNSTALLATiONiNSTRUCTiONS 5. Install the L brackets on the outer sill with the Outer inner SIll SIll short side of the bracket against the back of the inner sill. Install one L bracket 7.5" to each side of center line. See Fig• 5. Short Side ./'" 6. Carefully lift the air conditioner and slide it into Fig. 5 the open window.
WAC 5 6 8 USER MAN final 3/2/05 12:23 PM Page i_ OPERATINGiNSTRUCTiONS _Mechanicam control model MODE The mode knob controls fan speeds and cooling speeds. To set desired cooling temperature, simply OFF rotate the mode knob dial to the appropriate setting. See Fig. 9. Thermostat THERMOSTAT The thermostat automatically cycle (compressor) room temperature.
WAC 5 6 8 USER MAN final 3/2/05 12:23 PM Page i_ OPERATINGiNSTRUCTiONS You can easily operate this air conditioner by pressing relevant button on the control pane[ as we[[ as the remote control Control Panel (_) Button The air conditioner will be started when it is energized or will be stopped when it is in operation, if you press this button. When the air conditioner is heating, allow 3 minutes after you press this button.
WAC 5 6 8 USER MAN final 3/2/05 12:23 PM Page i_ OPERATINGiNSTRUCTiONS 0 0 0 0 0 0 Power BUTTON The appliance will be started when it is energized or will be stopped when it is in operation, if you press this button. Mode Mode BUTTON Used to select the operation mode. Power Saver BUTTONS Used to set room temperature in COOLING mode or used to set time in Timer mode. ii High BUTTON Used to select the high fan speed mode. Mid BUTTON Used to select the mid (same as low) fan speed mode.
WAC 5 6 8 USER MAN final 3/2/05 12:23 PM Page i_ OPERATINGiNSTRUCTiONS • How to insert the Batteries Remove the battery cover according to the arrow direction. Insert new batteries making sure that the (+) and (-) of battery are matched correctly. Reattach the cover by sliding it back into position. Note: Use 2 LR6 AA(f.Svolt) Replace batteries with becomes dim. If the replacement will keep original control) batteries.
WAC 5 6 8 USER MAN final 3/2/05 12:23 PM Page i_ CAREAND MAINTENANCE When servicing the air conditioner, be sure to turn the mode switch to the "OFF" position and disconnect the power cord from the electrical outlet. 1. DO NOT use gasoline, benzine, thinner or other chemicals on the air conditioner as these substances may cause damage and deformation to the paint finish of plastic parts. DO NOT forget to install the air filter.
WAC 5 6 8 USER MAN final 3/2/05 12:23 PM Page TROUBLESHOOTING 1_ GUIDE Frequently, a problem is minor and a service call may not be necessary, use this troubleshooting possible solution. PROBLEM Air conditioner not operate POSSIBLE will CAUSE SUGGESTED No power to the unit. Check connection power source. guide for a SOLUTION of power cord to Check fuse or circuit breaker. Set MODE knob to position than "OFF". Inefficient or no cooling other Dirty air filter.
WAC 5 6 8 USER MAN final 3/2/05 12:23 PM Page 1_ WARRANTY 5 YEAR FULL WARRANTY This product is warranted for 5years from the date of original purchase. Any part which fails in materials or workmanship will be replaced within the warranty period. This warranty covers in home service. Acopy of your proof of purchase, with date of purchase and product name included, is required to arrange this service repair.
WAC 5 6 8 USER MAN final 3/2/05 12:23 PM Page 20 lntr0ducci6n Gracias por elegir este aire acondicionado para enfriar su hogar. Este MANUAL DE USO Y MANTENIMIENTO proporciona la informaciOn necesaria para cuidar y mantener en forma adecuada su nuevo aire acondicionado. Funcionar(] sin problemas durante muchos afios si le brinda el mantenimiento apropiado. Para evitar problemas al instalarlo, lea completamente informaci(}n acerca de la instalacion Modeio Mec antes de comenzar.
WAC 5 6 8 USER MAN final 3/2/05 12:24 PM Page 20 lntr0ducci6n D, Modemo de Remoto contromador Entrada de Aire Inter*ar Aleta deAire Horizontal AireVertical PalancadeAireFresco(s01oenelmodelo8K) Gabinete Filtro deAire (en el interior Panel Rejilla de Entrada de Aire Interior Control Remoto Panel de Control j" Cable Panel de Control Entrada de Aire Exterior de Alimentaci0n Control Remoto < Nota: Las im0genes de este manualestdn En consecuencia, es probable que que usted selec
WAC 5 6 8 USER MAN final 3/2/05 12:24 PM Page 2_ Especificaciones el6ctricas 1. Todos los cables deben cumplir con los c6digos el6ctricos locales y nacionales y los debe instalar un electricista licenciado. Si tiene preguntas relacionadas con las siguientes comuniquese 2. Verifique con un electricista el suministro resuelva cualquier instrucciones, licenciado. de energi a disponible problema de instalar y hacer funcionar y con los cables ANTES esta unidad. 3.
WAC 5 6 8 USER MAN final 3/2/05 12:24 PM Page 20 C0nsej0s antes de la instalaci6n Su unidad de AireAcondicionado para Habitaciones se ha disen_ado para Iograr un alto rendimiento y ahorrar energ_a electrica. Siga las siguientes sugerencias para Iograr un mayor rendimiento. El AireAcondicionado dise_ado en ventanas unidad para Habitaciones de modo se ha tal que resulte facil su instalaci6n armadas sencillas NO se ha dise_ado o dobles.
WAC 5 6 8 USER MAN final 3/2/05 12:24 PM Page 20 lnstrucciones de Instalaci6n F. La unidad est6 dise_ada para evaporar bajo condiciones Debido a que el compresor de los controles se encuentra (a la derecha No obstante, la condensaci6n bajo condiciones de extrema humedad, es probable que la condensaci6n del lado de la unidad), normales. excesiva haga que la bandeja base se desborde este hacia el lado ser6 mas pesado y m_s dificil de manipular.
WAC 5 6 8 USER MAN final 3/2/05 12:24 PM Page 2_ lnstrucciones de Instalaci6n _>__ _ /@ _G_2_iS_ e_ V_¸__ 1. Si el aire acondicionado tiene un gabinete de 18" de ancho, podr(_ colocarse en aberturas de ventanas de 21"a 32" de ancho. La altura m_nima de abertura es de 14" desde la parte inferior del marco hasta el umbral (Fig. 1). Fig. 1 2. Inserte los paneles gula en las guias del aire acondicionado. Sujete las cortinas a la unidad con los tornillos (Fig. 2). Tornillos Fig. 2 / 3.
WAC 5 6 8 USER MAN final 3/2/05 12:24 PM Page 20 lnstrucci0nes de Instalaci6n Umbral Externo Tomil]o modo que la parte mds corta del soporte apoye contra la parte posterior del umbral interno. Instale un soporte en L a 7.5" de cada lado de la I[nea central. Vea la de 3/4" Umbral Intemo k 5. Instale los soportes en L en el umbral externo, de L[nea ./ Cenfral / Tomillo de 3/4" Lado Corto det Soporte Fig. 5. 6.
WAC 5 6 8 USER MAN final 3/2/05 12:24 PM Page 2_ lnstrucciones de Instalaci6n MODE (Modo) La perilla de modo controla las velocidades de ventilador y de enfriamiento. Para fijar una temperatura de enfriamiento, simplemente haga rotar la perilla y col6quela en el nivel deseado. Vea la Fig. 9. THERMOSTAT (Termostato) El termostato controla automciticamente el ciclo de enfriamiento (compresor) del aire acondicionado para mantener la temperatura del ambiente.
WAC 5 6 8 USER MAN final 3/2/05 12:24 PM Page 20 lnstrucci0nes de Operaci6n Panel de Control Este aire acondicionado se puede operar facilmente con los botones del panel de control asicomo tambien con el control remoto. Bot6n (9 (Encendido/Apagado) Si presiona este bot6n, encender_el aireacondicionado. Cuando el aire acondicionado esta de calefacci6n, se per imprentar este bot6n 3 minutos despues.
WAC 5 6 8 USER MAN final 3/2/05 12:24 PM Page 20 lnstrucciones de 0peraci6n 0 Bot6n Power (Encendido/Apagado) El aparato se encender6 si estd apagado o apagam cuando estd en operaci6n, si oprime este bot6n. 0 0 0 0 Bot6n Mode (Mode) Utilice este bot6n para seleccionar el mode de operaci6n. 0 0 Bot6n +- Botones de ajuste de temperatura oprima para ajustar la temepratura del cuarto. oprima para programar la hora. Bot6n High Paraajustarelmodoalta ventilador.
WAC 5 6 8 USER MAN final 3/2/05 12:24 PM Page 30 lnstrucciones de Operaci6n • Colocai6n de las pilas Retire la tapa de las en el sentido de la flecha. Introduzca las pilas nuevas,con cuidado de que coincidan los polos(+)y(-). Vuelva a instalar la tapa,desliz('mdola otra vez a su posici6n. Nota: • Utilice pilas 2 LR6 AA(1.5_.No utiice pilas recargables.Sustituya las pilas por otras nuevas del mismo tipo cuando la pantalla aparezca atenuada.
WAC 5 6 8 USER MAN final 3/2/05 12:24 PM Page 30 Cuidad0 y Mantenimient0 Cuando repare el aire acondicionado, aseg_rese ¥!_ de colocar la perilla de modo en OFF y luego desconectar el cable de alimentaci6n del tomacorriente electrico. 1. NO utilice gasolina, productos quimicos estas sustancias y deformar bencina, el acabado ya que de pintura las piezas de pl6stico.
WAC 5 6 8 USER MAN final 3/2/05 12:24 PM Page 30 Gua para la S01uci6n de Pr0blemas Generalmente los problemas son sencillos Esta guia puedeayudarlo a resolverlos. PROBLEMA CAUSA El aire acondicionado no funciona La unidad suministro yes probableque no sea necesariollamar POSlBLE SOLUCI6N no recibe el6ctrico. a un tecnico. SUGERIDA Verifique si el cable de alimentaci6n st6conectado al tomacorriente. e Verifique el fusible o el cortacircuito.
WAC 5 6 8 USER MAN final 3/2/05 12:24 PM Page 30 Garantia GARANTIA COMPLETADE 5ANOS Este productose garantiza por 5aSos a partir dela fechade la compra original. Cualquier parte que falle en materiales o la ejecuci6n sera substituida dentro del perfodo dela garantia. Estagarantia incluyeservicio adomicilio. Unacopia de su prueba dela compra,con lafecha dela compradel productoincluida, serequiere para acordar esta reparaci6n del servicio.
WAC 5 6 8 USER MAN final 3/2/05 12:24 PM Page 3O Admiral ° © 2005 Admiral'_ Kelon Air Conditioner Co., and Kelon USA, Inc. All rights reserved.