
User Guide


Using Help | Contents | Index Back 151
Adobe After Effects Help Working with Masks and Transparency
Using Help | Contents | Index Back 151
To create a rectangular or oval mask the size of the layer:
1 Select a layer in the Composition window or display a layer in the Layer window.
2 In the toolbox, double-click either the rectangle tool or the oval tool.
To create a rectangular or oval mask by specifying a mask shape numerically:
1 Select a layer in the Composition window or display a layer in the Layer window.
2 Choose Layer > Mask > New Mask. A new mask appears in the Composition or Layer
window with its handles at the outer edges of the frame.
3 Choose Layer > Mask > Mask Shape.
4 Select Rectangle or Oval.
5 If you want, specify the size and location of the mask’s bounding box. For information
on coordinates, see “Info palette” on page 23.
6 Click OK.
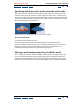
About Mask Paths
A mask in After Effects is a drawn path consisting of path segments and control points.
Segments are the lines or curves that connect two control points. Control points define
where each segment of a path starts and ends.
In addition, the mask you create can be either an open or closed path. An open path has
different beginning and ending points; for example, a straight line is an open path. A
closed path is continuous and has no beginning or end; for example, a circle is a closed
path. Closed-path masks can create transparent areas for a layer. Open paths cannot
create transparent areas for a layer, but are useful when used as a parameter for an effect;
for example, creating a visible line or shape from the mask using the Stroke effect. For
more information, see “Applying effects to a mask” on page 161.
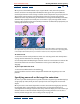
Creating masks from motion paths
You can copy Position, Anchor Point, or an effect’s point position keyframes and paste
those keyframes to a selected mask. This is useful to create animations that follow the edges
of a mask. When you create masks from motion paths, make sure that you copy keyframes
from a single position property only—do not copy the keyframes of any other property. For
information on motion paths, see “Setting layer position” on page 103.
To create a mask from a motion path:
1 In the Composition window, display the motion path from which you want to create the
mask.
2 In the Timeline window, select the successive keyframes along the motion path you
want to use as a mask. Click the Position property name to select all the keyframes. Shift-
click successive keyframes to select only a few keyframes.
3 Choose Edit > Copy.
4 In the Timeline window, select the layer you want to apply the mask to and expand its
properties, or open the layer in its Layer window.
5 Do one of the following:
• To use the motion path as a new mask, choose Layer > Mask > New Mask.