
User Guide


Using Help | Contents | Index Back 159
Adobe After Effects Help Working with Masks and Transparency
Using Help | Contents | Index Back 159
When you use the Pan Behind tool to pan a layer behind a mask, the mask’s position
remains constant in the Composition window, but changes in the Layer window. The
masked layer’s Position values change in relation to the composition. As you pan past the
edges of the layer’s frame, the layer’s Mask Shape values also change. Using the Pan
Behind tool saves steps; without it, you would have to change the masked layer’s Position
and Mask Shape properties manually. You can animate a layer panning behind another
layer by setting keyframes for the masked layer’s Position and Mask Shape properties (see
“Setting keyframes” on page 98).
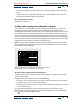
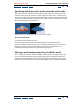
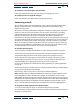
When you use the Pan Behind tool in the Composition window, After Effects automatically makes
two adjustments for you. In the Layer window, the mask is moved in relation to its layer (top), while
in the Composition window, the layer is moved in relation to the composition (bottom).
To move a mask:
1 Select the mask or masks you want to move. See “Selecting masks and control points”
on page 153 for information on selecting masks.
2 In the Composition window, drag the mask or masks to a new location. To constrain the
movement of the mask or masks to horizontal or vertical, press Shift after you start
dragging.
To pan a layer behind its mask:
1 Select the Pan Behind tool in the toolbox ( ).
2 Click inside the mask area in the Composition window and drag the layer to a new
position.
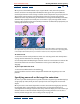
Specifying one mask as the target for animation
As soon as you draw the first point on your first mask for a layer, the Layer window displays
a Target pop-up menu, which you use to specify a mask as the target for all new mask
shapes.
When you create a new mask shape while a mask is selected in the Target pop-up menu,
the targeted mask is replaced by the new shape. You can change this behavior by
selecting None from the pop-up menu so that any new mask shape you create in the Layer
window creates a new mask instead of replacing an existing mask. You can also lock a
mask to prevent changes to it. See “Locking a mask” on page 163.