
User Guide

Using Help | Contents | Index Back 218
Adobe After Effects Help Applying Effects
Using Help | Contents | Index Back 218
For more information, see the After Effects product section on Adobe’s Web site.
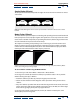
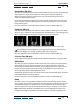
Brush Strokes
This effect applies a rough painted look to an image. You can also use this effect to achieve
a pointillist-style look by setting the length of the brush strokes to zero and increasing the
stroke density. Although you specify the direction of strokes, they are scattered randomly
by a small amount to give a more natural effect. This effect alters the alpha channel, as well
as the color channels; if you have masked out a portion of the image, the brush strokes
“paint” over the edges of the mask.
For more information, see the After Effects product section on Adobe’s Web site.
Color Emboss
This effect works like the Emboss effect, without suppressing the image’s original colors.
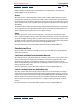
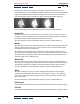
Emboss
This effect sharpens the edges of objects in the image and suppresses colors. The effect
also highlights the edges from a specified angle. The layer’s quality setting influences the
Emboss effect by controlling the Relief setting. Relief is calculated at the subpixel level in
Best quality and rounded off to the pixel level in Draft quality.
The Direction option specifies the apparent direction from which the highlight source is
shining, in degrees. A setting of 45 degrees causes the shadow to be cast from the
northeast direction. Relief specifies the apparent height of the embossing, in pixels. The
Relief setting actually controls the maximum width of highlighted edges. Contrast
specifies the sharpness of the image content’s edges. At lower settings, only distinct edges
show the effect. As you increase the setting, the highlight becomes more extreme.
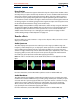
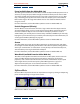
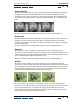
Find Edges
This effect identifies the areas of the image that have significant transitions and empha-
sizes the edges. Edges can appear as dark lines against a white background or colored
lines against a black background. When the Find Edges effect is applied, images often look
like sketches or photographic negatives of the original.
The Invert option inverts the image after the edges are found. When selected, edges
appear as bright lines on a black background; when not selected, edges appear as dark
lines on a white background.
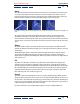
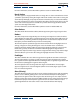
Glow (PB only)
This effect finds the brighter parts of an image, and then brightens those and surrounding
pixels to create a diffuse, glowing halo. It can also simulate overexposure of brightly lit
objects. Base the glow on either the original colors of the image or on its alpha channel.
Glows based on alpha channels produce diffuse brightness only at the edges of the image,
between the opaque and transparent regions. You can also use this effect to create a
gradient glow between two colors and to create multicolor effects with looping.