
User Guide

Using Help | Contents | Index Back 344
Adobe After Effects Help Using Vector Paint (PB only)
Using Help | Contents | Index Back 344
• First, choose the Shift-Paint Records option you want to apply before you paint the
strokes that will use this option. These options are available only on the Shift-Paint
Records submenu of the Vector Paint contextual menu.
Note: You cannot apply a Shift-Paint Records option to strokes you have already created.
• Second, hold down Shift as you paint. Otherwise, the Shift-Paint Records options will
not apply to those strokes.
When you draw, the Info palette displays the abbreviation QP followed by a description of
the selected option: Current Frame, Next Frame (for To Sequential Frames), Realtime, or
Continuously. These options affect stroke start times in the following ways:
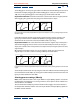
To Current Frame All strokes start at the current frame (the Time Marker position when
you draw the strokes). This is similar to ordinary painting mode except that Shift-Paint
Records has no redraw delays.
To Sequential Frames All stroke start times are offset by one frame. The next frame is
calculated according to the composition frame rate at the time of drawing.
For example, if the Time Marker is at 0:00 when you draw three strokes, then the start
point is 0:00 for the first stroke, 00:01 for the second stroke, and 00:02 for the third stroke.
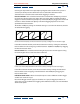
In Realtime Stroke start times are determined by how they are drawn. The strokes are
recorded and played back in real time even if you lift the brush while drawing. Strokes play
back exactly as they were recorded, including any time that elapsed (gaps) between the
creation of the strokes (provided that you continued to hold down Shift during the time
gap).
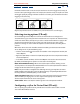
Continuously Stroke start times follow one another, without any gaps. When one stroke
is finished drawing, the next one begins immediately. Otherwise, this is similar to the In
Realtime option.
Setting Wiggle Control options (PB only)
Vector Paint strokes are made up of many tiny points that create the stroke path. You
cannot isolate or individually adjust these individual points, but you can affect them using
Vector Paint features such as Smoothing and Wiggling. The wiggling of a stroke is created
by manipulating and displacing these points along the stroke path.
Set wiggle options in the Effect Controls window under Vector Paint. Click the arrow
beside Wiggle Control to display or hide the following options: Enable Wiggling, Wiggles/
sec, Displacement Variation, Pressure Variation, Pressure Detail, and Individual Stroke
Seeds. Click the arrows beside each of these to see or hide more options.
Enable Wiggling When Enable Wiggling is checked, all strokes on that layer are set to
wiggle using the Wiggle Control values set in the Effect Controls window (described
below).
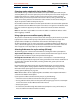
Wiggles/sec This value determines the number of Wiggles per second of Composition
time. Wiggling is spline-based morphing of paint strokes. Wiggles/sec controls the speed
at which the morph completely shifts shape. Lower values result in a smooth animation of
morphing strokes. Higher values create more rapid wiggling.
Example: In a 30-fps composition, setting the Wiggle/sec value to 30 creates one wiggle
per frame.