
User Guide


Using Help | Contents | Index Back 405
Adobe After Effects Help (5.5) Rendering a Movie
Using Help | Contents | Index Back 405
Tracking render dependencies
Use this feature to set postrender actions for files rendered on multiple machines. While
performing a render, the render engine checks to confirm that any item that it needs to
begin rendering has completed its own render. For example, if render item B depends on
render item A, which has not finished rendering or has received an error, then render item
B will not render. This feature, called “tracking dependencies,” works both when rendering
a single project or performing a watch-folder render. By using this feature in conjunction
with postrender actions, you can set the output of a watch-folder render to be rerendered
as a single Quicktime™ or AVI movie.
To output a multiple machine render as a Quicktime or AVI movie:
1 Create a multimachine render. See “Rendering using a watch folder (PB only)” in
chapter 14 for information on multimachine renders.
2 Drag the multimachine render’s output module to the Project window. This creates a
placeholder for that render's output.
3 Drag the placeholder back to the render queue.
4 Set the desired Render Settings and Output Module settings for the placeholder and
render the footage.
Note: The subsequent render of a Quicktime or AVI movie from a multimachine-rendered
sequence file will be rendered by only one machine.
Wo r king with new file export options
After Effects 5.5 features several new file export options.
Rendering as a RealMedia file
Use the RealMedia Output Plug-in to generate RealMedia files that can then be embedded
in Web pages for both streaming and downloading. This plug-in supports RealVideo®,
RealAudio®, and RealVideo with audio.
To render as a RealMedia file:
1 Place the item to be rendered into the render queue. For information on placing items
in the render queue, see “Working in the Render Queue window” in chapter 14.
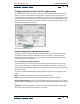
2 In the Output Module Settings dialog box, choose RealMedia from the Format menu.
3 In the Video Output section, click the Format Options button.
4 Set the pertinent options in the RealMedia Output Options dialog according to the
following descriptions and click OK:
RealMedia Clip Settings Indicates how the RealMedia file is optimized according to the
content of the file and the intended playback quality.
Video Quality Specifies the image and playback quality of the file. Choose Normal Motion Video for clips
that contain mixed-format video. This choice creates the largest file in most cases. Choose Smoothest
Motion Video for clips that contain high action. Choose Sharpest Image Video for limited-motion clips.
Choose Slideshow for video that appears as a series of still photos. This choice creates the smallest file in
most cases.