
User Guide


CHAPTER 8
152
Effects Menu – Edit View
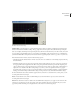
Graphic Phase Shifter dialog
Note: For more information about Adobe Audition’s graph controls (such as how to add and remove control points), see the
“Looking at the Work Area” chapter.
Most surround sound stereo decoders do different things with audio depending on the phase relationship. If you’re trying
to take advantage of surround sound, try making just one channel 90 degrees out of phase. This would play the audio
on all channels when surround-sound decoded. If you make the left channel 180 degrees out of phase (this is the same as just
inverting one channel), it’ll play on the rear speakers when decoded.
You can create simulated stereo by creating a zigzag pattern that gets “zigzaggier” at the high end on one channel. Put
two channels together that have been processed in this matter (using a different zigzag patterns for each) and the stereo
simulation is more dramatic. (This would have the same effect as making a single channel twice as “zigzaggy”.)
If you adjust the phase of one channel in just a small frequency band first, then use Flange or another Adobe Audition
effect that depends on phase, you’ll get different results than with non-pre-phase-shifted audio.
Splines Check this option to generate a smoother, best fit curve instead of a straight line between control points on the
graph. When you use Spline Curves, the line will not ordinarily travel directly through the control points; rather, the
points control the shape of this curve. Use spline curves when you want very smooth curves instead of straight lines (with
their discontinuities at the control points). To get the curve closer to a control point, click to create more control points
near the point in question. The more control points there are clustered together, the closer the Spline Curve will be to
those points.
+/-360º Range When checked, the graph’s y-axis (vertical) ruler goes from +360 degrees (top) to -360 degrees (bottom).