
Specifications


8
USING CAPTIVATE
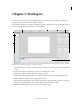
Workspace
Last updated 9/28/2011
Toolbars
Toolbars provide you an easier access to the most commonly used menus. You can quickly complete a task or a
procedure by clicking the buttons on the toolbar instead of navigating to the menu.
You can hide or show toolbars according to your requirements. To show or hide a toolbar, select Window and then
select the name of the toolbar.
Main Options Shortcuts to frequently performed actions, such as, save, record, and preview.
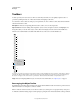
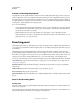
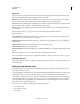
Object Toolbar Shortcuts for adding Adobe Captivate objects, such as, text captions, buttons, and highlight boxes.
Using this toolbar you can also draw objects, such as, lines and rectangles, and also set the stroke and fill colors.
The Line tool contains hidden tools. Click and hold the mouse on the tool to view the hidden tools.
A. Selection Tool B. Insert Text Caption C. Insert Rollover Caption D. Insert Highlight Box E. Insert Click Box F. Insert Button G. Insert
Text Entry Box H. Insert Rollover Slidelet I. Insert Zoom Area J. Insert Mouse K. Insert Text Animation L. Line tool M. Rectangle tool
N. Oval tool O. Polygon tool P. Set Stroke Color Q. Set Fill Color R. Set Stroke/Fill to Black/White S. Swap Fill/Stroke Colors
Align Shortcuts for aligning different objects on a slide. For more information, see “Align objects” on page 67.
Rearranging the Object Toolbar
By default, the tools in the toolbar are arranged in a single column. Click the double arrow at the top of the toolbar to
make it horizontal or to arrange the tools in two columns.
Note: To make the toolbar horizontal, ensure that the toolbar is free-floating and is not grouped with any other panel.
To make the toolbar free-floating, drag it out of the panel group using the two horizontal dotted lines at the top of the bar.
B
D
C
E
F
G
H
I
J
K
A
L
M
N
O
P
Q
R
S