
User Guide

342
ADOBE GOLIVE CS2
User Guide
To create image borders
You can create image borders to highlight images on a page. Borders around linked and nonlinked images appear in
the default colors for links and text, respectively.
1 Select the image, and then select Border in the More tab of the Image Inspector.
2 Type in the desired border width in pixels, and press Enter (Windows) or Return (Mac OS).
See also
“To set default colors for text or links on the page” on page 180
Creating rollovers
About rollovers
Rollovers respond to a viewer’s mouse movements and clicks, providing interactivity on a web page. To aid
navigation, you can use rollovers to highlight hyperlinked images. To further enhance interactivity, you can combine
rollovers with actions.
Rollovers require separate images for each rollover state: Normal, Over, Down, Click, Up, and Out. The Normal state
appears when the mouse is over another part of the page. The remaining states appear when the viewer moves or
clicks the mouse over a rollover object.
Note: Normally, images for all states of a rollover have identical dimensions. If a rollover has an image with different
dimensions, you can either resize it in a graphic editor, or choose Image from the Width or Height menu in the Image
Inspector.
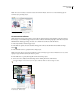
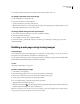
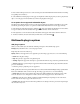
C
A B
Rollovers palette
A. HTML element of trigger object B. Expert Mode warning icon C. Palette menu button
To create self rollovers
With self rollovers, the most common rollover type, mouse actions over an image cause changes in that image alone.
1 In the Layout Editor, select the desired image.
2 In the Rollovers palette, select the desired rollover state, and then click the New Rollover Image button .
3 In the URL text box, specify an image for the state.
4 To force browsers to fully download the image before enabling the rollover, click Preload.