
User Guide


ADOBE INCOPY CS2
User Guide
253
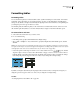
3 In the Preview proxy, specify which lines to change. For example, if you want to add a heavy stroke to the outside
lines but not to the inside lines of the selected cells, click an inside line to deselect it. (Selected lines are blue;
deselected lines are gray.)
Select the lines you want to affect in Preview proxy.
In the Preview proxy, double-click any outside line to select the entire outer selection rectangle. Double-click any
inside line to select the inside lines. Triple-click anywhere in the proxy to select or deselect all lines.
4 For Cell Stroke, specify the desired weight, type, color, tint, and gap settings.
5 For Cell Fill, specify the desired Color and Tint settings.
6 Select Overprint Stroke and Overprint Fill if desired, and then click OK.
See also
“Table stroke and fill options” on page 254
To add a stroke or fill to cells using the Swatches palette
1 Select the cell or cells you want to affect. To apply a stroke to header or footer, select the header or footer row.
2 Choose Window > Swatches to display the Swatches palette.
3 Make sure the Formatting Affects Container button is selected. (If the Formatting Affects Text button is
selected, the color changes affect the text, not the cells.)
4 Select the Stroke button or the Fill button in the Swatches palette.
5 Select a swatch.
To add diagonal lines to a cell
1 Using the Type tool , place the insertion point in a cell, or select the cell or cells in which you want to add
diagonal lines.
2 Choose Table > Cell Options > Diagonal Lines.
3 Click the button for the type of diagonal line you want to add.
4 Select Diagonal in Front to place the diagonal line in front of the cell contents. Select Content in Front to place the
diagonal line behind the cell contents.
5 Under Line Stroke, specify the desired weight, type, color, and gap, choose a Tint percentage and Overprint
options, and then click OK.