
User Guide


33
ADOBE INCOPY CS2
User Guide
4 Choose one of the following from the Workspace Access menu:
This Workspace Is Visible To Others Gives others access to your shared Version Cue projects.
This Workspace Is Private Keeps your Version Cue Workspace hidden from other users.
Note: If Version Cue is installed on a computer that uses a firewall and you want to share the workspace with others,
make sure that TCP ports 3703 and 427 are left open and deselect the Internet Connection Firewall option (Windows
only). For information, see Windows Help.
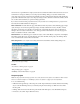
5 In the Settings tab, do any of the following:
• From the Workgroup Size menu, choose the number of people who use the Version Cue Workspace on a typical
day. This setting controls how the workspace handles the potential load.
• From the Optimize For menu, choose the type of project you generally create. By default, this option is set to
Mixed Media, to support workflows that involve both print media (such as InDesign files) and web content
(created in GoLive). If you typically produce only print media, or if you create only web content, choose either
Print Media or Web Media from the Optimize menu.
• In the Memory Usage text box, enter the amount of RAM that you want to make available to Version Cue. The
default is 128 MB. This setting allocates RAM to optimize interoperability between Version Cue and Adobe
Creative Suite components. For more robust requirements, such a larger workgroup or many assets, set the RAM
to 256 MB or higher.
6 Select Show Version Cue CS2 Tray Icon (Windows) or Show Version Cue CS2 Status In Menu Bar (Mac OS) to
keep the Version Cue menu icon visible, giving you quick access to Version Cue Administration and preferences.
7 Click the Locations tab and do one of the following:
• To move the Data folder, where projects, file versions, and user IDs are stored, click the Choose button next to the
current folder location. Select a new location (not a network drive) for the folder. You must choose a location on
the computer in which the Version Cue Workspace is installed. Click OK.
• To move the Backup folder, where project backups are stored, click the Choose button next to the current folder
location. Select a new location for the folder. You must choose a location on the computer in which the Version
Cue Workspace is installed. Click OK.
Important: The workspace must be turned off before you change the folder locations. Do not attempt to move these
foldersmanuallyoreditany of thefiles in theVersion CueDatafolder. TheDatafoldercontainsfiles that maintain the
integrity of the Version Cue file versions, metadata, and project information.
8 To export workspace data, click the Export tab, choose an export version and a location for the exported data, and
then click Export.
9 Click the Updates tab, and then click Check For Updates to see whether any updates are available online. If so,
you’re prompted to install the updates.
10 Click OK (Windows) or Apply Now (Mac OS).
If prompted, click Yes (Windows) or Restart (Mac OS) to restart the Version Cue Workspace. (If Version Cue was
running when you changed the settings, you are prompted to restart.)
See also
“To export a Version Cue project to your computer” on page 80