Version 1.
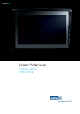
Tablet PCs ITC1013 Product Portfolio Copyright © ads-tec GmbH Raiffeisenstr.14 D-70771 Leinfelden-Echterdingen Germany 2 © ads-tec GmbH • Raiffeisenstr.
Tablet PCs ITC1013 INDEX ABOUT US .......................................................................................................................................... 5 1 REMARKS ................................................................................................................................. 6 1.1 RELEVANT DATA COMMUNICATION WITH THE DEVICE ........................................................................... 6 1.2 DESCRIPTION OF THE WARNING SYMBOLS USED IN THIS GUIDE.......
Tablet PCs ITC1013 6.10 ITC1013 ADSXTERN TEST ......................................................................................................... 31 6.11 MANUAL REINSTALLATION.......................................................................................................... 31 6.12 INSTALLATION OF THE TT13 SOFTWARE PACKAGE .......................................................................... 32 6.13 WLAN ...............................................................................
Tablet PCs ITC1013 ABOUT US S ads-tec GmbH Raiffeisenstr. 14 D-70771 Leinfelden--Echterdingen Tel: +49 711 4589 94-0 Fax: +49 711 4589 94-990 www.ads-tec.com ads-tec GmbH provides large enterprises and globally active corporattions with cutting edge technology, up-to-date know-how and comprehensive services in the area of automation ocessing technology and systems engineering.
Tablet PCs ITC1013 1 REMARKS 1.1 RELEVANT DATA COMMUNICATION WITH THE DEVICE The following documents are essential for setting up and operating this device: USER MANUAL: Contains information for installation, commissioning and operating the device along with technical data of the device hardware. a 1.
Tablet PCs ITC1013 1.5 COPYRIGHT This User’s Guide inclusive of all the images it contains is entirely proprietary and subject to copyright. Any irregular use of this Guide by third parties infringing copyright terms is thus strictly forbidden. Reproduction, translation, as well as electronic and photographic image storage and/or amendment processes, are subject to prior written authorisation directly by M/s. ads-tec GmbH.
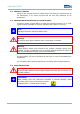
Tablet PCs ITC1013 2 OPERATING INSTRUCTIONS This device contains electrical voltages and extremely sensitive components. The manufacturer, or a service partner authorised by the manufacturer, should be consulted if you plan to make any modifications. For this type of work, the device must be switched off at the mains and the power lead must be disconnected. Suitable measures for avoiding electrostatic discharge towards parts of the components when touching the equipment must be taken.
Tablet PCs ITC1013 2.3 WARRANTY / REPAIRS During the unit warranty period, any repairs thereto must strictly be conducted solely by the manufacturer or by service personnel that has been duly authorised by the manufacturer. 2.4 HANDLING AND PROPER DISPOSAL OF LITHIUM BATTERIES This device contains a lithium battery to supply the systemclock until there is no power supply connected. Depending on exposure, the battery has a lifetime of 3-5 years. Note: High thermal exposure will age the battery faster.
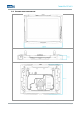
Tablet PCs ITC1013 2.6 10 EXTERNAL DEVICE DIMENSIONS © ads-tec GmbH • Raiffeisenstr.
Tablet PCs ITC1013 3 COMMISSIONING The power supply connection and interfaces of this device are installed at the side of case. All supply leads and all required data leads have to be connected before starting commissioning. Warning: The device must be switched off before connecting or disconnecting any cables in order to prevent damage to the electronics! The device may only be switched on after acclimatising to the ambient temperature in order to avoid condensate accumulation.
Tablet PCs ITC1013 3.2 READINESS FOR OPERATION CHECKS Accurately check the unit for any hidden damages possibly incurred during improper transport and/or handling or wrong operation site and/or storage conditions (e.g. smoke emissions or formation by the unit, etc.). If any damages are found, the unit must be decommissioned or scrapped. Ensure that it is safe from accidental re-implementation. 3.3 TOUCHSCREEN The control system is equipped with an analogue, resistive touchscreen.
Tablet PCs ITC1013 4 FRONT PANEL FUNCTIONS 4.1 STATUS INDICATORS This device is equipped with different status LEDs in the front. These LEDs indicate current events, like the system activity state, the current accumulator charge status and WLAN activities.
Tablet PCs ITC1013 WLAN LED INDICATORS Static Device is not connected with a WLAN network Static Device is connected with a WLAN network Flashes Device is connected with a WLAN network and has data traffic BLUETOOTH LED INDICATORS Static Static Flashes 14 Bluetooth module is disabled. Bluetooth module is enabled. Device is connected with a Bluetooth subscriber and has data traffic © ads-tec GmbH • Raiffeisenstr.
Tablet PCs ITC1013 4.2 FRONT CONTROL KEYS The keys on the front panel are occupied with the following functions by a specific driver in the soft keyboard: SYMBOL: FUNCTION: ON / OFF pushbutton for the device (approx. 0,5 seconds delayed) Shift key (SHIFT) for activating the second keyboard level.
Tablet PCs ITC1013 Warning: The front control keys should not be operated with a touch stylus but with the fingers, only. Note: All function keys in the front panel, except for the ON / OFF pushbutton and the Fn button, have 2 function levels each. The primary function is activated by simply pushing the respective key. The second function level (small symbol to the top right) can be activated each time by pushing the Fn key first, and then additionally pushing the desired function key.
Tablet PCs ITC1013 5 INTERFACES 5.1 20V DC POWER SUPPLY TECHNICAL DATA OF THE POWER ADAPTER • Power consumption: Max. 70 Watts • Input voltage: 100…240 V AC • Mains frequency: 50…60Hz • Current consumption: 3.5A (230V AC) • Max. switch-on current: < 60A (230V AC) Note: The typical power consumption of this device is indicated in the "Technical details" chapter. 5.2 14.
Tablet PCs ITC1013 BATTERY STATUS REPLACEMENT The TT13 batterie es can be removed by using a mechanical ejecctor on the back of the device. us can be retrieved by pushing a button on the batteries. The batteries The batteries statu display will light up u for a few seconds and show the current batte eries charge status on a scale from 0 to 10 00. If the display lights red, this represents a wea ak battery. If the display is green, it shows that the battery is fully charged.
Tablet PCs ITC1013 5.3 USB CONNECTIONS The USB interfaces are used for connecting peripherals with USB connection. The interfaces comply with the USB 2.0 standard. PIN NUMBER SIGNAL NAME 1 VDC 2 D- 3 D+ 4 GND Note: The two side USB ports together have a current limit of 1.5A. This allows trouble-free operation of external devices, like an external DVD drive. The in-depth USB interface is designed according to the standard for 0.5A. © ads-tec GmbH • Raiffeisenstr.
Tablet PCs ITC1013 5.4 ODU-INTERFACE (OPTIONAL) By using the SD Connector, the device can be connected to an Ethernet network (10/100 Mbit). Data throughputs of 10MB can be achieved with a maximum cable length of 5m. Note: This interface does not allow booting via the network. If you want to boot the device via the network connection, we recommend using the LAN interface.
Tablet PCs ITC1013 PIN-OUT: RS232 PIN-NUMBER SIGNAL NAME 1 DCD 2 RxD 3 TxD 4 DTR 5 GND 6 DSR 7 RTS 8 CTS 9 RI 10 NC The SD Connect cable must be connected so that the red markers match. For disconnecting the SD Connect cable, it must be pulled rearwards in the area marked in green. This loosens the snap-in mechanism at the end of the plug. Note: The interface is always shown in the network connections, even if the interface is not available regarding the configuration of the device.
Tablet PCs ITC1013 5.5 NETWORK CONNECTION (RJ45) If the drivers required for functioning are installed on the device, the control system may be integrated in an Ethernet network supporting the 10/100 Mbit standard by using the Ethernet 10/100BaseT network connector. Specifications of this network topology must be observed in this case. PIN NUMBER 5.
Tablet PCs ITC1013 5.7 SMART-CARD READER (OPTIONAL) The device offers a Smart Card Slot which is available at the side. © ads-tec GmbH • Raiffeisenstr.
Tablet PCs ITC1013 6 SOFTWARE & DRIVER INSTALLATION The device will be delivered with a pre-installed Windows operating system on request by the customer. The drivers required for this are already installed and the operating system will be enabled by entering the licence information. Should an initial installation be required, please follow the following steps.
Tablet PCs ITC1013 6.2 POWER DISPLAY The power display can be administrated in the system control menu regardless of which operating system is used. 6.3 USB LOCK The existing USB interfaces can be locked by using the USB lock option. USB interfaces can individually be locked as well. Password protection can also be enabled if desired. 6.4 POWER BUTTON CONFIGURATION Power button configuration can be used in Regular Mode - both functions (ON & OFF) are then enabled for the power button.
Tablet PCs ITC1013 6.5 ADS-TEC RFID SAMPLE APPLICATION The proper function of the RFID reader can be verified by using the RFID sample application. 6.6 SOFT KEYBOARD The soft keyboard application allows you to adapt more settings like the appearance, the language layout, the look, etc. 26 © ads-tec GmbH • Raiffeisenstr.
Tablet PCs ITC1013 6.7 SCREEN MOB SETTINGS This application is used for safely cleaning the monitor. The touch screen monitor can be blocked in the settings for any period of time. This application is enabled via the Start menu. © ads-tec GmbH • Raiffeisenstr.
Tablet PCs ITC1013 6.8 TT13 WIRELESS KONFIGURATION Hinweis: The application is intended to activate/ deactivate the whole hardware in the device, which is intended for wireless data communication. Die Anwendung dient zur kompletten Aktivierung / Deaktivierung der Hardware im Gerät, welche für drahtlose Datenkommunikation dient.
Tablet PCs ITC1013 WIRELESS CONFIGUR RATION: BLUETOOTH CLASS-SWITCH © ads-tec GmbH • Raiffeisenstr.
Tablet PCs ITC1013 6.9 TT13 TOUCH ROTATION Note: The service enables the loading for the best configuration for 0° and 90°. If the button landscape/portrait is activated, the switch from 0° to 90 takes effect. Pushing the button again will switch back to 0°. Note: Every kind of exposure needs to be calibrated once via the 25 point calibration. 30 © ads-tec GmbH • Raiffeisenstr.
Tablet PCs ITC1013 6.10 ITC1013 ADSXTERN TEST Note: More information for TT13 adsxtern can be seen on the Service-CD. 6.11 MANUAL REINSTALLATION The following Stepps are only required if a reinstallation of the operating system is necessary. INSTALLATION OF THE OPERATING SYSTEM Install the operating system from a storage. (USB / LAN / CD/DVD) INSTALLATION OF THE DEVICE DRIVERS FROM THE SERVICE CD Additionally the device drivers have to be installed from the supplied Service-CD.
Tablet PCs ITC1013 6.12 INSTALLATION OF THE TT13 SOFTWARE PACKAGE Note: With the TT13 Software Tools hardware components can be controlled, monitored and evaluated. In case of high exposure the Software Tools will help to prevent lasting damage by protecting important hardware components actively. In diagnostic cases the Software Tools will give information about the system condition and enable fast troubleshooting. Once the installation is completed, you can finish the setup by clicking on Finish.
Tablet PCs ITC1013 CONFIGURATION OF THE COUNTRY CODE The default Installation of the WLAN driver, which is provided by Service-CD, installs the driver with the country code “United States”. The channels 1-11 are used. The country code can be changed later. The following chapter shows how to change the country code. 1) Open the control panel Start Control panel 2) Open the network connection via double click. 3) Choose your wireless network connection via right mouse button and click on Properties.
Tablet PCs ITC1013 4) 34 The now showing dialgouebox you have to chosse configure © ads-tec GmbH • Raiffeisenstr.
Tablet PCs ITC1013 5) Change to the tab Advanced. Choose the country in value to the desired country. 6.14 BLUETOOTH Note: Detailled Information with the keyword Bluetooth can be seen in Windows Help which is located in the path: Start Help & Support © ads-tec GmbH • Raiffeisenstr.
Tablet PCs ITC1013 6.15 UMTS (OPTIONAL) The TT13 device is equipped with a mini PCI Express card of the Sierra Wireless MC8792V type. By using the UMTS card, audio and data signals can be transmitted.
Tablet PCs ITC1013 Insert the SIM card in the SIM card drawer as shown in the picture. Push the SIM card drawer back into the device with the SIM card facing down. © ads-tec GmbH • Raiffeisenstr.
Tablet PCs ITC1013 6.16 CAMERA (OPTIONAL) The integrated camera gives the opportunity of recording photographic or video data. The camera has the following characteristics: Optical resolution: 1/3.2 inch Pixel size: 2.8 um Max. frame rate: 15fps @ UXGA Effective resolution: 1600 x 1200 UXGA (Format: 4:3) / 2 megapixels Auto focus: AF CAMERA MODULE ACTIVATION Open the Control Panel of your operating system by using the path: Start Control panel Now start the Scanner and camera wizard.
Tablet PCs ITC1013 Start the Scanner and camera wizard by clicking on the camera icon. Confirm the message shown by clicking on Next. In the following dialogue window, a picture preview, which allows you to take a photo, will appear on the left-hand side. Once the camera has automatically focussed on the selected object, the photo can be created by pushing the Take photo button. Then click on Next. © ads-tec GmbH • Raiffeisenstr.
Tablet PCs ITC1013 Select a suitable name and storage location in the following dialogue window. Confirm this with Finish. 40 © ads-tec GmbH • Raiffeisenstr.
Tablet PCs ITC1013 6.17 SOFT KEYBOARD By using the soft ke eyboard, data can be entered via the touchscree en like with an external keyboard. Note: The soft keyboard of the TT13 device can be delivered in 25 languaages. Depending on the selected languagee, the soft keyboard representation and funcction may vary. Basic functions are identtical in all languages.
Tablet PCs ITC1013 NUMERIC KEY-PAD VIEW: Switch to representation of the function-key bar Note: Continuing Information to the Softkeyboard can be taken from the Softkeyboard User Manual. FUNCTION-KEY BAR VIEW: Note: If a function is to be activated, which requires pressing two keys at the same time (e.g. Alt + F4), these keys have to be pushed one after another at the soft keyboard, and the special keys Shift, Alt and Ctrl must always be pushed first.
Tablet PCs ITC1013 7 ACCESSORIES 7.1 DVD DRIVE / EXTERNA AL TYPE (OPTIONAL CONNECTION b connected to the TT13 device by using the US SB interface. The DVD drive can be DRIVER INSTALLATIO ON Required drivers will be installed automatically, as soon as the DVD drive d is connected with the USB interface. FUNCTIONS The TT13 device must be switched on to open the drive. After pusshing the Eject button, o and must be pulled out completely.
Tablet PCs ITC1013 7.2 LASER PRODUCT SAFETY This product has been designed and manufactured according to FDA regulations "title 21.CFR. chapter1, subchapter J. based on the Radiation Control for Health and Safety Act of 1968". This product is also classified as a class 1 laser product. There is no hazardous invisible laser radiation during operation, because invisible laser radiation emitted inside of this product is completely confined in the protective housings.
Tablet PCs ITC1013 7.3 TRANSPORT CASE The optionally available transport case features protected transport of the device. By the way the transport case offers the opportunity to store accessories like batteries, power supply and Software. Exterior view: © ads-tec GmbH • Raiffeisenstr.
Tablet PCs ITC1013 7.4 BATTERY CHARGING STATION C4/TT13 Optionally there is the opportunity to charge the battery of the device by an battery charging station. The battery charging station features two battery slots. This allows you to charge two batteries parallely. CONNECTING THE 20V DC POWER SUPPLY Before commisioning the battery charging station, a 20V DC power supply has to be connected. Connect the power supply at the back of the battery charging station.
Tablet PCs ITC1013 INSERTION OF THE BATTERIES The batteries need to be placed into the battery slots to get a connection between the pins of the battery charging station and the battery. Note: If the battery is placed correctly into the battery charging station a signal tune will sound and the charging process starts. If the battery gets removed a signal tune is sounding too. © ads-tec GmbH • Raiffeisenstr.
Tablet PCs ITC1013 LED STATUS DISPLAY During operation, different system activities will be displayed.
Tablet PCs ITC1013 PICTOGRAPHIC ILLUSTRATION Battery is charging Battery completely charged Device is not ready / Defective power supply Battery defective © ads-tec GmbH • Raiffeisenstr.
Tablet PCs ITC1013 7.5 SUBSTITUTION POWER SUPPLY Optional a substitution power supply for operating the device is available. 7.6 CAR POWER SUPPLY Optional a car power supply for the device is available. The device can be comfortably supplied with power in vehicles. 7.7 SUBSTITUTION-BATTERY Optional a substitution battery for operation is available. 50 © ads-tec GmbH • Raiffeisenstr.
Tablet PCs ITC1013 7.8 TT13 MECHANICAL DOCKING O ADAPTER The available TT13 3 Docking D offers in combination with the Table Stan tand -/ Wall bracket a stable mounting solu olution for every kind of location. Via the Docking-Connector on the backside, the device can be con nnected to a DockingStation. The Docking is available in two different types. The first layout can c only be used as a nector which is able to attachment for the device.
Tablet PCs ITC1013 MOUNTING THE DEVICE TO THE DOCKING 1) The Device needs to be placed on the red marked area behind the turquoise marked area. 2) The Device has to be pressed onto the Docking. The Device should engage perceptible. REMOVE THE DEVICE FROM THE DOCKING 1) Press turquoise coloured unlocking downwards and hold it this way 2) Bend the device forwards 3) Release the device upwards and remove it from the Docking. The shown Docking-Solution displays the mechanical Engaging.
Tablet PCs ITC1013 7.9 TABLE STAND The available TT13 Docking offers in combination with the Table Stand -/ Wall bracket a stable mounting solution for every kind of location. Mount the Docking via the supplied M5x30-8.8 SW Inbus screws to the Table Stand. © ads-tec GmbH • Raiffeisenstr.
Tablet PCs ITC1013 7.10 WALL BRACKET The available TT13 Docking offers in combination with the Wall bracket a stable mounting solution for every kind of location. 1) The Wall Bracket needs to be mounted via VESA 75 or 100 to the installation site. 2) The Docking needs to be mounted via the supplied M5x30-8.8 SW Inbus screws to the Wall Bracket. 7.11 ITC1013 SUBSTITUTION PACK OF TOUCH STYLUS The optional Stand for ITC1013 allows for easy operation anywhere. 54 © ads-tec GmbH • Raiffeisenstr.
Tablet PCs ITC1013 7.12 3 POINT CORD Optional a 3 Point Cord for mobile Work is available. The 3 Point Cord can be mounted directly onto the device and makes the device to a mobile workstation. 1 x DZ-MECH-33255-1 A 2 x DZ-MECH-33255-2 Flachkopfschr.M5x20, verz. DIN 921 B 3 x DZ-MECH-31033-0 1 x DZ-MECH-31039-0 © ads-tec GmbH • Raiffeisenstr.
Tablet PCs ITC1013 MOUNTING THE 3 POINT CORD ONTO THE DEVICE 1) First the cord guides need to be mounted. Although the required mounting possibility for left and right handers has to be choosen. Right handed operation: Choose red marking in picture Left handed operation: Choose white marking in picture 56 © ads-tec GmbH • Raiffeisenstr.
Tablet PCs ITC1013 2) Mount the screws as shown in the picture to marked positions. Note: Tighten the screws with max. 120 Ncm. The Cords should be movable but without loosening the screws. MOUNTED VIEW FOR RIGHT HANDED OPERATION 3) The Cord can be added via the carabine intro the Cord guides. The Device is prepared for mobile operation. © ads-tec GmbH • Raiffeisenstr.
Tablet PCs ITC1013 58 © ads-tec GmbH • Raiffeisenstr.
Tablet PCs ITC1013 7.14 HAND GRIFF Alternativ zum Trag gegurt ist ein Hand Griff für mobiles Arbeiten erh hältlich. Der Hand Griff kann direkt am Gerä ät montiert werden und macht das Gerät zu einem m mobilen Arbeitsplatz. 2 x beigestellte Schrrauben 1 x Hand Griff MONTAGE DES HAND D GRIFFS AM GERÄT 1) Das Hand Strap isst an den markierten Bohrungen zu montieren. 2) Schrauben Sie de en Hand Griff an den markierten Stellen wie im Bild zu sehen fest. © ads-tec GmbH • Raiffeisenstr.
Tablet PCs ITC1013 Hinweis: Ziehen Sie die Scchrauben mit max. 120 Ncm fest. 3) Montierter Zusta and Hand Griff 60 © ads-tec GmbH • Raiffeisenstr str.
Tablet PCs ITC1013 7.16 ODU 10POL TO RS232 ADAPTERCABLE 1M The ODU 10pol. RS232 adapter cable enables the connection of the device via the RS232 interface of the connectable device. 7.17 PROTECTION BEZEL The optional available protection bezel offers protection against transport damage. © ads-tec GmbH • Raiffeisenstr.
Tablet PCs ITC1013 8 CERTIFICATIONS 8.1 CERTIFICATIONS / TESTS The product ITC1013 complies with all documents / standards listed in the CA Conformity Declaration section. 8.2 ELECTROMAGNETIC COMPATIBILITY (EMC) Certificate of acceptance in accordance with the Federal Electromagnetic Compatibility Act in Germany ("EMVG") of 2007 (respectively the EMC Directive no. 2004/108/EC).
Tablet PCs ITC1013 9 TECHNICAL DETAILS 9.1 DISPLAY DATA Display 13.3" TFT, WXGA 1280 x 800 pixels Sunlight Readable (optional) 9.2 Display colours 262.
Tablet PCs ITC1013 10 SERVICE AND SUPPORT ads-tec and appointed partner companies offer you comprehensive maintenance and support services, ensuring quick and competent support should you have any questions or concerns with regard to ads-tec products and equipment. ads-tec products may also be provided and installed by partner companies. Such devices may have customised configurations.
Tablet PCs ITC1013 11 COMPONENT REPLACEMENT Warning: Make sure that all cable connections are removed and that all supply voltages are disconnected from the device! 11.1 OPENING THE SERVICE SLOT Remove the six screws at the service slot on the device rear panel. The screws can be removed by using a size Tx 8 screw driver. By using the groove at the service slot bottom, you can remove the rear cover. © ads-tec GmbH • Raiffeisenstr.
Tablet PCs ITC1013 Removing the service slot cover gives you the opportunity of replacing the following components: 66 1 HDD/Flash 2 Lithium battery © ads-tec GmbH • Raiffeisenstr.
Tablet PCs ITC1013 11.2 HDD/SSD (MASS-STORAGE DEVICE) REPLACEMENT REMOVAL The pulling aid provided on the HDD should be used for removing the HDD from the device. Please pull the HDD carefully out. INSTALLATION The HDD must carefully be lowered into the slot and then pushed down until you feel that it has snapped in. © ads-tec GmbH • Raiffeisenstr.
Tablet PCs ITC1013 11.3 REPLACING THE LITHIUM BATTERY INSTALLING / REPLACING THE BATTERY 1) Now the lithium battery can be removed. It must only be replaced by the same battery type. The type of battery to be used is: Lithium battery CR2032 230mAh (e.g. ads-tec part number: DZ-SONS-04075-1) Please observe the correct polarity when replacing the battery. Warning: There is a risk of explosion if the battery is replaced with the wrong type or with the wrong polarity.
Tablet PCs ITC1013 12 CE CONFORMITY DECLARATION Gloss ar y ITC1013 © ads-tec GmbH • Raiffeisenstr.